How to Drift a Longboard: A Coach’s Step-by-Step Guide
This post contains affiliate links. As an Amazon Associate, we earn from qualifying purchases.
To drift a longboard, you initiate a controlled slide by shifting your weight to break the wheels’ traction, using your heels or toes to push the board sideways while managing speed with a setup carve. The Coleman or heelside slide is the safest starting point, requiring a helmet, slide gloves, and knee pads to practice on a gentle, smooth slope.
The physics behind that slide involve a precise transfer of weight from the center of the board to its edge, overpowering the wheel’s grip. Get that transfer wrong, and you either spin out or stick straight, neither is a slide. A key part of learning how to drift a longboard is mastering this weight shift.
What follows is the progression I use with new skaters: the essential protective gear, the required prerequisite skills, and the step-by-step mechanics for your first controlled slide, which is the core of how to drift a longboard. We’ll also cover how to troubleshoot when the board won’t break loose and how to care for your gear so it lasts.
Key Takeaways
- Start with a Coleman (heelside) slide; it’s the most forgiving and teaches weight transfer without exposing your body.
- Protective gear is essential, a certified helmet, slide gloves with puck discs, and knee pads prevent the injuries that stop practice.
- Your setup carve is everything; a hard, committed turn into the hill is what breaks traction, not brute force.
- Lean on your front foot throughout the slide; shifting weight to the back foot is the most common cause of a high-side crash.
- Practice on a gentle, smooth slope with minimal traffic; mastering the slide at 5 mph is safer and more effective than surviving it at 15 mph.
The Absolute Prerequisites: Gear and Mindset
You can’t learn to drift if you’re afraid of falling. More precisely, you can’t learn if you’re injured from a fall you weren’t prepared for. The reality is: sliding is a controlled crash. Dressing for that crash isn’t optional; it’s your first skill.
A certified multi-impact skate helmet is your most important piece of gear. Slide gloves are next, not winter gloves, but gloves with hard plastic or urethane pucks sewn onto the palms. When you go down, you lead with these pucks, not your skin. Knee pads round out the essentials; concrete is unforgiving, and a bruised kneecap will bench you for a week. Elbow pads are a smart addition, especially when you’re starting out.
The right mindset is just as crucial. You’re not trying to survive a slide; you’re trying to command it. This means committing to the carve and the lean, even when your instinct is to bail. Hesitation is what causes the board to hook up unpredictably and throw you. Trust the gear, and trust the process.
Common mistake: Practicing slides in street shoes and jeans. A grazed palm or a torn knee will end your session immediately and teach you to fear the next attempt. Gear up so you can fall, get up, and try again within the same minute.
Foundational Skills You Must Master First
Before you even think about breaking traction, you need to be utterly comfortable on your board at speed. If you’re still wobbly when pushing or nervous on a mild incline, sliding will be a disaster.
Carving is your foundational skill. You need to master hard, committed carves where you lean your body into the turn and feel the G-force. This is the motion that pre-loads the board for a slide. If you can’t carve confidently, you lack the balance and edge control needed to initiate a drift. Spend time on a long, mellow hill doing linked carves from one side of the road to the other.
Speed management is the other half. You need to know how to stop reliably, usually with a footbrake or a simple carve to scrub speed. If your only plan for stopping is “run off” or “fall,” you have no business adding slides to the mix.
Finally, get used to a bit of speed. You don’t need a 40 mph mountain road, but you do need enough momentum for the wheels to break free. Being tense and rigid at that speed guarantees failure. Your body needs to be loose and responsive.
The Core Mechanics of a Longboard Slide
A slide happens when the sideways force you apply to the board overcomes the friction between the wheels and the ground. It’s not a jump or a kick; it’s a precise unweighting and redirecting of momentum.
The sequence is always the same: setup carve, initiation, slide, recovery. The setup carve is a hard turn opposite the direction you plan to slide. If you want to slide to your right (a heelside slide), you first carve hard to your left. This loads the board with rotational energy. As you come out of that carve, you snap your shoulders and hips back the other way while dropping your weight, this is the initiation. The board will want to follow, and if your weight is in the right place, it will slide sideways instead of gripping.
Your body position during the slide is critical. For a heelside slide, you’ll be in a crouch, with your weight centered over your front foot, your back leg extended to push the board out, and your slide-glove hand reaching down to touch the pavement for stability. Your eyes should be looking down the road where you want to go, not at your feet.
A longboard slide is a controlled loss of traction initiated by a hard pre-carve and a sudden, committed weight shift to the board’s edge, using the hands (in glove-down slides) or footwork (in stand-up slides) to manage the slide angle and duration.
The sound of a slide is a consistent, loud hiss. A chattering, intermittent screech means you’re alternately gripping and sliding, which can get you bucked off. That smooth hiss is what you’re listening for.
Choosing Your First Slide: Coleman vs. Stand-Up
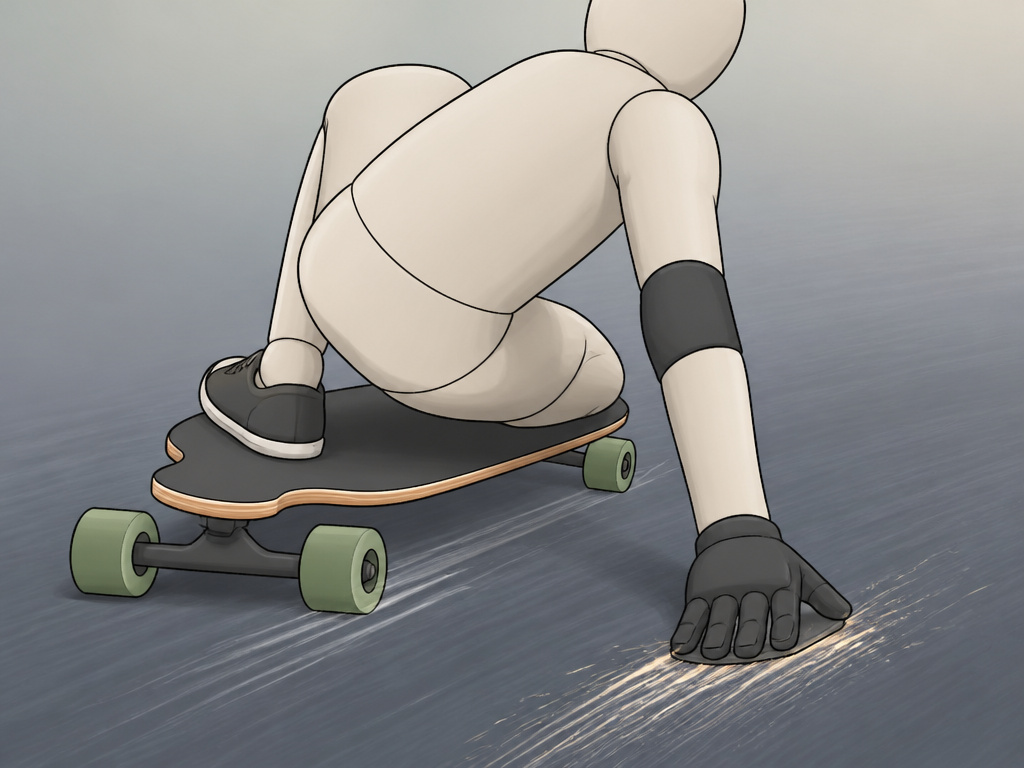
Not all slides are created equal for beginners. The two main families are glove-down slides (like the Coleman) and stand-up slides. Your choice here decides your learning curve and your risk of injury.
The Coleman slide is a heelside, glove-down slide. You drop into a deep crouch, reach your glove-hand down to the pavement, and use that point of contact to control the slide. It’s lower to the ground, more stable, and gives you a clear physical reference point. Because you’re low, falls are less dramatic. This is the unanimous recommendation for a first slide across every credible coaching resource I’ve seen.
Stand-up slides, like the toeside or heelside 180, keep you upright. They require more precise balance, faster weight transfer, and a higher degree of commitment. A mistake here often results in a “high-side” fall, where the board suddenly regains traction and flings you over the top. It’s a harder, faster wipeout.
For your very first session, the answer is straightforward: learn the Coleman. It builds the muscle memory for weight transfer and board control in the safest possible package. Trying a stand-up slide first is like learning to ski on a black diamond run, possible, but painful and inefficient.
| Slide Type | Best For | Key Risk If Skipped |
|---|---|---|
| Coleman (Heelside) | First-time sliders, speed control | Spinning out due to improper weight shift |
| Stand-up Heelside | Intermediate riders, style | High-side fall from sudden re-grip |
| Toeside Slides | Advanced riders, linking tricks | Catching an edge and pitching forward |
Step-by-Step: Learning the Coleman Slide
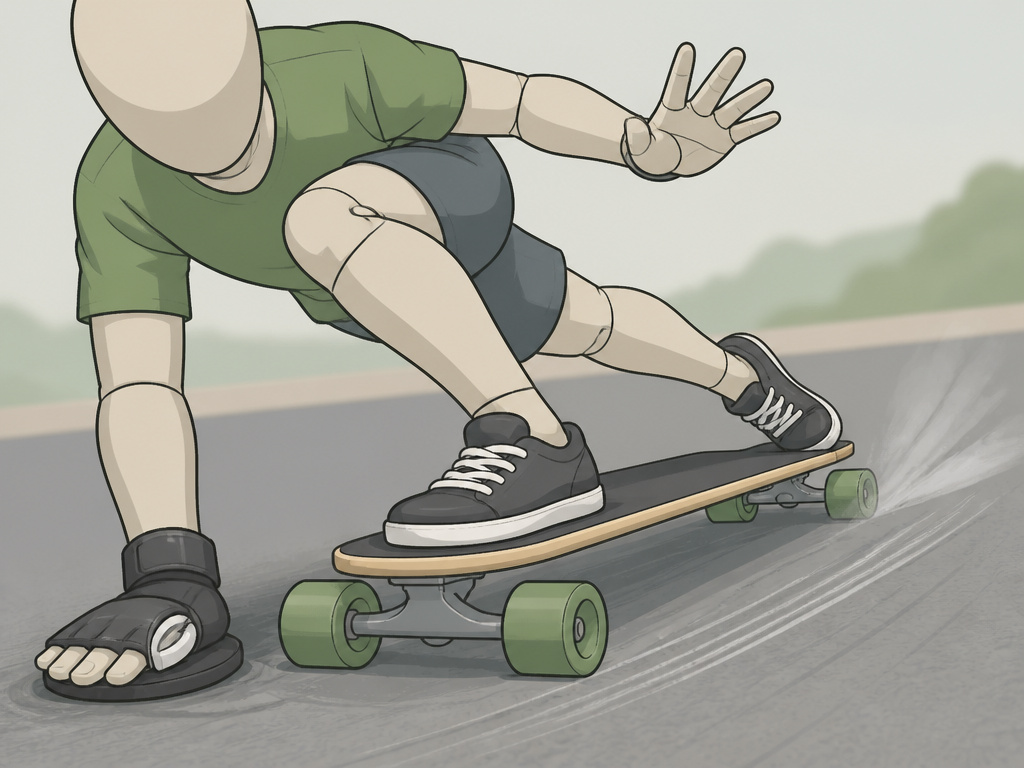
Here is the process step by step. Find a gentle, smooth hill with a clear runoff and no traffic. Gear up completely: helmet, slide gloves, knee pads, elbow pads. Warm up with some confident carves.
Step 1: The Setup Carve. Carve hard away from your slide direction. For a regular-footed rider doing a heelside slide (sliding to the right), carve hard to the left. Lean your whole body into it. This wind-up stores the energy you’ll release.
Step 2: Initiation and Hand Down. As you finish the carve, snap your shoulders and hips back to the right. Simultaneously, drop into a low crouch and reach your right hand (with the slide puck) down toward the pavement in front of your front truck. Do not look at your hand. Look where you want to go.
Step 3: Kick Out and Slide. As your hand makes contact, push your back foot out to the side. This “kick” breaks the rear wheels loose. Keep your weight firmly on your front foot. You should feel the board pivot sideways and hear the hiss. Let it slide.
Step 4: Control and Recovery. To end the slide, simply stop pushing out with your back foot and gently stand up, bringing your weight back over the board. The wheels will grip, and you’ll roll away. Look in the direction of travel the entire time.
The part nobody mentions is the timing of the hand placement. Reach down too early, and you’ll put weight on your hand before the slide starts, causing a jarring stop. Reach down as you initiate the turn, the hand stabilizes the slide; it doesn’t start it.
Common Beginner Mistakes and How to Fix Them
You will make mistakes. Everyone does. Recognizing and fixing them quickly is what separates a productive session from a frustrating one.
Problem: The board won’t break traction. You carve, you kick, and nothing happens, you just keep rolling straight.
- Cause: Insufficient speed or an uncommitted carve. You’re not loading the board with enough rotational force.
- Fix: Use a slightly steeper hill or push for more speed. Focus on a harder, more aggressive setup carve. Really throw your shoulders into it.
Problem: You spin out 180 degrees and slide backwards. The board rotates too far and you lose control.
- Cause: Over-rotating your shoulders or kicking too hard with the back foot. You’re applying too much turning force.
- Fix: Keep your shoulders more square to the board during the initiation. Modulate the “kick” from your back foot, it’s a push, not a stomp.
Problem: You “high-side” and get thrown over the board. The slide starts, then the wheels suddenly grip and catapult you.
- Cause: Shifting your weight from your front foot to your back foot mid-slide. This loads the rear wheels, causing them to hook up.
- Fix: Consciously keep the majority of your weight on your front foot throughout the entire slide. Drill this at a standstill: get in your slide stance and have a friend try to gently push you over, you should feel stable.
Problem: The board slides then immediately grips, stopping abruptly. The slide is short and choppy.
- Cause: Not committing to the slide posture. You’re instinctively trying to stand up or straighten out too quickly.
- Fix: Commit to the crouch and the hand-down position. Practice holding the slide stance on flat ground until it feels natural, not panicked.
Longboard and Wheel Setup for Sliding
Your gear influences your success. A heavy, flexible cruiser board with soft, grippy wheels is built for traction, making it fight you every time you try to slide.
For sliding, you want a stiffer deck. This gives you a more direct, predictable connection to the trucks and wheels. Drop-through or top-mount designs both work; it’s more about personal preference and the discipline (downhill vs. Freeride).
Truck adjustment is critical. According to Decathlon’s support guide, the kingpin nut on your truck is your tuning knob. Tightening it with a T-tool makes the board more rigid and stable at speed, which can help with initiation. Loosening it makes the board more maneuverable and easier to lean into a carve. The guide warns that overtightening can damage the surrounding bands (bushings), and loosening it too much can lead to wheel bite, where the wheel touches the board while turning, causing it to instantly lock up. A quarter-turn adjustment can make a noticeable difference.
Wheels are the most important factor. You need dedicated slide wheels. These are typically harder and have a rounded lip, as opposed to a sharp, grippy lip. The rounded edge allows the wheel to release from the pavement smoothly. Trying to slide on soft, grippy cruising wheels is like trying to slide on velcro, it takes far more force and skill.
Maintaining Your Slide Wheels and Gear
Sliding is abrasive. It wears down your wheels and your gloves. Ignoring this wear leads to poor performance and wasted money.
Slide wheels develop flat spots, worn-down patches that make your ride feel bumpy and can cause vibration. This is normal. You can even out the wear by rotating your wheels on the axle (flipping them so the inside edge becomes the outside edge) and rotating them between positions (front to back). Once a wheel is too small or too conically worn, it’s time to replace it. A dedicated set of slide wheels is an investment, but it saves your nicer cruising wheels.
Slide glove pucks wear down to nothing. When the plastic wears thin, replace the puck discs. Most gloves have removable pucks held by Velcro. Don’t wait until you’re grinding plastic into the pavement, that ruins the glove base. Keep a spare set of pucks in your gear bag.
Truck maintenance matters too. After a session, check for grit in the pivot cup and kingpin. Grit increases resistance and makes your turns feel crunchy. A quick wipe-down keeps everything smooth. Remember the Decathlon warning: the goal is a firm, responsive feel, not a cranked-down, immovable joint.
Mental Preparation and Overcoming Fear
The mental barrier is often bigger than the physical one. Staring down a hill with the intent to deliberately lose control, which is central to how to drift a longboard, is counterintuitive. Your brain screams “Danger!”
The fix is to break the process down into non-scary chunks. Your first goal is a “shutdown slide” at walking pace on flat ground: just get the board to pivot 90 degrees and stop. Next, try it on a minuscule incline. Then, focus on the sound, try to make the wheels hiss for one second. You’re not learning to slide; you’re learning to make a specific sound for a specific duration.
Visualization works. Between runs, close your eyes and run through the steps: the hard carve, the crouch, the hand placement, the kick, the hiss, the recovery. Feel the motions in your mind. This builds neural pathways almost as effectively as physical practice.
Finally, accept that you will fall. The gear is there so that falling is a learning event, not a traumatic one. When you do come off, get up immediately and analyze what happened. Was your weight back? Did you look down? Use the fall as data, not as failure.
Where this goes sideways: Letting a few falls convince you that sliding “isn’t for you.” Every competent slider has a catalog of crashes. The difference is they treated each one as a lesson and geared up for the next attempt.
Types of Slides
Learning to drift means choosing the right slide for the situation. A pendulum slide is a classic, full-rotation slide where the board swings around 180 degrees, perfect for speed control on hills. A predrift is a smaller, quicker slide used to set up a turn, scrubbing speed before you carve. A stand-up slide is executed fully upright, without grabbing the board, and is considered an advanced technique for high-speed control. Start with the pendulum to learn the fundamental feeling of the board breaking traction, then work on integrating smaller predrifts into your carves.
Heelside vs Toeside Slides
The difference comes down to which edge of the board you slide on. For a heelside slide, you push the board out in front of you, sliding on the wheels closest to your heels. Your weight is over the board’s toe edge. It often feels more natural as you face the direction of travel. A toeside slide happens on the wheels near your toes, with your weight on your heels; your back is more toward the direction you’re moving, which can feel more exposed. Beginners typically find heelside slides more approachable, but mastering both is key for controlling your line in any turn.
Frequently Asked Questions
How do you powerslide a longboard?
Powerslide is a type of stand-up heelside slide where you use a sharp carve and a hard foot push to break the wheels loose, often ending in a 90-degree or 180-degree slide. It’s more advanced than a Coleman because it requires greater balance and commitment without the hand-down stability. Master the Coleman first, then work on transferring that weight-shift skill to an upright position.
What longboard is best for drifting?
Stiff, symmetrical deck (often called a freeride board) paired with hard, round-lipped wheels is a common setup for sliding. Many brands make popular freeride models. The board should feel responsive, not flexy, when you stand on it.
Can you drift on any longboard?
Technically, yes, but it’s far more difficult on a board not designed for it. A flexible pintail with soft, grippy wheels will resist sliding, requiring much more speed and force. This increases the risk and makes learning the finesse of a slide much harder. Using the right tool for the job is safer and more effective.
How long does it take to learn to drift a longboard?
There is no universal timeline. The time it takes to learn a basic, controlled Coleman slide varies based on the rider’s comfort with speed and carving. Consistency is key, practicing for 30 minutes twice a week is better than a single 4-hour marathon session that leaves you bruised and frustrated.
Do you need special wheels to drift?
Absolutely. Slide-specific wheels are harder and have a rounded lip to release from the pavement predictably. Trying to slide on standard cruising wheels is a battle against their designed purpose, which is maximum grip. Using the correct wheels is the single biggest equipment change that will help you learn.
Before You Go
Sliding opens up a new dimension of longboarding, it’s how you control speed with style and confidence. But it demands respect. Gear up completely, master the carve, and start with the forgiving Coleman slide on a gentle hill.
If you take one thing from this guide, let it be this: the difference between a sketchy, scary slide and a controlled, repeatable one is the setup carve. That hard, committed turn is what loads the spring. The rest is just letting it unwind.
Nail that, and the rest of the longboard slides universe opens up, from powersliding for quick speed checks to the fluid style of longboard freeriding. Remember, every expert was once a beginner staring down a hill, wondering if they could do it. You can. Just break it down, step by step.
