How to Fix a Flat Tire on an Electric Scooter
This post contains affiliate links. As an Amazon Associate, we earn from qualifying purchases.
Fixing a flat on an electric scooter means matching your repair to the scooter’s drive system and tire type. For a hub-drive rear wheel, power off and disconnect the motor cable before removing the wheel. For a tubeless tire (common on newer models), use a plug kit; for an inner tube, you’ll need to patch or replace it.
The extra steps for a motorized wheel aren’t just about safety. They’re about protecting several hundred dollars’ worth of electrical components from a short circuit. A generic bicycle guide will get your wheel off, but it won’t tell you how to handle the wiring harness or what to do when the valve stem is recessed into a motor casing, as highlighted in the OKAI guide. For these specific issues, you need a dedicated tutorial on how to fix a flat tire on an electric scooter.
What follows: the essential safety protocol every manufacturer stresses, a method to diagnose your tire system in thirty seconds, the tool lists from four different OEMs, and the decision points that tell you when to patch, when to replace, and when to call a professional.
Key Takeaways
- Before any repair on a hub-drive rear wheel, power off the scooter, remove the battery, and disconnect the motor cable — skipping this can fry the controller.
- Identify your tire system: Pure Electric Gen 1 & 2 scooters use inner tubes, while Gen 3+ models are tubeless; using a tubeless repair kit on a tube-type tire will not work.
- A snakebite flat (two parallel slits) means you rode with pressure too low; patching it is temporary unless you consistently maintain the PSI printed on the tire’s sidewall.
- If you lack confidence or the puncture is at the valve stem, taking it to a professional is often cheaper than buying specialized tools and risking further damage.
The 3-Step Safety Protocol You Must Follow First
This isn’t about being overly cautious. It’s about not turning a $20 tube replacement into a $200 controller replacement. The manuals from Schwinn, VoltBike, and OKAI all lead with the same three actions for how to fix a flat tire on an electric scooter. Miss one, and you risk the kind of damage that doesn’t show up until your next ride.
First, power down and remove the battery. This is your primary electrical disconnect. Guides from VoltBike and Wheelyshop state it plainly: “Remove the battery or ensure your bike is turned off before starting rear wheel repair.” It cuts all power to the motor and control systems. Leaving the battery in is like working on a car with the ignition in the “on” position—a stray tool can close a circuit.
Second, for a rear hub-motor wheel, locate and disconnect the motor cable. Schwinn’s help article specifies this is only for “hub-drive setup” on the rear wheel. You’ll typically find a connector near where the axle meets the frame. Unplug it gently. For a front wheel flat or a scooter with a mid-drive motor, as Schwinn notes, you can skip this step and follow a standard bicycle repair guide.
Third, let all the air out of the tire completely. Use a valve core tool or press the Schrader valve stem with a small screwdriver. A partially inflated tire is under tension, making it harder to remove from the rim and increasing the risk of pinching a new tube during installation. You want it totally flat.
Common mistake: Starting work with the battery still connected on a hub-motor scooter. A slipped wrench can bridge the motor phase wires, sending a current surge back to the controller that it isn’t designed to handle. The scooter might power on afterward, but the motor will run rough or not at all within a few miles.
Is It a Tube or Tubeless Tire? How to Diagnose in 30 Seconds
You can’t pick a repair method until you know what you’re repairing. The industry lacks a standard, so a 2024 Pure Electric Air 3 is tubeless, while a 2023 Pure Air 2 uses an inner tube. Getting this wrong wastes time and money.
Check the sidewall of your tire first. Look for the words “Tubeless” or “TLR” on the tire sidewall. If you don’t see it, look at the valve stem. A tubeless valve stem is usually thicker, made of metal, and screws directly into the rim. A tube valve stem (Schrader or Presta) is rubber and pulls through a hole in the rim. If you’re still unsure, your scooter’s manual or the manufacturer’s support site is the final authority. Pure Electric’s help center, for example, clearly lists that Gen 1 & 2 (original Pure Air, Air Pro, Air 2) have inner tubes, while Gen 3 onwards (Pure Air 3, Air 4, Air 5, Advance, Flex) use tubeless tyres.
This diagnosis dictates your entire toolkit and process. Confusing the two is the most common reason a DIY repair fails.
The Essential Toolkit: From Generic to Model-Specific
You need more than tire levers and a pump. Scooter wheels are small, stiff, and often packed around a motor or brake disc. The tool lists from OEMs reveal what you’re actually up against.
A generic kit gets you started:
- Plastic tire levers (metal ones can damage alloy rims)
- A pump with a pressure gauge and the correct valve head (Schrader is common)
- A valve core tool
- A set of hex keys and wrenches (sizes vary)
But model-specific guides call for more. The OKAI Neon/Neon II procedure requires a PH2 Phillips screwdriver, a 2.5mm hex key, an Exacto-knife, a flathead screwdriver, an 18mm open-end wrench, and tire spoons. The VoltBike guide adds zip ties and a cutter to its list of 18mm and 10mm wrenches and plastic levers.
Here’s the breakdown of when you need the specialized tools:
| Tool | Generic Use | Model-Specific Need |
|---|---|---|
| Valve Adapter / Extender | Reaching recessed valves | Critical for OKAI Neon – prevents valve stem from pushing into motor casing. |
| Exacto-Knife / Blade | General utility | OKAI procedure: Used to carefully disconnect motor from controller. |
| Zip Ties | Securing cables | VoltBike guide: Recommends them for managing motor cables during removal. |
| Camera / Phone | Documentation | All complex hubs: Take photos of spacer order and cable routing before disassembly. |
The takeaway? Before you start, find the official guide for your scooter model. What looks like an optional step in a generic video might be the only way to avoid breaking a plastic clip or straining a wire on your specific scooter.
Step-by-Step: Removing the Wheel and Diagnosing the Flat
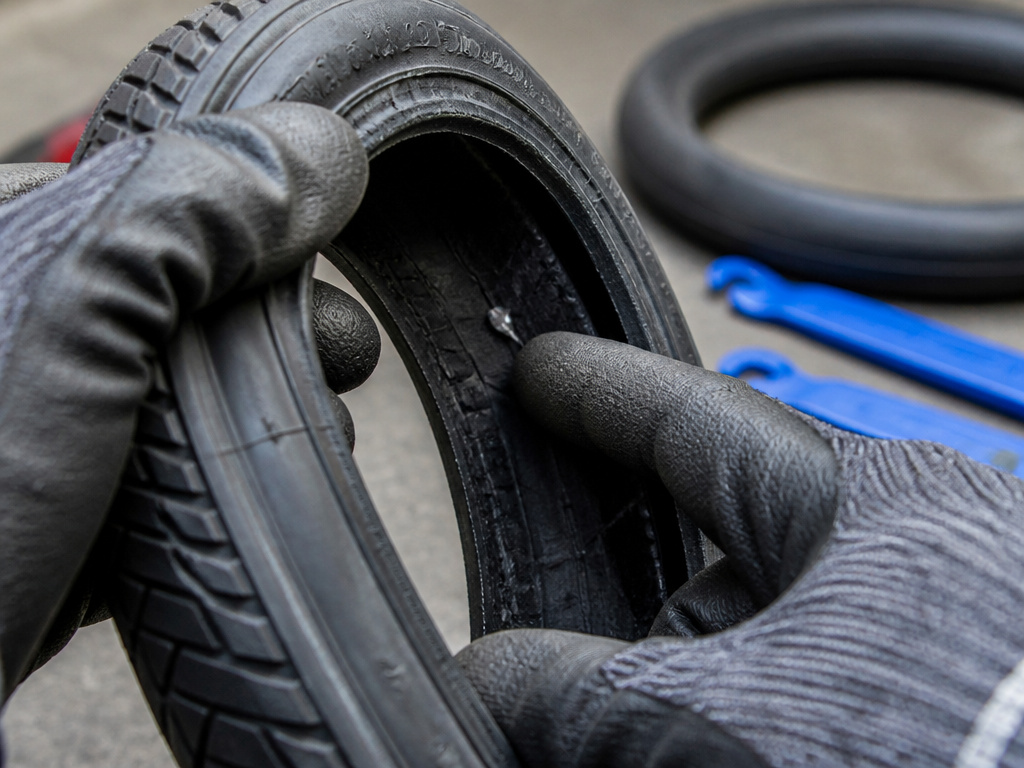
With the scooter powered off, the battery out, and your tools laid out, the physical work begins. Patience here saves frustration later.
- Remove the wheel. This often involves removing a front fender or fork cover held by Phillips screws (like on many Xiaomi clones), then loosening axle nuts or bolts with an Allen key or wrench. For the rear wheel, you may need to loosen the brake caliper and gently guide the motor cable out as the wheel drops free.
- Deflate and break the bead. With the wheel on the ground, press on the tire opposite the valve to push the bead into the rim’s center channel, creating slack. Insert a plastic tire lever between the tire bead and rim, hook it on a spoke, and work your way around to pop one side of the tire off.
- Find the leak. For a tube, inflate it slightly and listen for a hiss or submerge it in a tub of water to look for bubbles. For a tubeless tire, mix soapy water in a spray bottle and spray it over the tire to find the bubbling puncture. Run your fingers carefully inside the tire to find the thorn, glass, or nail that caused the flat. If you don’t remove it, it will puncture your repair.
Where this goes sideways: Not finding the cause. You patch the tube, reassemble everything, and the new tube goes flat within five minutes because a tiny shard of glass was still embedded in the tire tread. The Wheelyshop guide stresses this: “Find the cause. Run your fingers carefully around the inside of the tyre.”
Patch, Replace, or Call a Pro? Your Decision Flowchart
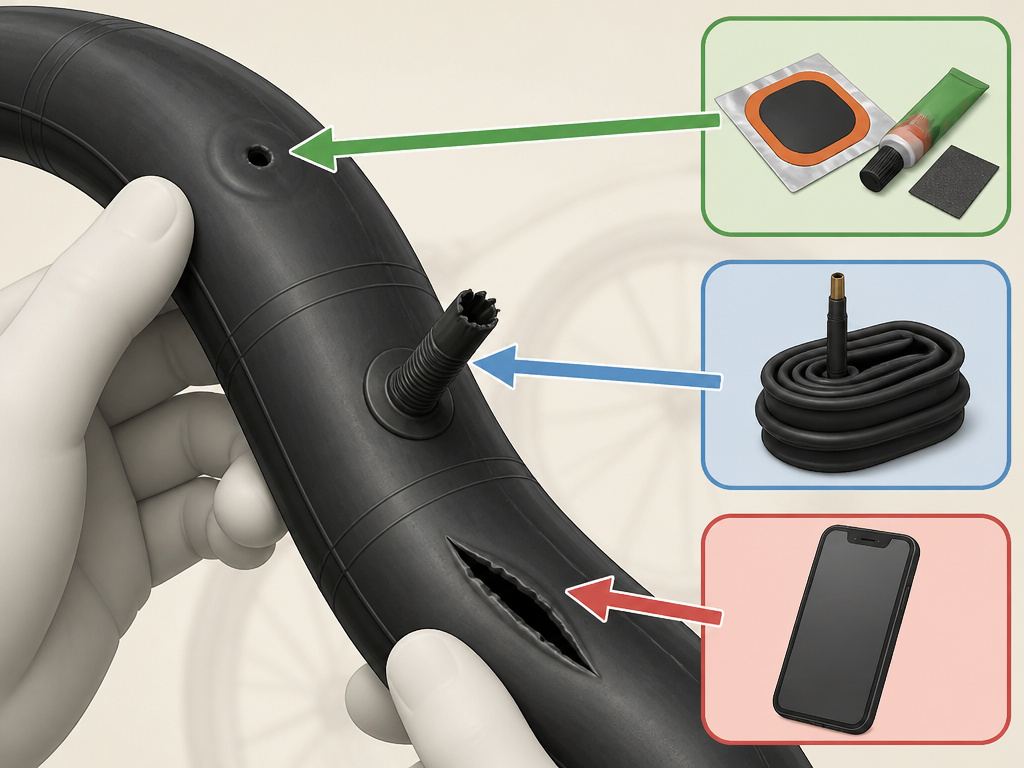
Here’s where sources and real-world practice diverge. Manufacturer guides like Schwinn’s present patching as a standard option. But community-focused advice, like from Wheelyshop, notes “a lot of riders fit a fresh tube straight away and patch the old one later as a spare.” Your choice depends on the damage, your location, and your confidence. Sources disagree: VoltBike describes patching as a standard option, while Wheelyshop notes many riders prefer to immediately replace the tube and patch the old one later as a spare. Patch the tube if: The hole is a single, clean puncture (not a tear) and is located on the smooth, curved part of the tube. It should not be at the valve stem or along a seam. A patch kit with rubber cement and a sanding tool can create a permanent repair. It’s the best choice if you’re stranded or want to save the tube as a backup.
Replace the tube if: The puncture is a snakebite (two parallel slits from low pressure), at the valve base, or a tear longer than a patch. The Wheelyshop advice is blunt: “Don’t patch if the hole is at the valve, if it’s a split longer than the patch, or if the tube already carries several patches – a new tube costs less than another flat.” This is the fast, reliable path.
Replace the tire and tube together if: The tire carcass is visibly damaged (cut, gouged), the tread is worn out, or you’re following a more cautious replacement philosophy. REV Rides explicitly recommends this: “We recommend replacing your tires and tubes at the same time.”
Call a professional if: You’re facing a tubeless tire repair on a complex rim, the puncture is in the sidewall, or you simply lack the tools or confidence. Pure Electric states for its inner-tube models: “We recommend taking it to a professional repairer.” OKAI similarly advises, “If you lack confidence… We recommend reaching out to a trusted local repair shop.” Knowing when to get it fixed professionally is a skill in itself, as sources disagree on this point: Pure Electric recommends professional repair for inner tube models, while Schwinn and VoltBike encourage DIY repair.
| Symptom | Likely Cause | Recommended Action | Time/Cost Trade-off |
|---|---|---|---|
| Slow leak, single bubble in water test | Small puncture (thorn, glass) | Patch the tube. | Low cost, 15 minutes of drying time for cement. |
| Tire instantly flat, two small slits | Snakebite pinch flat from low pressure | Replace the tube. Check tire pressure weekly. | Fast. New tube ensures reliability. |
| Leak at valve stem when sprayed | Faulty valve core or torn valve base | Replace the tube. Patching valve failures rarely holds. | Necessary. A valve repair is temporary. |
| Large tear or sidewall cut | Impact damage (curb, pothole) | Replace tire and tube. The tire’s structure is compromised. | Higher cost, but required for safety. |
| Multiple patches already on tube | General wear and tear | Replace the tube. The rubber is fatigued and will fail elsewhere. | Prevents a future roadside failure. |
Reassembly and Inflation: Avoiding the Final Pitfalls
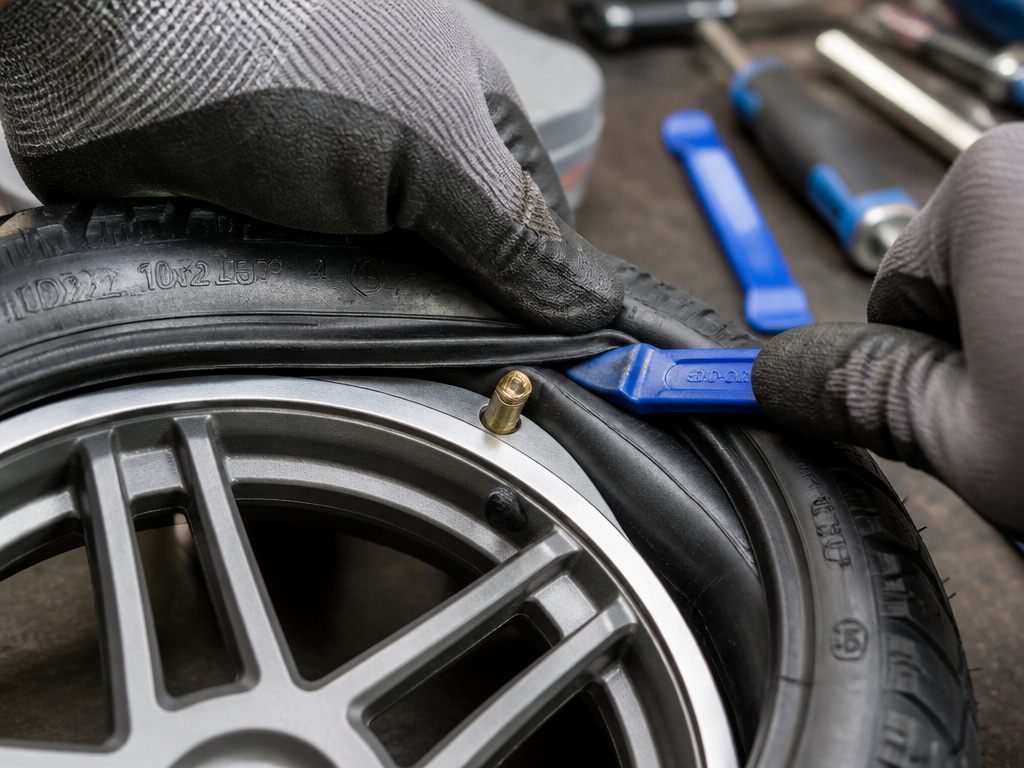
Getting the tire back on the rim is often harder than getting it off. The stiffness that protects you from punctures fights you now.
For a tube replacement: Insert the new tube into the tire first and inflate it just enough to give it shape. Do not inflate it more. This is the VoltBike method: “First pump up the tube just enough to take shape and make it easier to install.” Fit one bead of the tire onto the rim, then tuck the valve stem through its hole. Work the second bead on by hand, starting opposite the valve and using your palms to roll it over the rim. The last section will be tight. Use a plastic tire lever gently, watching that you don’t pinch the tube underneath.
For a tubeless tire: Ensure the rim and tire bead are clean. Use a tire sealant designed for tubeless tires as you mount it. You’ll need a high-volume air source. A floor pump often won’t seat the bead. A compressor or a CO2 inflator cartridge is typical.
Final steps: Inflate to the PSI printed on the tire sidewall. Pure Electric notes that riding at 25 PSI instead of 36 PSI can reduce your range by around 20%. Check that the tire is seated evenly all around the rim. Reinstall the wheel, ensuring any motor cable connectors click firmly into place and axle nuts are tightened to spec.
What to Do If You Get a Flat Miles From Home
You’re not going to disassemble your scooter on the sidewalk. Have a small roadside kit and a plan.
Your kit should include:
- A compact hand pump or CO2 inflator.
- A tubeless plug kit (like a Dynaplugger) if your scooter is tubeless.
- A can of tire sealant. For tubeless tires, it can seal small holes; for tubes, it’s a messy, temporary get-you-home fix.
- A multi-tool with the hex keys/wrenches for your axle.
The process: If you have a tubeless tire and a plug kit, you can often repair the puncture without removing the wheel. Find the object, remove it, insert the plug. Inflate and ride cautiously. If you have a tube and a slow leak, inflating it with your hand pump might give you enough pressure to ride a mile or two, then inflate again. The goal is to get to a safe place or public transit, not to complete the repair.
Reddit threads are full of this reality. One user’s advice cuts to the chase: “A cellphone to call someone to pick you up. Most scooters trying to change a tire is hard enough with proper tools and not in the side of a road.”
Pneumatic vs Solid Scooter Tires
Electric scooters primarily use pneumatic tires, which are air-filled. These come in two main types: those with a separate inner tube and modern tubeless systems. Models like the Pure Electric Gen 1 and 2 use inner tubes, while Gen 3 and newer models switched to tubeless. A flat in a tubed system typically requires replacing or patching the inner tube, often recommended as a job for a professional. For tubeless tires, you can use a specialized tubeless repair kit or sealant to plug the hole from the outside. Maintaining correct air pressure is critical for pneumatic tires, as riding with low pressure can significantly reduce your range and increase the risk of a specific type of flat called a pinch flat, which shows as two small slits side-by-side.
Frequently Asked Questions
Can you ride an electric scooter with a flat tire?
No. Riding on a flat tire, even for a short distance, can destroy the inner tube beyond repair, damage the tire sidewall, and potentially bend the metal rim. On a motorized wheel, it can also overheat and damage the motor. Always walk it or use another transport method.
How much does it cost to fix a flat tire on a scooter?
The cost spectrum is wide. A DIY repair with a patch kit costs under $10. A new tube is $10-$25. A professional repair typically ranges from $30 to $80 plus parts, depending on labor time and whether it’s a front or more complex rear motor wheel. As OKAI notes, “”
Can you use Fix-a-Flat or Slime on an electric scooter?
You can, but with major caveats. For tubeless tires, sealants are designed for this and can be a permanent repair for small holes. For inner tubes, sealants are a temporary emergency fix only. As Reddit users warn, the mess makes a repair afterward much harder, and many repair shops will charge extra or refuse to work on a wheel full of dried sealant.
How do I know if I need a new tire or just a new tube?
Remove the wheel and inspect the tire internally and externally. If the tire has a deep cut, a gouge that exposes the casing cords, or worn-out tread, you need a new tire. If the tire looks intact and the damage is isolated to the tube, you only need a new tube.
Is it harder to fix a flat on a scooter than a bike?
Yes, often significantly. The small, stiff tires are harder to lever off, and the integration of motors and wiring adds steps not found on a bicycle. VoltBike acknowledges this: “Removing the (rear hub motor) wheel of your Voltbike is a slightly more technical job.” The first time is always the hardest; it gets easier with practice and the right tools.
Before You Go
One rule most guides skip: if your flat was caused by low pressure (that snakebite), fixing it is only half the job. A tire at 25 PSI instead of 36 PSI isn’t just soft. It’s a pinched tube waiting to happen, and it saps your range.
The scooter flat repair isn’t a single procedure for how to fix a flat tire on an electric scooter. It’s a branching path determined by your scooter’s make, model year, and where the puncture landed. Start by identifying your tire system, follow the OEM’s safety steps to the letter, and be honest about when a job is beyond your toolkit or patience. Carrying a plug kit and a phone is your real roadside insurance. Everything else is preparation.
