How to Change Longboard Wheels: Step-by-Step
This post contains affiliate links. As an Amazon Associate, we earn from qualifying purchases.
To change longboard wheels, you need a skate tool or wrench to remove the axle nuts, pull the old wheels off, transfer the bearings and speed washers to the new wheels, and remount them. The critical step most people get wrong is the final axle nut tightness, overtightening kills speed, while undertightening creates dangerous wheel wobble.
The difference between a smooth, fast ride and a sluggish, wobbly one often comes down to that final quarter-turn on the axle nut. It’s a physical adjustment, not an abstract rule, and three major sources give slightly different takes on where the sweet spot lies. This is a key step in learning how to change longboard wheels.
What follows is the full walkthrough for how to change longboard wheels: the tools that save time, the step-by-step swap, the manufacturer disagreements on tightness, and the one mistake that sends riders tumbling if they skip it.
Key Takeaways
- You only need a skate tool or a wrench to remove the axle nuts; specialty bearing presses are optional. For the Ghost Longboard, a 15 mm socket wrench is specified.
- Transfer your old bearings to save money, but replace them if they are worn or damaged.
- Sources disagree on the ideal tightness: Decathlon advises tightening so the wheel can turn without coming off, the Ghost Longboard guide advises tightening to prevent wobble while allowing free spin, and Element Brand endorses a setup with a little play on the truck.
- Rotate your wheels in an X-pattern to combat coning and extend their life.
- Electric skateboard drive wheels are a completely different procedure, don’t start this guide if your board has a motor integrated into the wheel hub.
The Tools You’ll Need (And One You Won’t)
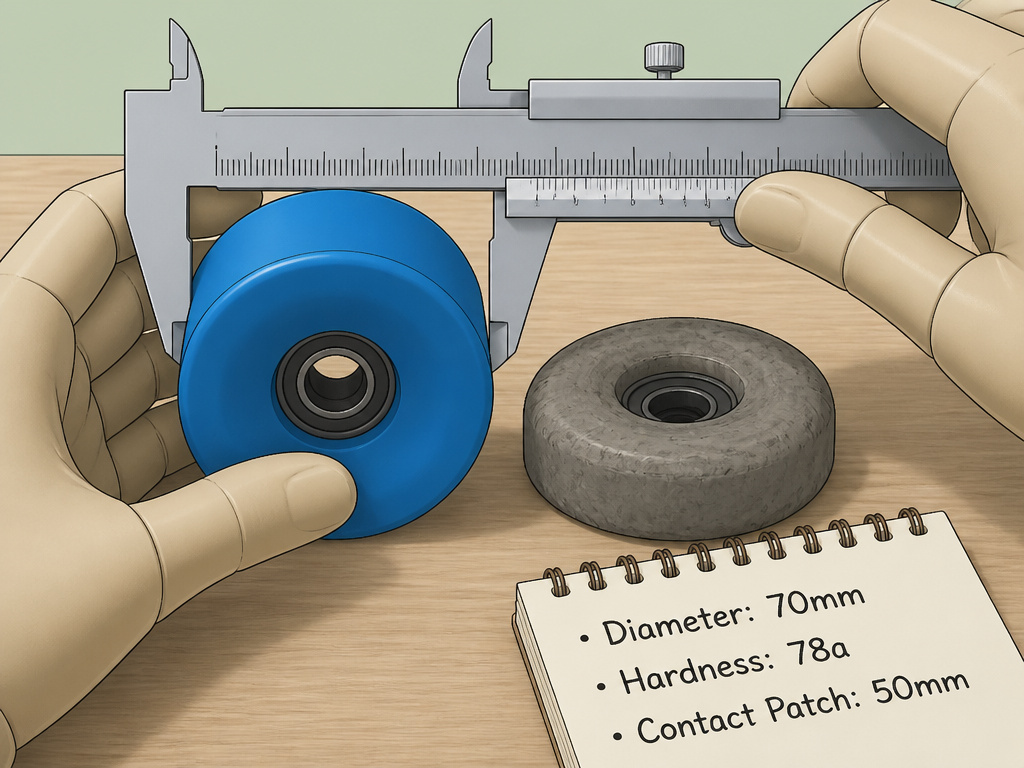
Grab a skate tool. That’s the main thing. The multi-tool with a socket for the axle nut (usually 15 mm, as specified in the Ghost Longboard repair guide) and a smaller socket for the kingpin is the standard. A 15 mm socket wrench works fine if you have one.
You do not need a bearing press or a specialized bearing removal tool for a standard wheel change. The truck axle itself is the perfect tool for popping bearings in and out. I keep a small rubber mallet in my kit for stubborn bearings, but your hands and the truck will handle 95% of jobs.
A skate tool’s built-in socket is designed for the axle nut’s size and gives you the leverage needed without rounding the corners. Using an ill-fitting wrench is how you strip hardware.
Keep a clean rag nearby. You’ll want to wipe down the truck axles and any speed washers. That’s it for the basics. If you’re dealing with a seized nut or a rusted axle, have a can of penetrating oil like WD-40 ready, but that’s for the troubleshooting section, not the standard swap.
Step-by-Step Wheel Replacement
Flip your board over so it rests on its deck. This gives you stable access to all four wheels and keeps the hardware from scattering.
Step 1: Remove the axle nut. Use your skate tool or wrench to loosen the nut on the first wheel. Turn it counter-clockwise. Once it’s off the threads, pull it free and set it aside with any accompanying speed washer. Do this for all four wheels.
Step 2: Pull the wheel off the truck. The wheel, with the bearings still pressed inside, should slide right off the axle. If it’s stuck, a light wiggle usually frees it. Place the old wheel aside.
Step 3: Remove the bearings. This is where the truck axle becomes a tool. Hold the wheel in one hand and position it so one of the bearings is aligned with the end of the truck axle. Push the wheel down onto the axle, using the axle as a punch to drive the bearing out from the inside. You’ll feel a soft pop when it gives. Flip the wheel and repeat for the second bearing. Catch the bearing and any spacer that was between them.
Step 4: Install bearings in the new wheel. Place the first bearing into the wheel’s seat, shield-side facing out. Position the wheel over the truck axle again and press down firmly to seat the bearing. You shouldn’t need a hammer. If it’s very tight, a few light taps with a rubber mallet around the wheel’s edge can help. Insert any spacer, then repeat for the second bearing on the other side.
Step 5: Remount the wheel. Slide the newly equipped wheel onto the truck axle. Replace the speed washer (if your setup uses one) and thread the axle nut back on by hand until it’s finger-tight.
Step 6: Final tightening. This is the step that decides your ride quality. We’ll settle the exact tightness in the next section. For now, snug the nut down so the wheel doesn’t wobble, but can still spin freely when you give it a flick.
Common mistake: Overtightening the axle nut until the wheel barely moves. This creates drag, burns out bearings faster, and can actually lead to wheel bite by distorting the urethane. The wheel should still have a tiny bit of lateral play when you wiggle it side-to-side.
Repeat the entire process for the remaining three wheels. Before you skate, give each wheel a spin. Listen for grinding, a sign a bearing isn’t seated straight or is damaged. Feel for wobble, a sign the nut is too loose.
The Axle Nut Tightness Debate
Here’s where the guides don’t agree. I’ve pulled the three main positions from the manufacturer sources.
| Source | Recommended Tightness | Key Warning |
|---|---|---|
| Decathlon Guide | “Tighten the nut so that the wheel can turn without coming off the truck.” | Warns against overtightening to avoid wheel bite. |
| iFixit (Ghost Longboard) | “Tighten the axle nut enough to prevent the wheel from wobbling, but not so tight as to prohibit the wheel from spinning freely.” | Focuses on eliminating wobble while maintaining free spin. |
| Element Brand | “The sweet spot for most riders allows the wheel to spin freely and generally gives it a little play on the truck.” | Explicitly endorses a slight lateral play as ideal. |
So who’s right? They all are, within a margin. The Decathlon and iFixit guides are fantastic for beginners, they prevent the catastrophic failures (wheel falling off, severe wobble). The Element guide addresses the subtle feel that experienced riders seek: a small amount of play cuts friction and allows the wheel to follow its natural path.
My rule after a decade of coaching: find the tightness where the wheel spins freely without wobble. Spin the wheel. If it stops very quickly, it’s likely too tight. If you can see the wheel wobble side-to-side as it spins, it’s too loose. Adjust by eighths of a turn from there. The goal is silent, long spinning with no visible shake.
When Standard Procedures Don’t Apply
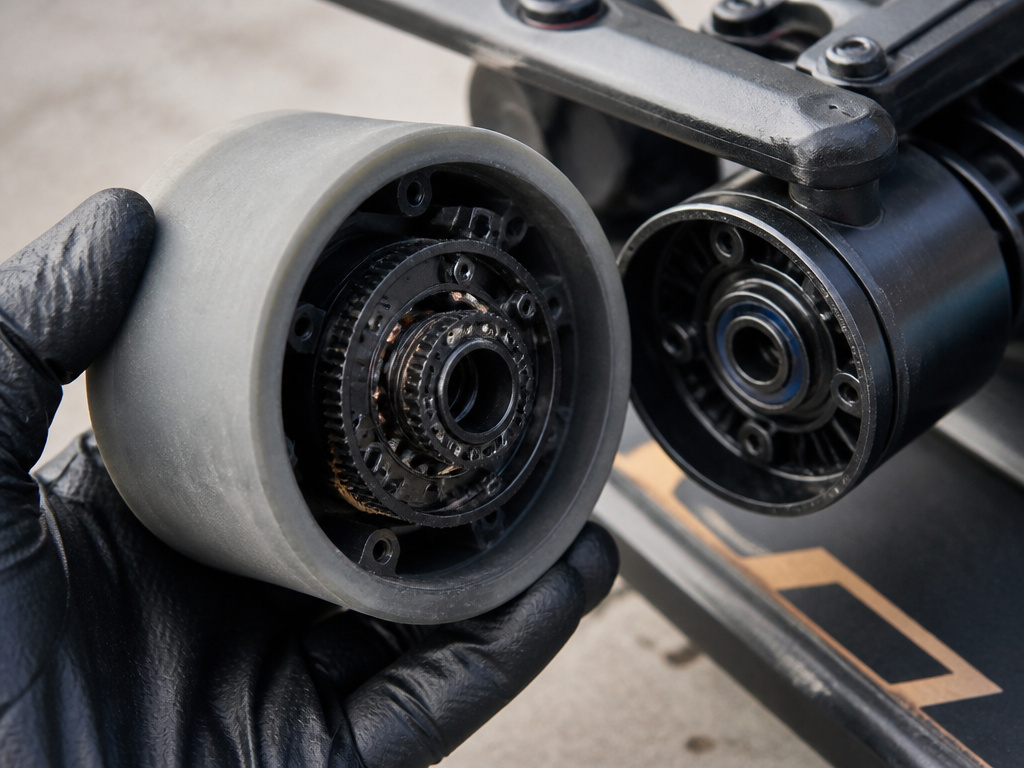
Not every wheel change follows the script. Two edge cases will break the steps above.
Electric Skateboard Drive Wheels. If your board has a motor, the wheel is often part of a drive system. As Atom Longboards notes, standard replacement procedures do not apply. The wheel is integrated with a motor pulley or hub. You must follow your specific board’s manufacturer guide. Trying to pry it off like a standard wheel can wreck a several-hundred-dollar motor.
Worn Axle Threads. The Element guide highlights this: “If the axle is worn the nut may be difficult to remove.” The threads can get mashed. Forcing it strips them. The fix is to work the nut back and forth, tighten a little, loosen a little, to ease the tension. A drop of penetrating oil on the threads can help if there’s rust.
Choosing Your New Wheels (The Short Version)
If you’re just replacing worn wheels with similar ones, skip this part of the how to change longboard wheels guide. If you’re upgrading or changing your ride style, here are the specs that matter, straight from the Nils Extreme Longboard manual.
Size (Diameter):
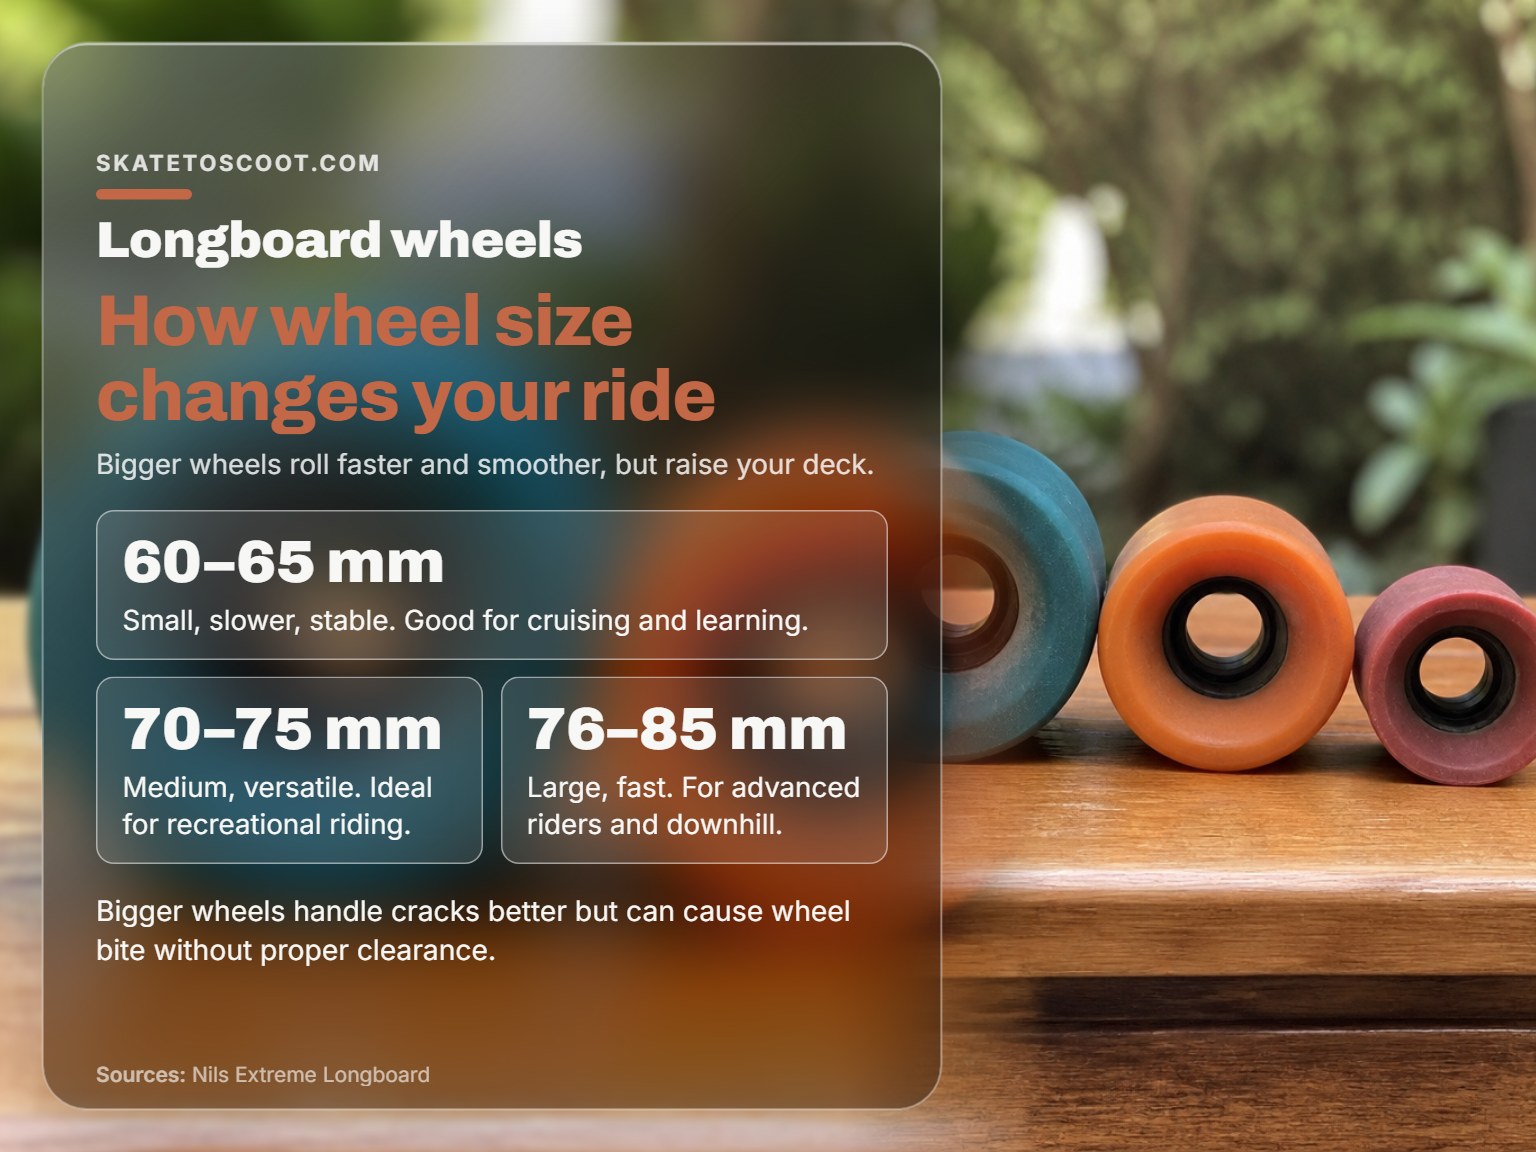
- 60–65 mm: Small, slower, stable. Good for cruising and learning.
- 70–75 mm: Medium, versatile. Ideal for most recreational riding.
- 76–85 mm: Large, fast. For advanced riders and downhill.
Bigger wheels roll over cracks and pebbles easier and hold speed longer. They also raise your deck height and increase the risk of wheel bite if your board doesn’t have enough clearance or riser pads.
Hardness (Durometer):
- 78A–80A: Soft. Great grip, better vibration damping. Ideal for rough pavement.
- 85A–92A: Harder. Faster, more durable, but less comfortable. Best for smooth surfaces like skateparks or fresh asphalt.
Softer wheels grip more but also slow you down slightly with friction. Harder wheels slide more easily and feel faster on smooth ground. For a general-purpose board, consult the manufacturer’s recommendations for size and durometer based on your riding style and surfaces.
Bearing Care: To Lube or Not to Lube?
The Nils Extreme manual is clear: “Do not lubricate the bearings – they are factory lubricated.” That’s the official, safety-first stance. It assumes most users will introduce more problems than they solve by opening the bearing shields.
The longboarding community, especially advanced riders, frequently does the opposite. They clean bearings exposed to rain or dirt and re-lubricate them with light skate-specific oil to extend their life. The factory lube is minimal and can dry out or get gunked up.
Here’s my take: If your bearings are new and rolling fine, leave them alone. If they’ve been through a wet season or sound gritty, cleaning and lubricating them can restore performance. It’s a maintenance skill, not a requirement. We have a full guide on the process of cleaning longboard bearings if you want to learn it.
Keeping Your Wheels Living Longer
Wheels aren’t cheap. Making them last is straightforward.
Rotate them. If you tend to slide or carve harder on one side, your wheels will wear into a cone shape. Rotating them evens out the wear. The most common pattern is the X-pattern: swap the front right wheel with the back left, and the front left with the back right. Do this periodically or whenever you notice one side looking more angled.
Check tightness regularly. That axle nut can work itself loose over time, especially if you didn’t quite nail the tightness the first time. A quick pre-session wiggle-check of each wheel takes five seconds and prevents a loose wheel from causing a crash.
Mind the surface. Razor-sharp gravel, sandy concrete, and frequent power slides will shave down wheels much faster than cruising on clean bike paths. It’s obvious, but worth remembering when you wonder why your friend’s wheels seem to last years longer than yours.
Troubleshooting Common Problems
Problem: The axle nut won’t budge.
Cause: It’s seized from rust, cross-threaded, or overtightened in the past.
Fix: Apply a penetrating oil like WD-40 to the seam between the nut and axle. Let it sit for 10 minutes. Use your skate tool and apply steady, firm pressure. If it still won’t turn, you may need to carefully use a longer wrench to apply more force, but be cautious not to strip the nut.
Problem: The bearing won’t come out of the old wheel.
Cause: It’s stuck from dirt, rust, or was pressed in extremely tightly.
Fix: Use the truck axle method described earlier, but you may need to tap the wheel (not the bearing) with a rubber mallet against the axle to provide more impact force. Avoid prying with a screwdriver, you’ll damage the bearing seat.
Problem: New wheel doesn’t spin freely after installation.
Cause 1: The axle nut is too tight. Loosen it slightly.
Cause 2: The bearings aren’t fully seated. Remove the wheel and press the bearings in more evenly.
Cause 3: A speed washer is misaligned or missing, causing the inner bearing race to be pinched. Reassemble, ensuring washers are flat against the bearing.
How to keep track of small hardware
When you remove the axle nuts and speed washers, put them in a small bowl or a magnetic parts tray immediately. The axle nut is small and can easily roll away. If your board uses self-locking nuts, remember that they are designed for a single use. Have replacements ready before you start, as self-locking nuts are designed for a single use. For a worn axle where the nut is stuck, the process of tightening and loosening it repeatedly to ease tension can send small parts flying, so work over a contained surface.
Frequently Asked Questions
Will any longboard wheels fit on a skateboard?
Usually, yes. Most skateboard trucks use the same 8mm axle diameter as longboard trucks. The limiting factor is wheel width. Skateboard wheels are typically narrower (30-40mm wide). A very wide longboard wheel might rub against the skateboard deck without riser pads, causing wheel bite. Always check clearance.
Can I change my wheels myself?
Absolutely. It’s one of the easiest maintenance tasks. If you can use a wrench and follow the steps for bearing removal and installation, you can do it in under 30 minutes.
How do I know when to change my wheels?
Change them when they’re worn down significantly, have deep flat spots from sliding, or are coned unevenly. Performance is the real indicator, if you’re getting wheel bite you never got before, or the board feels sluggish even with clean bearings, it’s time.
What about wheel bite?
Wheel bite happens when your wheel contacts the deck during a sharp turn, causing a sudden stop. It’s caused by wheels that are too large for your deck’s clearance, trucks that are too loose, or a lack of riser pads. If you experience it after a wheel change, adding a 1/8″ or 1/4″ riser pad between the truck and deck usually solves it.
Before You Go
The one thing I see riders mess up more than anything else is that final quarter-turn on the axle nut. They either crank it down like a lug nut or leave it so loose the wheel shimmies. Spend an extra minute on it. Flick the wheel, watch it spin, wiggle it side-to-side. Find that sweet spot where motion is free but there’s no slop.
If you’re upgrading, match your wheel size and durometer to the surfaces you actually ride. A hard 85A wheel on rough neighborhood pavement is a miserable experience, no matter how cool the graphic looks. And if you ever feel uncertain about a step, like how to properly disassemble a longboard for a deeper clean, the detailed guides are there for a reason.
Now go try it. A fresh set of wheels changes everything.
