How to Bypass Ignition Switch ON Electric Scooter
This post contains affiliate links. As an Amazon Associate, we earn from qualifying purchases.
To bypass an electric scooter ignition switch, you must create a direct electrical connection between the scooter’s battery power circuit and its controller, effectively removing the key switch from the loop. This typically involves identifying and connecting two specific wires; for example, the Niu N1S uses a red wire and a pink wire.
The core of this procedure is a simple electrical bridge, but its execution and safety depend entirely on your scooter’s specific system. The Niu N1S service manual, for instance, specifies its ignition uses a 2P connector (J11-B on the harness) with Pin 1 (Red) as the 60V power cord and Pin 2 (Pink) as the ignition switch signal. On a modern scooter with a digital CAN bus, however, this physical wire trick won’t work at all, which is a key reason to understand how to bypass ignition switch on electric scooter.
What follows is a breakdown of the three main approaches: a temporary screwdriver trick, a direct wire bypass, and the professional replacement. Each carries escalating risk, complexity, and permanent consequences for your scooter’s security and warranty.
Key Takeaways
- Disconnect the main battery before touching any wires. The Niu N1S manual warns of high-voltage circuits (60V) that can cause electric shock, and this is the single most important safety step.
- The screwdriver method only works on simple mechanical switches and provides zero security, it’s a temporary fix that can damage the ignition cylinder with repeated use.
- A permanent wire bypass creates an ‘always on’ circuit, leaving the scooter vulnerable to theft and susceptible to battery drain from parasitic current; plan to install a hidden battery disconnect switch immediately.
- Modern scooters with CAN bus or digital immobilizers cannot be bypassed with physical wires; attempting it will not start the scooter and may trigger fault codes.
- Replacing the ignition switch with an OEM or compatible part is the only method that restores factory security. Manufacturers like Niu recommend this be done by technical specialists, while other sources publish step-by-step guides for owners.
Understanding Your Scooter’s Ignition System (It’s Not Always Simple)

You can’t fix what you don’t understand. And the assumption that every scooter ignition is a simple two-wire mechanical switch is where most DIY guides fail their readers.
I’ve seen this common mistake more times than I can count. Someone reads a generic forum post, cuts what they think are the power wires on their modern scooter, connects them, and gets nothing, not even a flicker on the display. The problem isn’t their wiring skill. It’s that their scooter doesn’t use wires to say “on”; it uses digital handshakes.
Before you start: Working on a scooter’s electrical system exposes you to high-voltage circuits (like the Niu N1S’s 60V system) that can cause severe shock. Always disconnect the main battery connector first. Wear safety glasses when prying or drilling; the Niu manual specifically advises this for operations involving springs or stored energy.
Electric scooter ignitions generally fall into three camps, and your bypass method depends entirely on which one you have.
Basic Mechanical Key Switches: This is the classic system. The key physically rotates a cylinder, bridging a connection between two metal contacts. It’s literally a switch in a fancy housing. The Niu N1S is a perfect example: turn the key, and Pin 1 (Red/60V) connects to Pin 2 (Pink/KEY), sending power to the controller. Sources disagree on bypass procedures: the Niu manual is for specialists, while other guides suggest connecting those two wires.
Multi-Wire & Integrated Systems: Some switches have three or four wires for accessories, lights, or an alarm loop. Here, you need to identify the main power circuit wires. A multimeter is your best friend here. The Levyelectric article describes multi-wire ignition systems with 2-wire, 3-wire, or 4-wire configurations.
Digital Systems (CAN Bus, Keyless, Biometric): This is the growing category. On scooters with digital immobilizers, the ignition button or key fob may send a digital signal over a Controller Area Network (CAN bus). The physical wires you see carry data, not just raw power. A physical bypass here is like cutting a phone line to impersonate someone, it doesn’t work. You’d need to spoof the digital authentication signal, which is a whole different level of technical hack.
The Temporary Fix: Screwdriver Method (For Mechanical Switches Only)
When you’re stuck without a key and need to move the scooter now, this is the quick and dirty option. It’s the equivalent of using a paperclip to open a door when you’re locked out, it works, but it’s not a solution.
The physics are simple. A mechanical key switch has a wafer tumbler or a simple rotating plate inside. A flat-head screwdriver of the right size (the Levyelectric article recommends 3-5mm wide to match the slot) can engage that mechanism and turn it.
Step-by-Step:
- Inspect the slot. Make sure it’s clear of debris. Forcing a screwdriver into a gummed-up slot will just break things.
- Select a screwdriver that fits snugly. Too small, and it won’t engage; too large, and you’ll spread the housing.
- Insert and turn clockwise with steady, even pressure. You’re listening for a faint click and watching for the dashboard to light up.
- Hold it in position if your switch is momentary, or release it if it’s a maintained position switch.
Where this goes sideways: Using this method on a digital ignition. You’ll feel the cylinder turn freely with no resistance, but the scooter won’t power on. You’ve just wasted time and confused the issue.
Limitations are severe. First, it provides zero security. Anyone with a screwdriver can now start your scooter. Second, repeated use damages the delicate tumblers inside the cylinder. That smooth turn will become gritty, then stuck, and eventually the key (if you find it) won’t work either. This is purely a stopgap to get you home or to a repair shop.
The Wire Bypass Method: Connecting the Circuit Directly
This is the “hotwiring” people imagine. You’re removing the switch entirely and hardwiring the circuit closed. It’s a permanent electrical modification, and it changes the fundamental security of your vehicle.
The principle is the same whether you have a Niu N1S or a generic Amazon scooter: find the two wires that the key switch connects, and join them. The difference is in the identification.
| Scooter Type | Typical Wire Colors | Identification Method | Bypass Result |
|---|---|---|---|
| Simple Mechanical (e.g., Niu N1S) | Red (60V Power), Pink (KEY Signal) | Service manual pinout (J11-A/J11-B) | Permanent “ON” when battery connected |
| Generic 2-Wire Scooter | Two reds, or Red & Red/Yellow | Multimeter test for battery voltage | Permanent “ON” when battery connected |
| 3-Wire+ with Accessories | Red (Power), Black (Ground), Colored (Accessory) | Multimeter to find constant power wire | Permanent “ON”; accessories may need separate ground |
The step-by-step reality, drawn from the Niu N1S manual and community fixes:
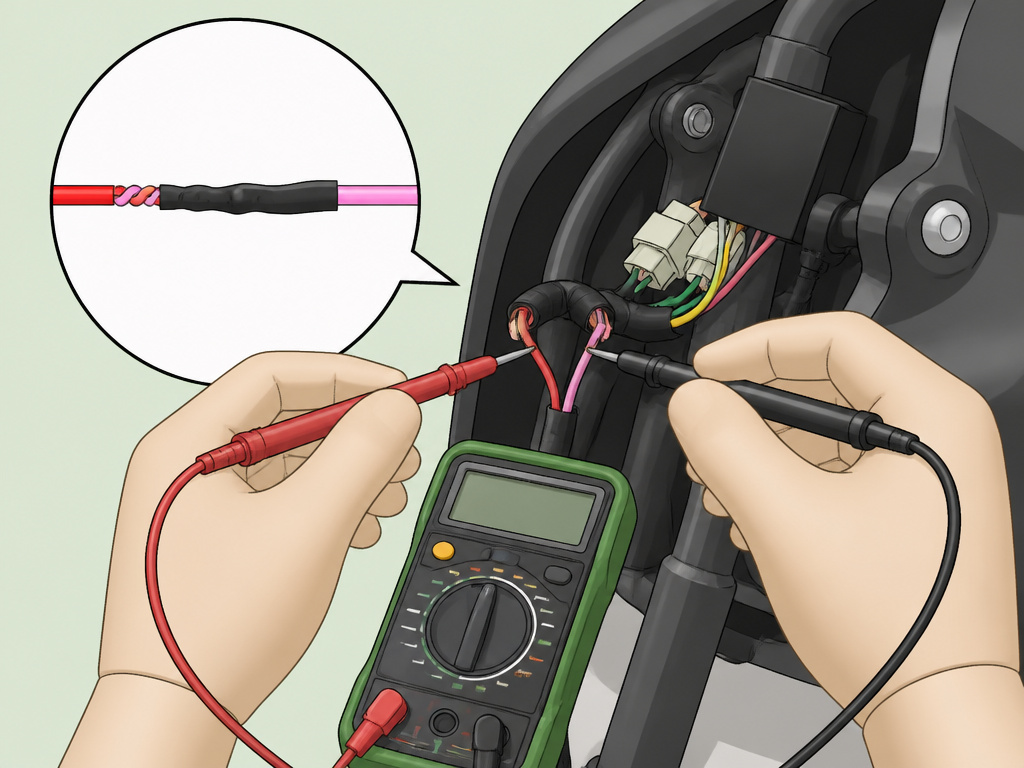
- Disconnect the battery. This isn’t a suggestion. The manual states high-voltage circuits can cause electric shock. Find the main battery connector and unplug it.
- Access the ignition switch. This usually means removing a handlebar cover or deck panel. You’re looking for the back of the key cylinder where the wires plug in.
- Identify the key wires. This is the critical part. If you have the manual, use it. For the Niu N1S, you’re looking for the red and pink wires on connector J11-A. If you don’t, you need a multimeter. Reconnect the battery briefly, set the multimeter to DC Volts (expect 36V, 48V, or 60V), and carefully probe the wires. The one showing full battery voltage is your power wire. The wire that shows 0V until you turn the key (if you had one) is the ignition signal.
- Disconnect and strip the wires. Cut or unplug the wires from the switch. Strip about 1-2 cm of insulation from each end, as the Levyelectric guide advises.
- Connect them securely. Twist the bare copper ends together tightly. This connection must be solid, a loose connection creates resistance, heat, and a fire hazard.
- Insulate the joint. Wrap the connection thoroughly with electrical tape, or use heat-shrink tubing for a more professional seal. No copper should be visible.
- Reconnect the battery and test. The scooter should power on as soon as the battery is connected. No key required.
Common mistake: Bypassing only two wires on a three-wire system that uses a ground loop for security. The scooter might not power on, or it might power on but not engage the motor. This is where a multimeter or wiring diagram is non-negotiable.
The consequences are permanent. Your scooter is now “always on,” leading to two major problems: security and battery drain. Theft is trivial, anyone can ride away. Also, the controller and display often draw a small standby current (parasitic drain). Leave it for a few weeks, and you’ll come back to a dead battery. This is why every guide, including the Levyelectric article, recommends installing a hidden battery disconnect switch or a fuse you can pull if you go this route.
When a Bypass Won’t Work: Digital Systems and Integrated Locks

Here’s the part nobody mentions until you’ve already torn your scooter apart. If your scooter has a sleek button instead of a key, or if the key also mechanically releases the handlebar (like on the Ather 450S), a standard wire bypass is either impossible or incomplete.
Digital Immobilizers (CAN Bus): On these systems, the “ignition” button sends a coded digital signal to the main controller. Simply providing 12V or 48V to a wire does nothing. The controller is waiting for the correct password. Community hacking forums sometimes find ways to spoof these signals, but it requires specialized hardware and software knowledge far beyond a simple wire connection.
Integrated Steering Locks: The Ather 450S key has a mechanical job: turning clockwise to release the handlebar. Even if you perfectly bypass the electrical part, the handlebar remains locked. You’d have to physically address the lock mechanism.
The telltale signs you’re dealing with a digital system: Keyless start with a fob or app, a start button instead of a key turn, or the presence of features like Bluetooth or RFID authentication. If you suspect this is your scooter, professional help isn’t just recommended; it’s your only option.
Replacing the Ignition Switch: The Right Way to Fix the Problem
Bypassing is a workaround. Replacement is a repair. It restores the factory-designed security and function, which is why manufacturers like Niu insist on using original components or certified equivalents.
Be honest about the process. It’s more involved than a bypass, but it’s also more satisfying and permanent in the right way. You’re not jury-rigging; you’re fixing.
Finding the Right Part: Compatibility is everything. You have three tiers: 1. Genuine OEM Part: This is the exact switch from your scooter’s manufacturer. It’s guaranteed to fit and function. The Levyelectric article notes these can cost $30-$60. 2. Model-Specific Compatible Switch: These are aftermarket switches made for your specific scooter model. They typically cost $15-$40. 3. Universal Switch: A generic 2- or 3-wire switch you wire in yourself. These run $10-$30 but require you to figure out the wiring yourself.
The Replacement Process:
- Disconnect the battery. Always.
- Remove the old switch. This involves taking off any covers, undoing the mounting nut or screws on the back, and unplugging the wiring connector.
- DOCUMENT THE WIRING. Take a photo with your phone. Which color wire went to which terminal? This photo will save you hours of headache.
- Install the new switch. Mount it, plug in the connector (if it matches), or connect the wires one-by-one using your photo as a guide.
- Test with the new key. It should turn smoothly and power on the scooter.
If the wiring doesn’t match, you’re essentially performing a bypass and installing a new switch. You’ll connect the scooter’s power wires to the new switch’s “in” terminal, and the controller wire to the “out” terminal. This is where understanding basic electrical wiring pays off.
Worth knowing before you start: The Niu N1S service manual states maintenance is for technical specialists only, and untrained work can cause injury or damage. If you’re not confident tracing wires and making safe connections, this is the point to call a professional. The cost of a locksmith or repair shop might be equal to the cost of you buying the wrong part twice.
Security, Legal, and Warranty Implications You Can’t Ignore
Modifying your scooter’s ignition isn’t just a technical decision. It’s a legal and financial one.
Security: A bypassed scooter has the theft deterrent of a brick. No key is needed. If you must bypass, you must add other layers of security: a heavy-duty physical lock, a hidden GPS tracker like an Apple AirTag, and ideally, that hidden battery disconnect switch. Storing it indoors is essential.
Legal Considerations: This should be obvious, but only perform these methods on a scooter you legally own. Bypassing a rental scooter (Bird, Lime) or someone else’s property is a crime. Full stop.
Warranty Voidance: This is the silent killer. Opening up the deck and splicing into the main wiring harness will almost certainly void any remaining manufacturer’s warranty. If your speed controller fails next month, you’ll be paying for it out of pocket. Manufacturers like Niu explicitly warn that improper maintenance can lead to an unsafe condition, and they will not cover damages resulting from it.
The Niu N1S scooter service manual is clear: “The risks… Which may be resulted from the use of components, maintenance procedures or tools not recommended by Niu, must be verified.” In plain English: if you hack it and it breaks, it’s on you.
How Modern Scooter Security Works
Premium electric scooters have moved beyond simple key switches. They now use keyless entry systems with Bluetooth or RFID authentication. Some high-end models even feature biometric fingerprint recognition. These systems create a digital handshake; the scooter won’t activate without the correct electronic signal from a paired phone, card, or fingerprint reader. GPS-integrated security can also prevent starting if unauthorized movement is detected. This means the old-school methods of using a screwdriver or connecting wires are completely ineffective on these models. The scooter’s brain is waiting for a specific digital conversation, not just for a circuit to be closed.
Frequently Asked Questions
Is there a way to bypass the ignition switch?
Yes, but the method depends on your scooter. For simple mechanical switches, you can use a screwdriver temporarily or connect the two main wires permanently. For modern scooters with digital systems (CAN bus), a physical wire bypass will not work.
What should I do if I lost the key to my electric scooter?
First, try to get a replacement key from the manufacturer or a locksmith. If that’s not possible or too costly, replacing the entire ignition switch is the best permanent solution. A temporary wire bypass should only be used if you understand the security and battery drain risks.
How can I bypass the speed limiter on my electric scooter?
This is a different procedure from bypassing the ignition. A speed limiter is usually a setting in the scooter’s software or controller, not a physical switch. Bypassing it often requires connecting to the scooter’s diagnostic port with a specific app or programmer, not simply connecting wires.
How do I turn my ignition switch on without the key?
For a mechanical switch, a flat-head screwdriver of the correct size (3-5mm) can often turn the cylinder. For a permanent solution, you can bypass the switch by identifying and connecting the two main power wires behind it, as detailed in the Niu N1S manual for that specific model.
Before You Go
One rule most guides skip: if your scooter has any kind of digital display, Bluetooth connectivity, or a start button instead of a key, assume a wire bypass won’t work. The time you spend tearing it apart will be wasted. The modern scooter security landscape has moved on from simple analog switches.
The permanent wire bypass is a one-way street. Once you cut and connect those wires, you’ve committed to a scooter with no key-based security. Your next steps aren’t optional, install a hidden battery disconnect, buy a serious U-lock, and never leave it out of sight in public. The convenience of no key is instantly offset by the anxiety of it being an easy target.
If you have the manual, use it. For example, the Niu N1S service manual holds the exact wire colors and connector codes for that model. If you don’t, and you’re not comfortable with a multimeter, the safest and most reliable path is to replace the switch with a compatible unit. It’s more upfront work, but it’s the only fix that doesn’t trade your scooter’s security for a shortcut.
