How to Change Bearings on Longboard: The 4 Tools You Need
This post contains affiliate links. As an Amazon Associate, we earn from qualifying purchases.
To change bearings on a longboard, you need a skate tool, new 608-size bearings, and your truck’s axle. Remove the wheel, use the axle to pry the old bearings out at a 45-degree angle, press the new ones in with the axle, and reassemble. Tighten the axle nut until the wheel stops spinning, then back it off a half-turn if you aren’t using spacers.
That axle-nut tightness is the single most common point of failure. Get it wrong and your new, expensive bearings will feel slow, grind, or seize quickly. The rest of the process is just mechanics, but that final adjustment is the difference between a buttery roll and a repair bill. A key part of how to change bearings on longboard is mastering this final step.
What follows: the two competing methods for popping bearings out (one is safer), how to handle bearings with built-in spacers, the manufacturer warning most riders ignore, and the exact sequence for how to change bearings on longboard that keeps your wheels from wobbling or binding.
Key Takeaways
- Use your truck axle, not a screwdriver, to pry bearings out at a 45-degree angle to avoid bending the shield.
- If your new bearings like Zealous or Atlas Blackouts have built-in spacers, you can tighten the axle nut fully.
- Without spacers, tighten the axle nut until the wheel stops spinning, then loosen it about a half turn.
- Factory-lubricated bearings from brands like NILS should not be re-lubricated, adding oil can attract more grit.
- Self-locking axle nuts are designed for single use according to manuals; reusing them risks a loose wheel.
The 4 Tools You Actually Need (and One You Don’t)
You can overcomplicate this. A full workshop isn’t required. The job requires a few key items, and one of them is already attached to your board.
First, a skate tool. The 1/2″ socket on it (usually the smaller of the two on the ‘T’ handle) fits the axle nut. This is essential. Second, your new 608 bearings. This is the universal size for skateboards and longboards. Third, a clean workspace. A bench, a table, the floor, anywhere the little spacer sleeve won’t vanish into another dimension. Fourth, your longboard’s truck axle. It’s the perfect bearing press and removal tool, and it’s free.
The tool you don’t need? A screwdriver. Or any flat, metal pry bar. The Motion Boardshop guide explicitly warns against using them when learning how to change bearings on longboard, stating you could “end up bending the bearing shield.” A bent shield creates friction, and that friction turns into heat and grinding paste inside your bearing race. The damage is immediate and often irreversible.
Before you start: The axle nut can be stubborn, especially if it’s been tightened with an impact wrench at the factory. Use the skate tool for leverage, but keep the board steady to avoid stripping the nut. A loose wheel at speed is a crash waiting to happen.
The Tool Debate: Axle vs. Pry Tool
Here’s where the primary sources disagree. It’s not a minor quibble, it’s a fundamental split on the right way to remove a bearing.
The iFixit Repair Guide, created by a university team, instructs you to use “the pointy end of the small tool that comes with the Skate Tool” to pry the bearing out from the side, while Motion Boardshop warns against using screwdrivers or similar pry tools. This method works, especially if the bearing isn’t fully seized. You lever against the wheel’s hub.
On the other side, Motion Boardshop and many experienced riders advocate for using the truck axle itself. The process: slide the wheel halfway onto the axle so one bearing is seated and the other is exposed. Then, using the axle as a fulcrum, you pry the exposed bearing out by twisting the wheel sideways, working your way around at a 45-degree angle to pop it free.
So which is correct? Both, with a caveat. The axle method is gentler on the bearing shield and uses a perfectly sized, rounded surface. The pry-tool method is faster but risks marring the wheel’s hub or slipping and damaging the shield. For a beginner, the axle is safer. For a stuck or seized bearing, you might need the force a tool provides. The critical rule is: never force a metal screwdriver blade between the bearing and the wheel.
| Removal Method | Best For | Risk If Done Wrong |
|---|---|---|
| Truck Axle (45° angle pry) | Beginners, preserving bearing shields | Can be slow on very tight bearings |
| Skate Tool Pointed End | Quick removal, slightly seized bearings | Can slip and gouge the wheel hub |
| Screwdriver (NOT RECOMMENDED) | None – this is the wrong tool | Bends the bearing shield, ruining it |
Step-by-Step Bearing Replacement
This is the core sequence. It assumes you have your skate tool, new bearings, and your board flipped over.
Step 1: Remove the Wheel and Axle Nut
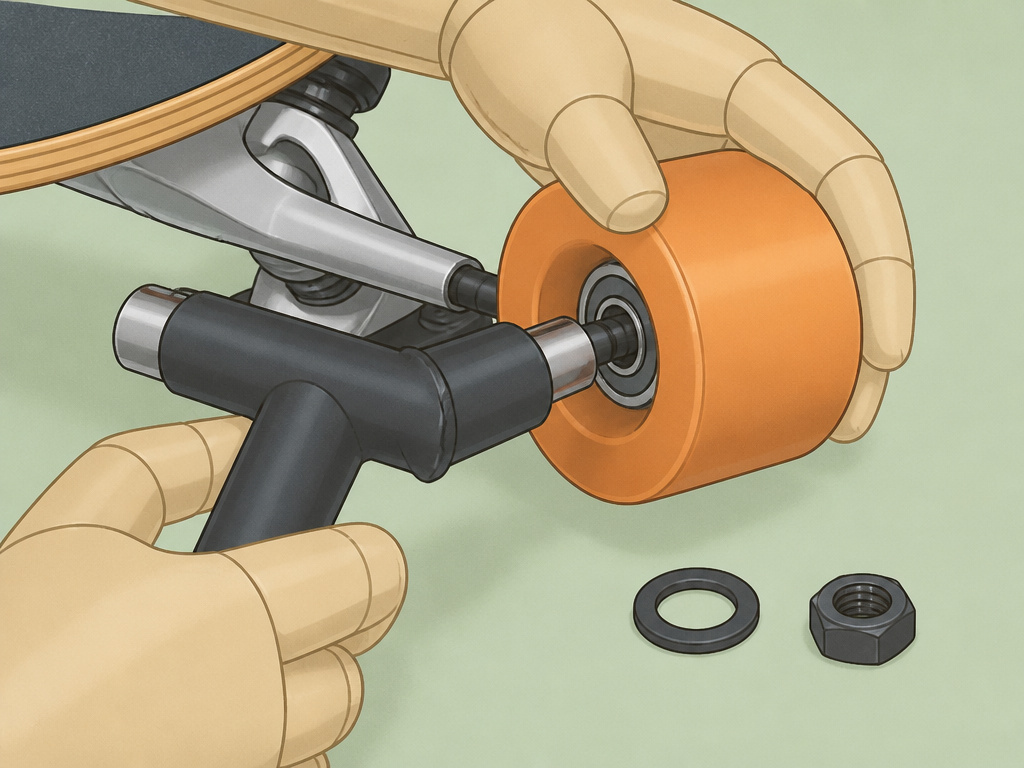
Place the board deck-down. Use the skate tool’s 1/2″ socket to loosen the axle nut. Turn it counter-clockwise. Once it’s loose, remove the nut and the thin washer (the speed ring) behind it. Slide the wheel straight off the axle. If it’s tight, a gentle wiggle helps. Set the nut and washer aside where they won’t roll away.
Step 2: Pop the Old Bearings Out
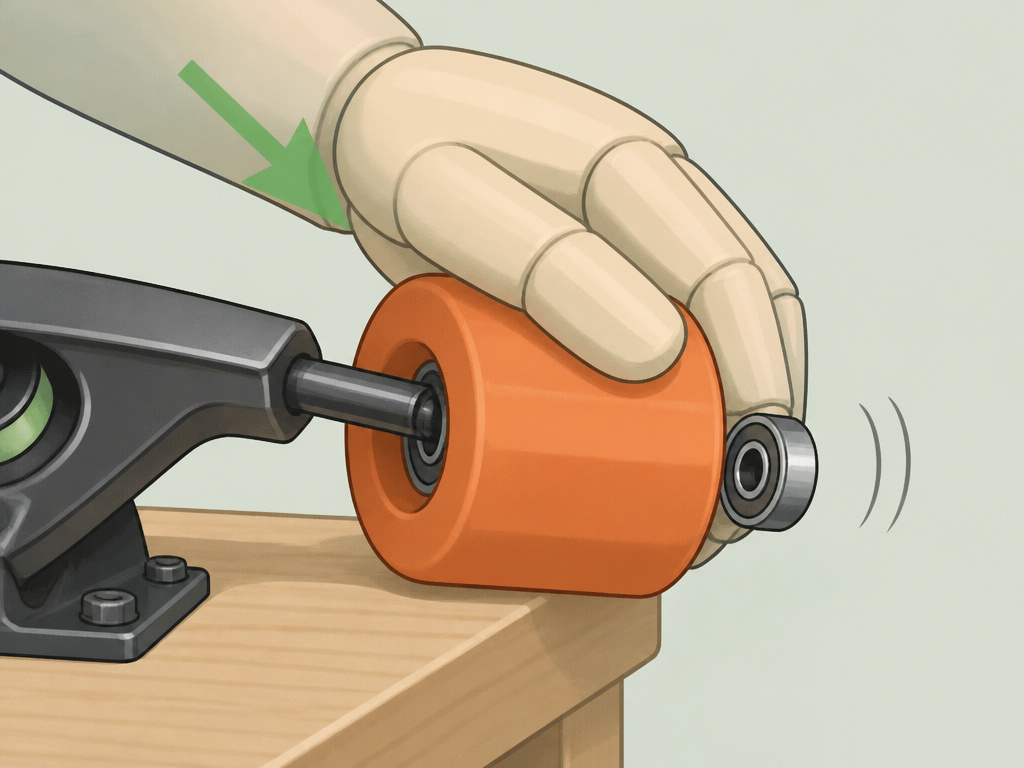
Hold the wheel in one hand. Take the truck and slide the axle into one side of the wheel until the first bearing is fully on the axle. The second bearing will now be protruding from the opposite side of the wheel hub. Place the bearing that’s on the axle against the edge of a table or hold it firmly. Now, push down on the wheel at a 45-degree angle to the axle, using the axle as your pry point. You’ll feel the bearing start to walk out. Rotate the wheel and repeat from a few spots; it should pop free. Flip the wheel and repeat to remove the second bearing. If a bearing is stubborn, you can try the pointed end of the skate tool, working it gently between the bearing’s outer race and the wheel’s plastic hub.
Step 3: Install New Bearings
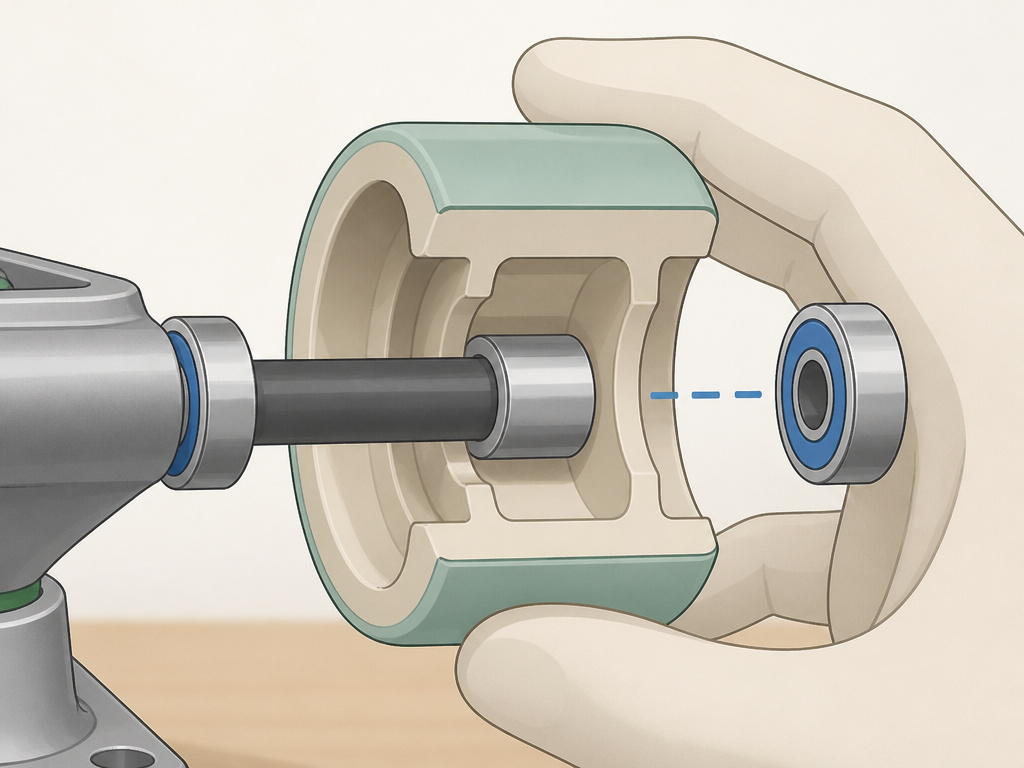
Take one new bearing. If it has a shield on one side only, the open side should face inward toward the wheel’s center. Slide the bearing onto the truck axle. Then, place the wheel over the bearing and press down firmly and evenly until you hear and feel a soft click or snap. The bearing is seated. Now, find the small metal spacer sleeve. This sits inside the wheel between the two bearings. Insert it. It should stand upright. Repeat the pressing process on the other side with the second bearing.
I’ve seen students try to hammer bearings in. Don’t. The axle is a perfect press. If you must, use the old bearing as a buffer between the new one and a mallet, but pressing by hand with the axle is cleaner and safer.
Step 4: Reassemble and Set the Tightness
Slide the wheel back onto the truck. Replace the speed ring (washer) and thread the axle nut back on by hand. Now, tighten it with the skate tool. This is the critical moment. Do you have a bearing spacer inside the wheel? If yes (or if you’re using bearings like Zealous or Atlas Blackouts with built-in spacers), you can tighten the nut fully until it’s snug. The spacer prevents the bearings from being crushed inward. If you do not have a spacer, sources disagree on the procedure: Motion Boardshop says to tighten the nut “just until they’re so tight that the wheel doesn’t spin. Then un-tighten them about a half turn,” while the NILS manual simply advises to “tighten (not too tightly!).”
Give the wheel a spin. It should rotate freely for several seconds without any side-to-side wobble. If it wobbles, tighten the nut a tiny bit more. If it binds or sounds gritty, loosen it another quarter-turn.
The Spacer, Shield, and Lubrication Trio
These three details separate a basic swap from a professional-grade job.
The Spacer’s Job: That little metal tube inside your wheel isn’t optional. It keeps the inner races of the two bearings aligned, preventing them from being squeezed inward when you tighten the axle nut. Without it, the balls inside the bearing get pinched, creating drag and heat. Brands like Zealous and Atlas Blackouts build this spacer right into the bearing assembly, so you don’t have a separate part to lose.
Bearing Shield Types: There are three main types, and they matter if you ever plan to clean your bearings.
- Rubber Seals: The most common. They’re black, flexible, and can be popped out with a sharp tool for cleaning.
- Metal Shields with a C-ring: A metal cover held by a tiny retaining ring. You can pop the C-ring to remove the shield.
- Full Metal Shields: Permanently pressed in. These bearings are essentially “sealed for life” and are not meant to be disassembled.
The Lubrication Disagreement: The NILS Longboard Manual states clearly: “Do not lubricate the bearings – they are factory lubricated.” Adding lubricant can attract dirt and is not recommended by the manufacturer.
What Most People Get Wrong (The Edge Cases)
The standard procedure works most of the time. These are the less common scenarios that leave people posting frustrated forum questions.
Seized or Rusted Bearings: If the axle-pry method doesn’t budge it, you need more force. Carefully using the skate tool’s pointed end is acceptable. As a last resort, some riders use a bearing puller tool, but that’s a specialized purchase. Often, a seized bearing means it’s time for a new one anyway, the internals are likely damaged.
Bearings with Built-in Spacers: As mentioned, Zealous and Atlas Blackouts are popular examples. When you install these, you omit the separate spacer sleeve. The installation is otherwise identical, but you can crank the axle nut down fully with confidence.
The Self-Locking Nut Rule: Your axle nut probably has a nylon ring inside. The NILS manual calls these “self-locking nuts (with a safety feature)” and says they “should only be used once.”
Where this goes sideways: Overtightening the axle nut without a spacer. The bearings bind immediately, but the damage, a dented raceway, is permanent. Your new bearings will feel slow and gritty from their first ride.
How to Know If You Need New Bearings (Or Just a Clean)
Not every slow wheel needs a replacement. Here’s a quick diagnostic.
- Grinding noise or gritty feel when spinning the wheel by hand: Likely dirt inside. Try cleaning bearings first.
- Visible rust on the bearing shield or axle: Replacement is best. Rust spreads.
- Side-to-side play (wobble) in the wheel: This is usually an axle nut tightness issue, not the bearing itself. Re-adjust.
- Wheel doesn’t spin freely even when loose: The bearing is seized. Replacement.
- Smooth but slow spin, no noise: Could be old, thickened lubricant. A clean and re-lube might restore it.
If cleaning is the answer, you’ll need isopropyl alcohol, a container, and an appropriate lubricant. The process involves removing bearings, degreasing, drying, and relubricating. It’s more time-consuming than a straight swap but can save money.
Fast Method Swapping Wheels and Bearings Together
When you want to switch your setup quickly, you can swap the entire wheel and bearing as one unit. First, use the 1/2″ socket on your skate tool to remove the axle nut. Be aware that self-locking nuts are designed for single use, so replacing them is recommended for safety. Pull the old wheel with its bearings still installed directly off the truck. To install the new wheel, simply slide it onto the axle. When tightening the axle nut, do so firmly but not too tightly. Tighten the axle nut until the wheel stops spinning freely, then back it off about half a turn. This prevents binding while keeping the wheel secure.
Frequently Asked Questions
Are longboard bearings the same as skateboard bearings?
Yes. Both almost universally use the 608 bearing standard (8mm inner diameter, 22mm outer diameter, 7mm width). The bearings are interchangeable.
How tight should the axle nut be?
If you have a bearing spacer (or bearings with built-in spacers), tighten it fully until snug. If you have no spacer, tighten until the wheel stops spinning, then back it off a half-turn. This prevents crushing the bearings.
Can I use a screwdriver to pop the bearings out?
You shouldn’t. Major guides like Motion Boardshop warn it can easily bend the thin metal bearing shield, which then rubs against the balls and creates drag. The truck axle is a safer, purpose-built tool.
Do I need to lubricate new bearings?
Most new bearings come factory-lubricated. Manufacturers like NILS explicitly advise against adding more. Many riders do add a drop of specific skate lubricant (like Bones Speed Cream) after a few months of use or after cleaning, but it’s not required initially.
Why is there a small metal sleeve inside my wheel?
That’s the bearing spacer. It sits between the two bearings and ensures when you tighten the axle nut, the force is taken by the spacer and not the bearing’s inner races. Without it, the bearings get compressed and won’t spin freely.
Before You Go
Be real about one thing. Changing bearings is a quick job that feels like a rite of passage. The tactile click of a bearing seating, the final spin test, it’s satisfying maintenance.
The one threshold to remember: if your axle nut has a nylon locking ring and it spins on with zero resistance, replace it. A loose wheel is the fastest way to end a session badly. Everything else, the brand of bearing, the ABEC rating, the debate over lube, matters far less than getting that nut tightness right and avoiding the screwdriver.
For your next upgrade, the choice between cleaning and replacing often comes down to noise. A noisy bearing is a dirty bearing; a silent one that won’t spin is a dead one. Start with a bearing cleaning before you buy new ones. And when you do buy, know that a standard set of bearings will serve most riders well. Your technique, not your gear, builds speed.