How To Make Longboard Gloves
As an Amazon Associate we earn from qualifying purchases.
Are you tired of scraping your hands and wrists every time you go longboarding? Do you wish there was a way to protect yourself from those painful falls? Well, I have good news for you – you can make your own longboard gloves! With just a few materials and some simple steps, you can create a pair of gloves that will keep your hands safe and give you the confidence to take on any hill or curve.
Longboarding is an exhilarating sport, but it can also be dangerous. One wrong move and you could find yourself with a nasty road rash. That’s why it’s important to take every precaution to protect yourself. Longboard gloves are a great way to add an extra layer of protection to your hands and wrists. Plus, they can give you better grip and control over your board, allowing you to ride with more confidence and precision.
In this article, I will guide you through the process of making your own longboard gloves. From choosing the right materials to sewing them together, I will provide step-by-step instructions to help you create a pair of gloves that are not only functional but also personalized to your style. Get ready to ride with confidence and style with your very own homemade longboard gloves.
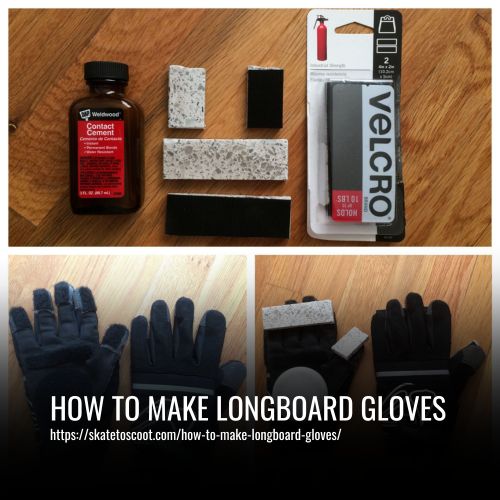
Steps to Make Slide Gloves for Longboarding
Longboarding gloves with palm pucks are essential for riders who want to maximize control and minimize the risk of road crashes. While there are various options available in the market, making your own slide gloves can be a fun and cost-effective alternative. In this guide, we will walk you through the step-by-step process of creating slide gloves that provide the necessary protection and functionality for your longboarding adventures.
1. Select your Velcro layout:
Selecting the appropriate Velcro layout is an important step in creating your homemade slide gloves. There are a few key factors to consider when choosing how to position and attach the Velcro strips.
Firstly, it is recommended to choose soft hook and loop tapes that are more stitching-friendly and made from flexible materials. This will make the sewing process easier and more comfortable. Avoid stiff tapes that can block the sewing needle or make sewing difficult.
To start, cut your Velcro strips into six pieces according to your design. Then, determine the layout that will provide the best fit and functionality for your slide gloves. Consider where you want the Velcro strips to secure the gloves when worn, and how they will allow for adjustability and a snug fit.
A common layout involves placing a piece of loop fastener fabric on the palm area of the glove, and one strip of hook fastener fabric on the back of the hand. This allows for a secure closure and adjustments as needed.
Once you have decided on the layout, carefully attach the Velcro strips to your homemade slide gloves using either sewing or adhesive methods, depending on the type of Velcro chosen. Make sure to securely fasten the strips, ensuring they will withstand the rigors of longboarding.
2. Glue and sew the Velcro:
To glue and sew the Velcro onto your DIY slide gloves, follow these steps:
- Prepare the materials: Gather your Velcro strips, adhesive glue, and a denim sewing needle. The denim needle is recommended as it is sturdy and prevents any bending or breaking issues during the sewing process.
- Pin the Velcro strips: Apply a small amount of adhesive glue to the back side of each Velcro strip. Then, carefully position and pin the strips onto your slide gloves. Ensure that they are securely attached and aligned for a proper fit.
- Sew the Velcro strips: Using a sewing machine, thread it with a heavier thread that matches the color of the gloves. Before you begin sewing, test the tension settings by using a snippet of fabric and the Velcro strip to ensure smooth stitching.
- Sew along the edges: Begin sewing along the edges of the Velcro strips, removing the pins as you go. Use a straight stitch or a zigzag stitch to ensure a secure attachment. Sew twice along the edges for added durability.
- Test for functionality: Once the sewing is complete, test the Velcro closure to ensure it securely fastens and adjusts as needed. Check for any loose threads and trim them if necessary.
3. Design the pucks:
Designing the pucks for your longboard gloves is an important step in creating high-quality and functional slide gloves. With a variety of cool shapes available online, you can choose your favorite designs to customize your pucks. To begin, create square and circle patches with a finger dimension of 5cm x 14cm and a palm size of 10cm x 11cm.
Before cutting the pucks, it’s recommended to stretch their dimensions on a chopping board. This will ensure accurate cutting and precise puck sizes. Additionally, having a board without a handle will make the cutting process much simpler.
To attach the pucks to your gloves, it’s suggested to use an anaerobic epoxy along with adhesive Velcro. This combination will allow for rapid and secure attachment of the palm puck to your gloves. The adhesive Velcro can be easily applied using the instructions provided in the previous steps.
4. Slide and smooth the pucks:
After cutting the pucks to your desired size, it’s time to smooth them out for optimal sliding performance. To do this, gently rub the edges of the pucks against the pavement. This will help remove any sharp edges and create a smoother surface for sliding.
It’s important to mention that the shape of the pucks can also be adjusted during this process. For example, you can start with an octagon shape and then transition to a circle for a simpler design.
By smoothing the pucks, you’ll ensure a more seamless slide during your longboarding sessions. It’s recommended to take your time with this step to achieve the desired shape and smoothness.
5. Stick pucks to gloves:
To stick the pucks to your longboard gloves, follow these steps for a secure attachment:
- Prepare the gloves: Before attaching the pucks, make sure your gloves are clean and free of any debris. This will ensure proper adhesion.
- Apply adhesive glue: Use a high-quality adhesive glue, such as white glue or spray adhesive, and apply an even coat to the desired areas on the gloves where you want to attach the pucks. Be cautious not to apply excessive glue that might seep through the fabric.
- Position the pucks: Carefully place the pucks onto the glued areas of the gloves. Ensure that they are aligned as desired for the best functionality and safety. Take your time during this step to achieve accurate placement.
- Press firmly: Once the pucks are in position, press them firmly onto the gloves. This helps to create a strong bond between the pucks and the glove material.
- Allow drying time: Give the adhesive glue sufficient time to dry and set as per the manufacturer’s instructions. This will ensure a secure attachment between the pucks and the gloves.
By following these steps, you can effectively stick the pucks to your longboard gloves, providing you with the extra protection and grip needed for sliding and controlling your longboard. Remember to read and follow the instructions of the specific adhesive glue you are using for optimal results.
6. Dry and finish gloves:
After you have attached the pucks to your sliding gloves, it is crucial to allow them sufficient time to dry and set properly. The pucks are made of a material that can be stubborn to adhere to gloves, so it is essential to ensure a strong bond before using them.
To facilitate drying, hang the gloves in a clean and cool place. This will help to prevent any unwanted movements or shifting of the pucks while they are drying. It is important to hold the gloves properly during this time to ensure that the pucks remain securely attached and non-removable.
Properly drying and finishing your gloves is vital for safety purposes. These gloves come into intense contact with the ground during your sliding rides, so a secure attachment between the pucks and the gloves is necessary to provide reliable protection and performance.
Once the adhesive glue has fully dried and set according to the manufacturer’s instructions, your longboard gloves will be ready for use. Don’t rush this step as it is crucial to ensure the longevity and effectiveness of your homemade slide gloves. Enjoy your rides with the confidence and peace of mind that comes from having well-dried and fully finished gloves.
What are Longboard slide gloves?
Longboard slide gloves, also known as longboarding gloves or sliding gloves, are a crucial piece of protective gear for longboarders. These gloves are designed specifically for longboarding and offer unique features not found in ordinary gloves. The main difference is the addition of sliding or palm pucks and finger pucks.
Longboarding gloves come in various sizes and qualities to cater to different styles of longboarding. Professional riders often opt for high-quality gloves that provide excellent protection and durability. However, many people choose to make their own gloves due to the relatively high cost of commercially available options.
Longboard slide gloves are essential for performing tricks and maneuvers while longboarding. They allow riders to slide smoothly on the pavement, making it easier to execute impressive moves and impress the audience. Additionally, these gloves can act as brakes or provide support during slides, enhancing the overall control and safety of the rider.
Using longboard slide gloves is crucial for staying safe while enjoying the thrill of longboarding. They protect the hands from injuries such as road rashes and provide extra protection in case of accidents. By wearing these gloves, riders can enjoy their longboarding experience while minimizing the risk of harm.
What You Will Need
To make longboard gloves, you will need the following materials and tools:
- Two pairs of gloves: One pair should be old gloves to avoid getting sticky, and the other pair should be new for DIY slide gloves. It is recommended to use a pair of UHMWPE gloves (Ultra High Molecular Weight Polyethylene) that cost around $12.5 and offer excellent durability and friction.
- A saw: A hacksaw is a suitable option for cutting out items during the process. It is affordable, costing around $12. However, be cautious as the hacksaw blade is brittle and can easily fracture. If you are not familiar with this saw type, any other available saw can be used.
- Duct tape and cloth glues: Choose durable and weather-resistant duct tape, as it will be essential for longboarding. The color of the tape is not important since it will not be visible on the gloves. Purchase enough glue ($8) for the entire process. Spray adhesive types are recommended, while ordinary white glue should be avoided.
- Optional items: Consider having a chopping board ($5), a clamp ($13), a normal pencil, and a clearly marked ruler ($5) for more precise measurements. A plastic cutting board with a width of 0.3 inches is recommended for a firm grip, but any available cutting board can be used. Clamps can be used to secure items, but the gloves can still be made without them.
It is understandable that the total price for all these items may be expensive. If possible, try borrowing some of the tools or gloves to minimize costs.
Homemade Sliding Gloves: Do’s and Don’ts for Safety and Performance
When it comes to making your own sliding gloves for longboarding, there are a few important do’s and don’ts to keep in mind. Following these guidelines will ensure that your gloves are safe to use and offer optimal performance while sliding. Here are some key points to remember:
- Do use high-quality materials: Invest in materials like palm pucks, Velcro strips, and loop fasteners that are specifically designed for longboard slide gloves. Using these high-quality materials will ensure durability and reliability during your rides.
- Do pay attention to glove construction: Use adhesive glues or white glue to attach the palm pucks securely to your gloves. Reinforce the attachment by adding extra layers of glue. Remember, a proper and secure attachment is crucial for safety and performance.
- Don’t use hockey pucks as sliding pucks: While it may be tempting to use hockey pucks as a cost-saving option, it’s not recommended. Hockey pucks are not designed for longboarding and may not offer the necessary coefficient of friction needed for sliding.
- Don’t use fingerless gloves: Fingerless gloves may seem like a good idea for flexibility, but they do not provide adequate protection for your fingers during slides. Opt for gloves that offer full coverage to keep your hands safe from road rashes and injuries.
- Ensure proper drying and finishing: After attaching the palm pucks, let your gloves dry in a clean and cool place to prevent any shifting or movement of the pucks. This will ensure that the pucks remain securely attached and non-removable.
By following these do’s and don’ts, you can create homemade sliding gloves that offer both safety and performance on your longboarding adventures. Remember to always prioritize safety by using proper materials and techniques when making your own gloves.
FAQs
Longboard slide gloves are specifically designed to protect your hands while longboarding. They provide extra protection when performing slides, making contact with the ground, and sliding on rough surfaces. They also improve grip and control, allowing riders to have a safer sliding experience.
High-quality materials such as palm pucks, polyester fiber wrist wraps, and elastic fabrics are commonly used in the construction of longboard slide gloves. These materials offer decent abrasion resistance, durability, and flexibility for optimal performance.
To choose the right size of longboard slide gloves, measure the circumference of your hand around the knuckles. Use the sizing chart provided by the manufacturer to determine the appropriate glove size. It’s important to have a snug fit that allows for finger movement without restricting your hand’s flexibility.
To extend the lifespan of your longboard slide gloves, it is recommended to hand wash them using mild detergent and cold water. Allow them to air dry in a well-ventilated area and avoid exposing them to direct sunlight or heat sources. Avoid using any glove conditioner or applying excessive force during washing, as this may affect the performance of the gloves.
Conclusion:
Making your own longboard gloves is not only a fun and creative project, but it also allows you to customize them to your exact preferences. Whether you’re a beginner or an experienced rider, having gloves that provide the right amount of protection and grip can make all the difference.
So why not give it a try? Get your creative juices flowing and start crafting your very own pair of longboard gloves today! Ride on!