How to Stand on a Longboard: The 3-Step Stance Test
This post contains affiliate links. As an Amazon Associate, we earn from qualifying purchases.
That “shoulder-width, knees bent” part is the consensus on how to stand on a longboard. Where beginners get stuck is the gap between that description and the wobbly reality of their first attempt. The real work isn’t in memorizing a posture; it’s in connecting your body’s balance to the board’s mechanics, which changes with every deck shape and truck setting.
What follows: a debunk of the two most common, and flawed, stance tests, a walkthrough of foot placement that actually accounts for your board’s geometry, and the muscle-memory drills that build stability before you ever push off.
Key Takeaways
- Test your stance by comfort, not a kick. The foot you use to kick a ball does not determine your longboard stance with certainty. Stand on the board and see which foot forward feels more stable.
- Never use the “surprise push” test. Asking someone to shove you is not a reliable stance test and creates an unnecessary fall risk, as noted by Longboard Bible.
- Foot placement follows deck geometry. On a drop-through board, stay within the main platform. On a drop-down, use the lowered section. Avoid wheel cutouts and unintentionally standing on the nose of a short cruiser.
- Wear a helmet certified for skateboarding. The U.S. Consumer Product Safety Commission (CPSC) states this is mandatory. Wrist guards are especially important for reducing fracture risk.
- A very narrow stance sacrifices stability. Move your feet toward the truck bolt areas, but keep them within the board’s safe standing platform for better fore-aft control.
The 3-Step Stance Test That Actually Works
Forget the old advice. Telling someone to “kick a ball” or “get pushed” to find your stance is a guess disguised as a test. Your soccer foot and your startled reaction don’t map to board control. Here’s what does.
First, find a completely flat, smooth patch of ground, carpet, grass, or a crack that stops your wheels. The board cannot move. Step onto it with your left foot forward, near the front truck bolts. Stand there for ten seconds. Now step off and repeat with your right foot forward. One will feel subtly more natural, like standing on a solid floor. The other will feel like you’re fighting a slight twist in your hips. The comfortable one is your likely stance. This is the core of building stability when learning to ride a longboard.
The foot you use to kick a ball does not determine your stance with certainty. Test both based on comfort and control. – Longboard Bible
Second, add your back foot. Once you’ve chosen a front foot, place your back foot near the rear truck bolts, roughly shoulder-width from the front foot. Your knees should be softly bent, weight centered over the board. Do not lock your knees or grip the deck with curled toes, that creates fatigue and reduces your ability to react. Look up, not down at your feet. Your goal here is static balance, the foundation for all the basics of longboarding and the core of how to stand on a longboard.
Third, practice stepping on and off. From beside the board, step your front foot onto its position, then follow smoothly with your back foot. Step off backwards. Do this ten times with each foot forward. This isn’t about rolling; it’s about programming the muscle memory of mounting the board cleanly, which is half the battle when you’re tired later. This drill directly improves your confidence with balancing on a longboard.
Where to Put Your Feet (It Depends on Your Deck)
“Stand over the trucks” is a useful starting cue, not a universal law. Your deck’s shape dictates where you can and should stand. Get this wrong, and you’ll fight for balance or risk a wheelbite crash.
| Deck Type | Where to Stand | What to Avoid |
|---|---|---|
| Top-Mount | Feet directly over or just inside the truck bolts. | Placing feet too far toward the nose or tail, which reduces leverage over the trucks. |
| Drop-Through | Stay within the main standing platform, between the wheel cutouts. | Letting your heels or toes hang into the wheel cutout zones. |
| Drop-Down | Use the lowered platform section; this is often the most stable area. | Standing only on the higher, angled sections near the bolts. |
| Short Cruiser | Feet near the bolts, using the full width of the deck. | Unintentionally placing your back foot on the kicktail, which can lift the front wheels. |
On a drop-through board, the trucks mount through the deck, lowering it. You must keep your entire foot on the solid platform between the wheel cutouts. A heel dangling into the cutout can catch during a turn. A drop-down deck gives you a purpose-built, lowered standing area, use it. For short cruisers, the kicktail is a tool for tricks, not a standing platform. Placing your back foot on it during normal riding makes the board unpredictable.
Common mistake: Using the same foot placement for every board. A drop-down deck and a pintail cruiser demand different stances for optimal control.
The width of your stance matters too. A very narrow stance (feet close together) gives less fore-aft stability. Widen your stance toward the truck bolt areas, but keep your feet firmly on the safe standing platform. This gives you a solid base to manage shifts in your weight, which is critical when you start improving your longboarding skills and adding speed.
Regular vs. Goofy vs. Mongo: Decoding the Jargon
The lingo can sound like a secret code. Regular means left foot forward. Goofy means right foot forward. That’s it. There’s no performance difference, and no one stance is “correct.” Your job is to pick the one that gives you control.
Mongo pushing is the controversial third term. It means pushing with your front foot while your back foot stays on the board. Most instructional sources, including Longboard Bible, advise against it, noting that pushing with the rear foot gives better stability and a faster switch to braking. Sources disagree on mongo pushing: Decathlon says if you feel more comfortable with it then ride it out, while Longboard Bible advises pushing with the rear foot for better stability and a faster switch to braking. For pure beginners, learning the standard rear-foot push builds a more reliable foundation for learning to stop on a longboard.
Your upper body plays a role too. In a basic cruising stance, your hips face perpendicular to the board or slightly forward (15-20 degrees), with your shoulders following. You’re not a stiff statue. Your arms are loose for balance. This neutral posture is your home base. When you need to push, you’ll pivot your front foot to point more forward, then shift your weight and push with the back foot. The official CPSC skateboarding safety fact sheet adds a crucial high-speed caveat: to reduce wobble risk, you should “ride forward and crouch on your board.” So your posture actively changes from a relaxed cruise to a defensive crouch as speed increases.
Posture, Balance, and the Myth of the “Ideal” Stance
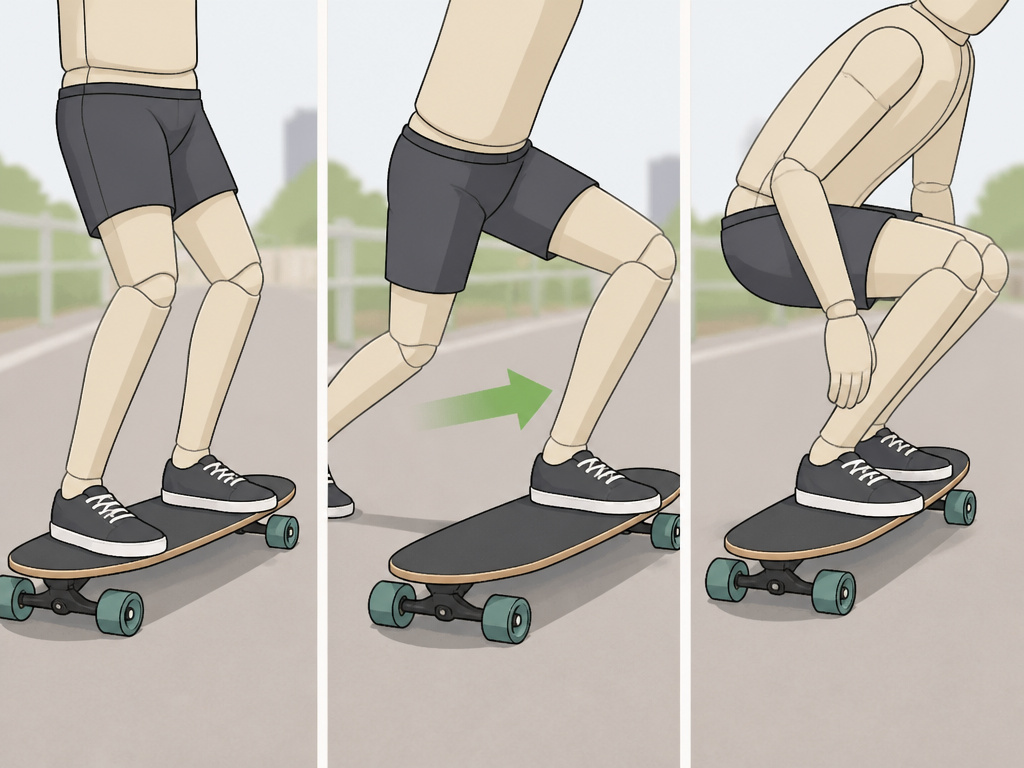
Decathlon’s guide makes a liberating point: “The ideal posture to stand properly on a board does not exist!” Other sources, however, prescribe specific angles. Who’s right? Both are, from different angles. There is no single perfect pose, but there are efficient, stable positions for given tasks.
For cruising, you only bend your knees slightly. Your center of gravity remains relatively high, and your body is relaxed. This is the posture you’ll use 90% of the time when placing your feet on a longboard for a casual ride. The moment you need to manage speed or instability, you must adapt. The CPSC’s advice to crouch is about hazard mitigation. Bending your knees deeply lowers your center of gravity, increases your connection to the board, and helps dampen speed wobbles. It’s not how you always stand; it’s how you stand when things get fast.
| Posture Goal | Knee Bend | Weight Distribution | Torso Position |
|---|---|---|---|
| Relaxed Cruising | Slight bend (10-20°) | Centered, even | Upright, facing slightly forward |
| Pushing / Foot Braking | Moderate bend on front leg | 70% on front foot, 30% on back | Leaned forward, chest over front knee |
| Speed Control / Wobble Prevention | Deep bend (45°+) | Forward, over front truck | Low crouch, chest near knees |
Balance is an active skill, not a static pose. If you feel wobbly, you’re likely stiff-legged or staring at your feet. Soften your knees. Look where you want to go, your head weighs a lot, and where it leads, your body follows. Curling your toes continuously against the grip tape is a sure sign of tension and will burn out your foot muscles fast. If you find yourself doing it, step off, shake out your feet, and remount with a conscious effort to relax.
Before You Roll: The Non-Negotiable Safety Check
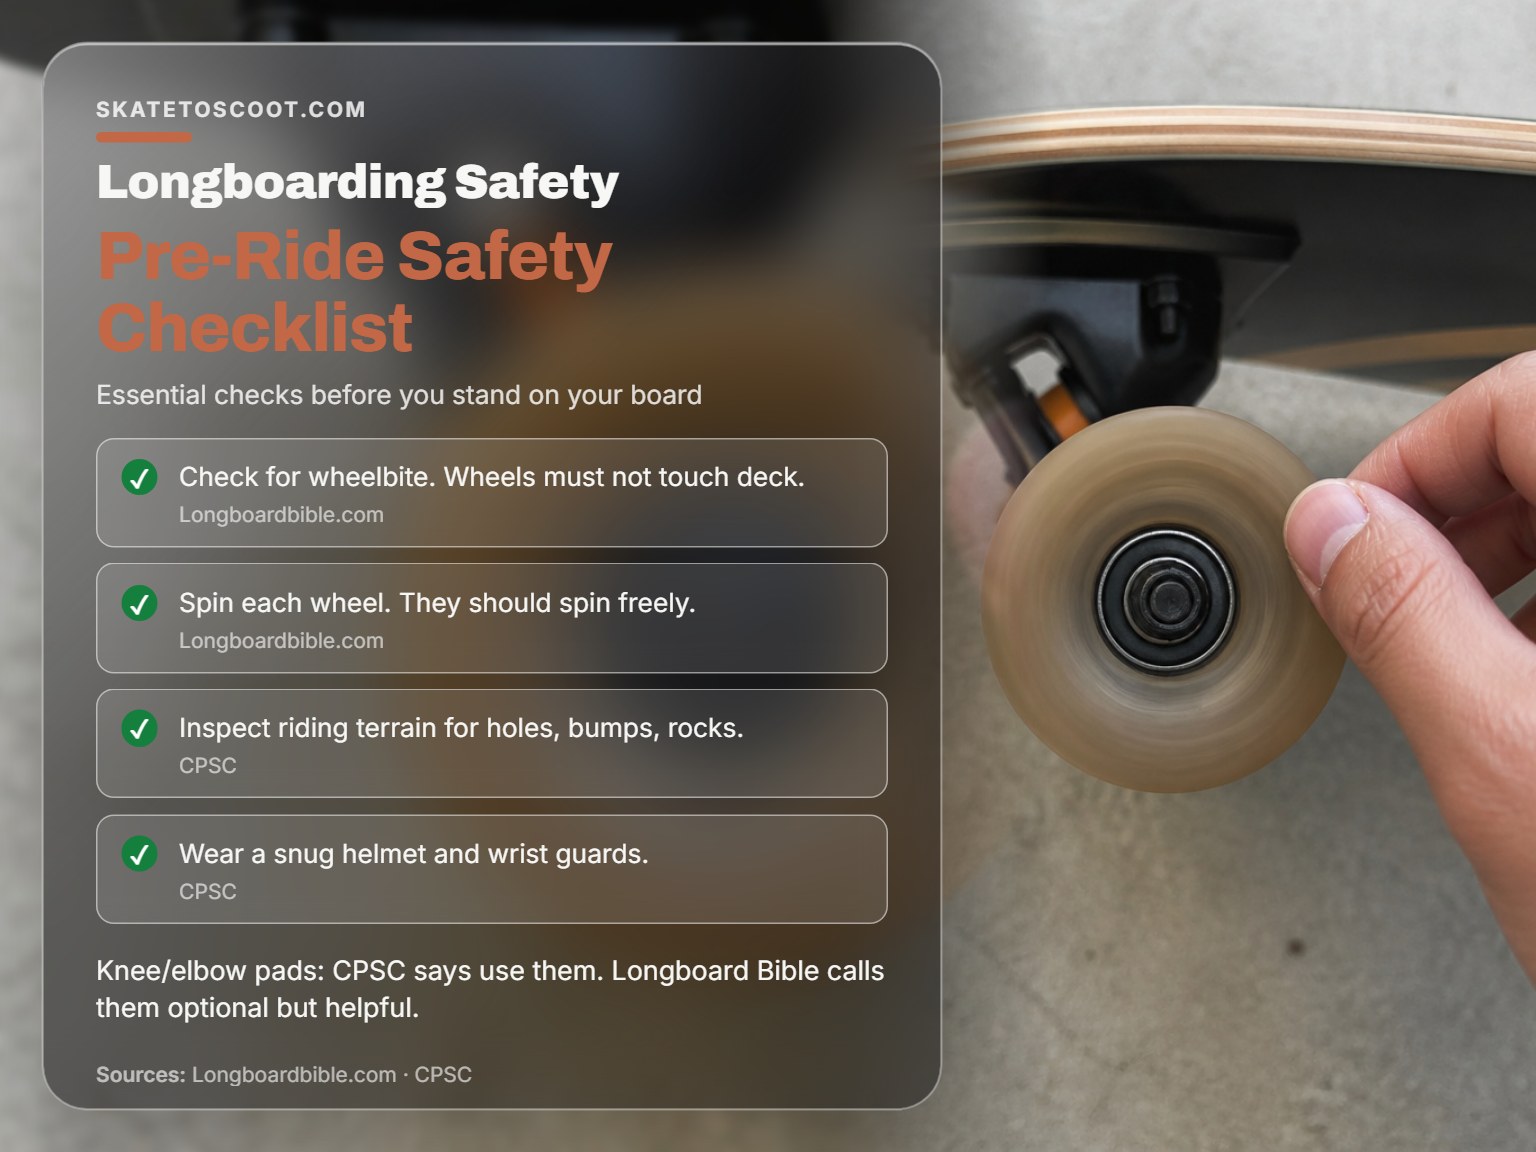
Stance is useless if your board is unsafe. A quick pre-ride check can help prevent mechanical failures.
- Check for wheelbite. Lean the board hard to each side. If any wheel touches the deck, you need riser pads or harder bushings. Wheelbite locks a wheel and throws you instantly.
- Spin each wheel. They should spin freely for several seconds without rubbing against the truck or deck. A dragging wheel kills your speed and stamina.
- Tighten all hardware. Check the kingpin nut on your trucks and all mounting bolts. Loose trucks can become dangerously loose during a ride. The CPSC notes that keeping hardware tightened improves stability at higher speeds.
- Inspect your terrain. The CPSC advises skaters to inspect the riding area for holes, bumps, rocks, and debris. Your perfect stance won’t save you from a hidden crack.
Your protective gear is part of your stance system. A helmet is essential. The CPSC states it should fit snugly with the chin strap fastened and sit level on your head. Wrist guards are “especially important for reducing the risk of fractures,” according to the same agency. Sources disagree on knee and elbow pads: the U.S. Consumer Product Safety Commission (CPSC) says to use them, while Longboard Bible calls them optional but notes they speed up learning because you fear falling less.
Putting It All Together: Your First Practice Session
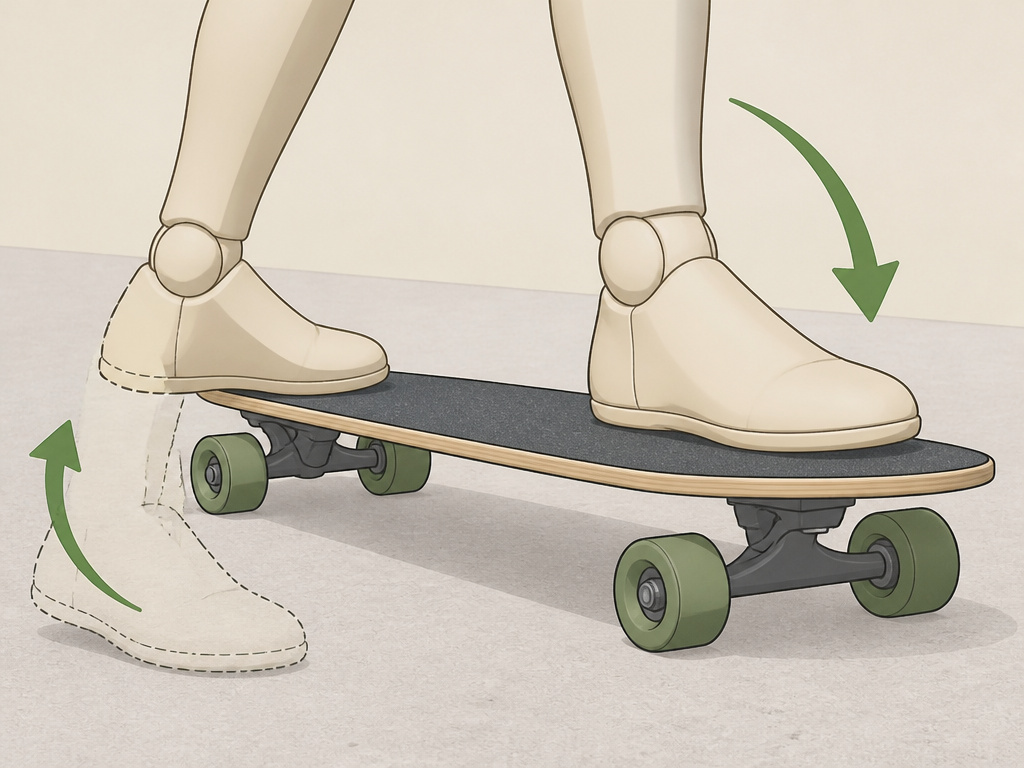
Theory ends here. Your first session has one goal: link stance, mounting, and dismounting into a fluid, confident sequence on flat, stationary ground.
Session 1 Drill: The Mount-Dismount Loop
- Place board on grass or in a crack.
- Step on with your chosen stance (front foot, then back foot).
- Hold the balanced stance for 5 seconds, soft knees, eyes up.
- Step off backwards smoothly.
- Repeat for 5 minutes.
When you can do this ten times in a row without a wobble, move the board to smooth pavement. Repeat the drill, but now the board can roll slightly. Let it roll an inch as you step on; catch it with your weight centered. This introduces the tiny movements of a live board. The moment you feel in control here, you’ve built the platform for everything else. You’re ready to learn to push, turn, and stop. You’ve learned how to stand on a longboard.
Frequently Asked Questions
Does being right-handed mean I’m regular or goofy?
No. Handedness does not reliably predict footedness. The only way to know is to test both stances on the board as described in the stance test section. Your comfort and balance are the true indicators.
Why shouldn’t I use the “push test” to find my stance?
As explicitly warned by Longboard Bible, a sudden, unexpected push triggers a startle reaction, not your natural balancing instinct. It’s an unreliable test that primarily creates a fall risk. A deliberate, controlled test on a stationary board is safer and more accurate.
Is it bad if I naturally push “mongo” (with my front foot)?
It’s less efficient for most riders and can delay your progress in learning to brake quickly. While some guides say if it’s comfortable, ride it out, the consensus for beginners is to learn the standard rear-foot push. It builds a stronger foundation for quick stops and better board control.
How wide should my stance be?
Aim for roughly shoulder-width apart, with your feet positioned over or near the truck bolts. A very narrow stance reduces fore-aft stability, making it harder to control your weight shifts. A stance that’s too wide may feel stable but can limit your ability to turn smoothly.
What if my feet hurt or cramp when I’m standing on the board?
This is usually caused by tension, locking your knees or curling your toes tightly against the grip tape. Make a conscious effort to relax your feet and keep a slight, soft bend in your knees. If discomfort persists, shorten your practice sessions and build up foot strength over time.
The Bottom Line
The goal isn’t to mimic a picture. It’s to build a stable, adaptable platform under your feet that works with your specific board. Start by finding your natural stance through a controlled test, not a guess. Then, map your feet to your deck’s geometry, drop-through, drop-down, or top-mount. Anchor everything with the mandatory safety check: a snug helmet, secure wrists, and a board that’s mechanically sound.
One rule most guides skip: if you catch yourself standing stiff-legged, staring at your front truck, you’ve already lost the connection. Your stance is alive. It softens to absorb bumps, lowers to kill wobbles, and shifts to steer. Master that feel on flat ground first. Everything else, the push, the carve, the stop, builds from there.
