How to Start an Electric Scooter: The 3-Step Sequence
This post contains affiliate links. As an Amazon Associate, we earn from qualifying purchases.
To start an electric scooter, you need three things: a charged battery, a functional power button, and the correct starting mode for your model. For most beginner scooters, this means pressing the power button, kicking to about 3 mph (5 km/h), then gently applying the throttle.
The difference between a smooth start and a frustrating stall depends on matching your scooter’s specific start sequence, which is dictated by its onboard computer. Knowing how to start an electric scooter correctly is therefore essential. Get that sequence wrong, and the motor won’t engage no matter how much you press the throttle.
What follows is the breakdown of every major scooter type’s start logic, pulled directly from the manufacturer manuals. You’ll get the universal steps, the model-specific gotchas, and the one pre-ride check that prevents many startup problems.
Key Takeaways
- The universal start sequence is power on, gain momentum (if required), then throttle. Skipping the momentum step on a kick-start model leaves you stranded.
- Check your battery before anything else. A Lime Gen 2.5 scooter shows 99.9% on its display when fully charged, and an error code “02E” means it’s too low to start.
- Understand your starting mode. Razor models like the XLR100 require a kick to 3 mph (5 km/h). Higher-end models like the Ather Rizta use a zero-start system activated by the brake lever and a start switch.
- Always charge immediately after riding and before long-term storage, but be aware that storage advice conflicts: Razor manuals for the XLR100 and Power Core E100 Series say “fully charge,” while general advice from sources like Dynamic Scooter is to store at 40-60% charge.
- If the scooter powers on but doesn’t move, the issue is almost always a misunderstood start mode, a low battery, or a safety lock like an engaged kickstand.
The One Pre-Ride Check That Prevents 80% of Startup Problems
Before you even touch the power button, your scooter needs to pass a basic readiness test. This isn’t just about safety; it’s about eliminating the variables that cause a no-start.
First, look at the battery. Is it charged? For a Lime Gen 2.5 scooter, the display will show 99.9% when full. For others, check the battery indicator lights on the deck or handlebars. If there’s no sign of life at all, the battery is likely completely drained and needs a full charge cycle, up to 6 hours for a Lime Gen 2.5, or up to 12 hours for a Razor Power Core E100.
Before you start: Never attempt to start or charge a scooter in freezing conditions. The Lime Gen 2.5 manual prohibits charging below 0°C (32°F), and Razor warns that storing a battery in freezing temperatures permanently damages it. A cold battery can’t deliver the current needed for the motor to engage.
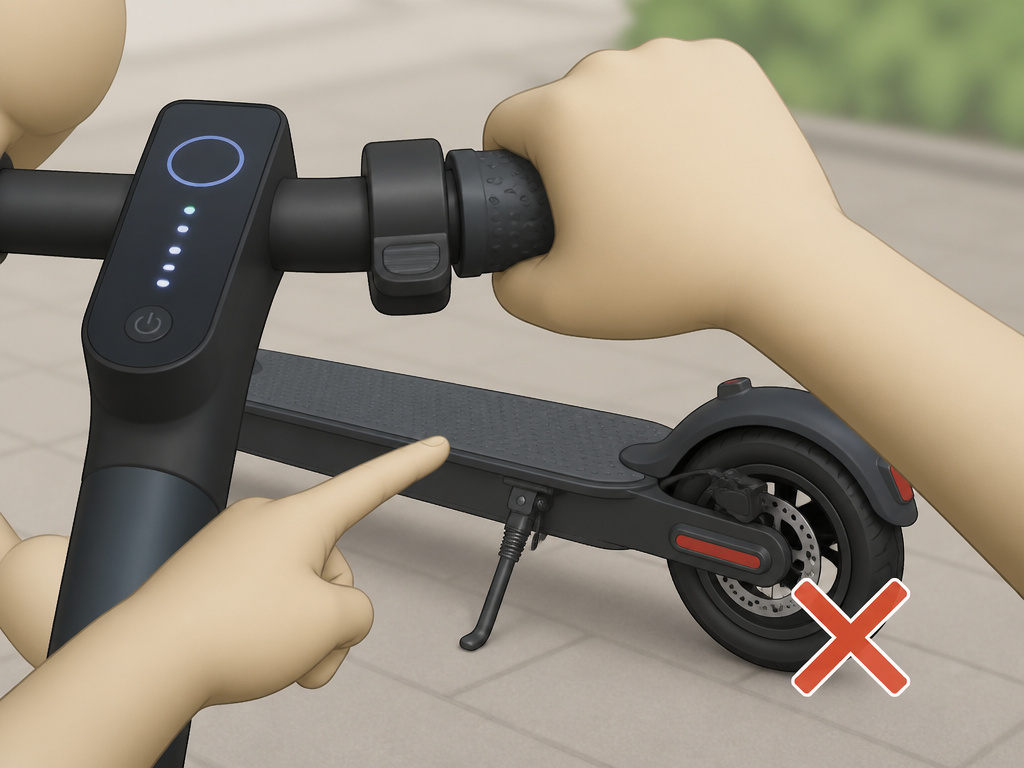
Next, do a 10-second physical scan. Is the kickstand up? On an Ather Rizta, the motor is disabled if the side stand is engaged. Are the tires firm? A soft tire won’t roll properly for a kick-start. Are the brake levers retracting fully? A stuck brake lever can trigger a motor-cutoff safety feature. Finally, ensure the scooter is on a flat, stable surface. Trying to start on a slope adds unnecessary difficulty.
This check takes 30 seconds. Skipping it leads to five minutes of confusion when the scooter refuses to cooperate.
The 3-Step Universal Start Sequence
Every scooter start, regardless of brand, follows a core three-act structure: wake up the electronics, satisfy the momentum requirement, and command the motor. Where brands differ is in how they fulfill step two.
Step 1: Power On. Locate and press the power button, usually on the handlebar console. Hold it for 1-2 seconds until you hear a beep or see the dashboard illuminate. Listen for any error beeps or alerts. Look at the display. Look at the display. You should see a battery level indicator and possibly a speed mode (like Eco or Sport). If the screen flashes an error code and then shuts off, note the code. On a Lime, “02E” specifically means low battery.
Step 2: Satisfy the Start Condition. This is the step that trips up most new riders. Your scooter has a built-in rule it must obey before the throttle will work.
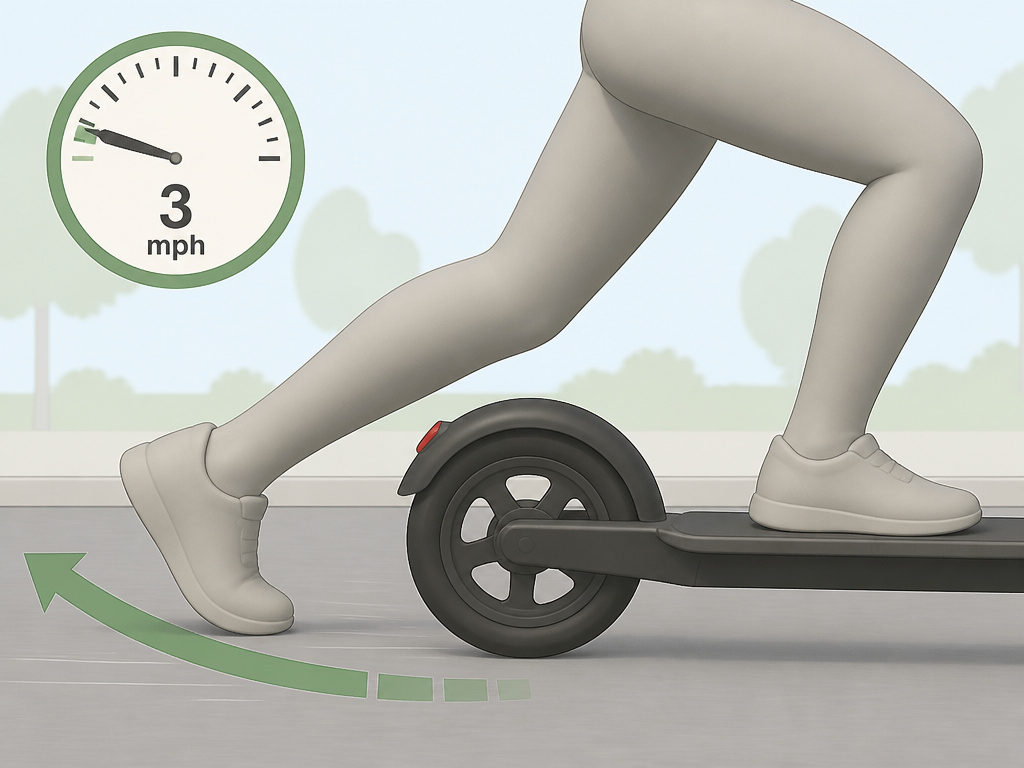
- Kick-Start Models (Common): The scooter must be moving under its own power. For Razor models like the XLR100 and Power Core E100, the manual is explicit: you must kick to accelerate to at least 3 mph (5 km/h) while pressing the throttle. The motor will not engage from a standstill.
- Zero-Start Models: The scooter allows starts from a standstill, but often requires a specific safety action. The Ather Rizta, for example, requires you to press the brake lever (either one) and the motor start switch to activate the riding screen.
Step 3: Apply Throttle. Once the start condition is met, apply the throttle gently and smoothly. A sudden, full twist on a kick-start model can jerk the scooter as the motor engages. On a thumb-throttle scooter, roll your thumb forward gradually.
Here’s a quick-reference table for the start conditions of specific models:
| Scooter Model | Power-On Action | Start Condition | Throttle Type |
|---|---|---|---|
| Razor XLR100 | Flip power switch to ON. | Kick to 3 mph (5 km/h) while pressing throttle. | Twist-grip |
| Razor Power Core E100 | Flip power switch to ON. | Kick to 3 mph (5 km/h) while pressing throttle. | Twist-grip |
| Lime Gen 2.5 | Press power button. | Depends on software setting; often requires a small push. | Thumb |
| Ather Rizta | Turn key to ON, then press brake + start switch. | Zero-start from standstill after switch sequence. | Thumb |
The most common mistake is treating all scooters the same. Assuming your new Razor is a zero-start model will leave you kicking fruitlessly at a curb when you compare a how to start an electric scooter.
Kick-to-Start vs. Zero-Start: Why It Matters
This is a fundamental design philosophy that changes how you ride, not merely a minor spec difference. Knowing which one you have is essential.
Kick-to-start is the older, more common system on entry-level and many mid-range scooters. It’s a safety feature. By requiring the scooter to be moving before the motor kicks in, it prevents accidental, wheel-spinning launches if you bump the throttle while mounting. The physical sensation is familiar: you push off like a regular kick scooter, and once you feel the scooter rolling freely, you add throttle. The motor engages with a quiet hum, and you’re off.
Zero-start is a feature on more advanced, often app-connected scooters. It’s a convenience feature. It allows you to start from a complete stop, which is useful in stop-and-go traffic or on hills. However, it often adds steps, like the Ather Rizta’s required brake-lever press, to prevent those accidental starts. The sensation is different: you’re commanding the scooter to move from a standstill. There’s no “push” phase, just instant, controlled torque.
So, which one do you have? If your scooter has a simple power button and a throttle, it’s almost certainly kick-start. If it has a digital dashboard with riding modes, a key, or a dedicated start button separate from the power button, it might be zero-start. Check your manual. The Razor manuals state the 3 mph rule in bold; the Ather guide describes the brake-and-switch sequence.
Where this goes sideways: Treating a kick-start scooter like a zero-start model. You’ll press the throttle, hear nothing, and assume it’s broken. The fix is simple: give it a good shove first.
Starting a Scooter with a Seat
Scooters with seats, like the Razor Power Core E100S, follow the same mechanical rules as their stand-up counterparts, but your technique must adapt. Your center of gravity is higher and further back, which affects your kick-start power and balance.
The sequence is identical: power on, kick to 3 mph (5 km/h), then throttle. The challenge is generating that initial momentum from a seated position. You can’t run alongside it. Here’s the technique:
- Sit comfortably on the seat with both feet on the footboard.
- Use one foot to push against the ground in a powerful, sweeping motion, like a paddle stroke. You may need 2-3 of these pushes to hit the required speed.
- Once you feel the scooter rolling freely, gently apply the throttle while keeping your pushing foot ready to stabilize.
The key is a strong, deliberate push. A timid shove won’t reach the 3 mph threshold, and the motor will never engage. Practice this in a wide-open space first. The first time the motor engages while you’re seated can be a surprising jolt forward if you’re not braced.
Throttle Control: Twist, Trigger, and Thumb
You’ve satisfied the start condition. Now you command the motor. How you deliver that command, through a twist-grip, a trigger, or a thumb paddle, dictates your control precision.
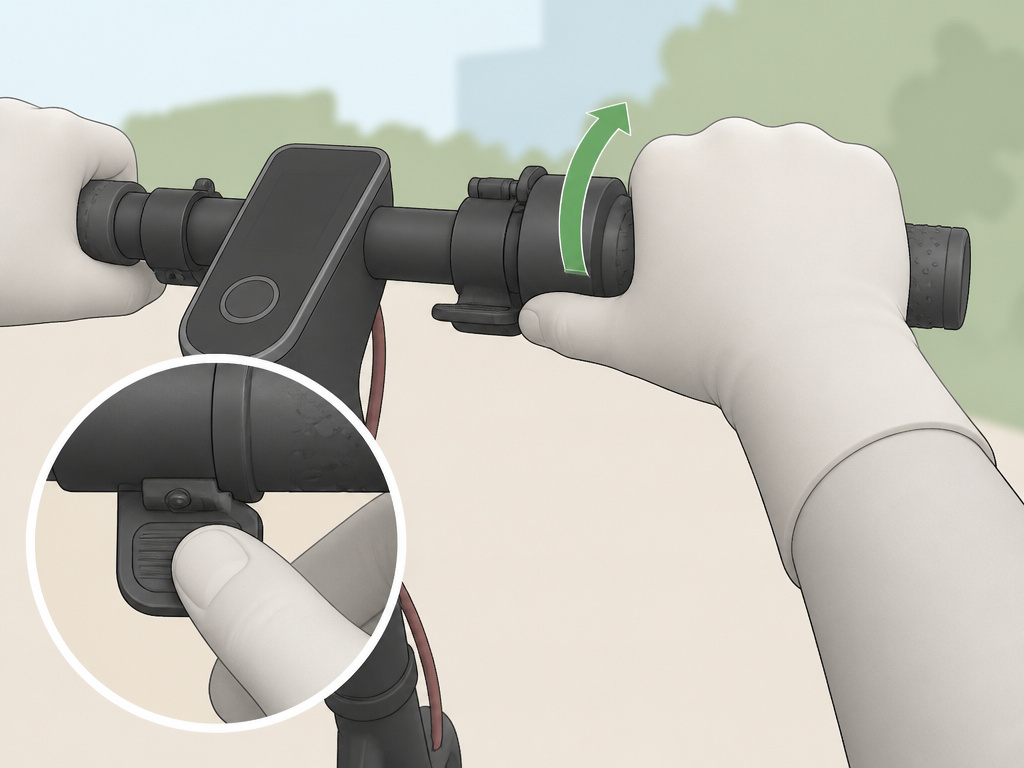
- Twist-Grip Throttle (Razor XLR100, many others): You rotate the entire right handlebar grip backward. It’s intuitive but can be sensitive. The mistake is an “all-or-nothing” twist. Instead, think of rolling your wrist back slowly, as if you’re gently revving a motorcycle. A smooth, quarter-turn is often all you need to get moving.
- Thumb Throttle (Lime, Ather, most commuter scooters): You press a lever or paddle with your thumb. This offers more precise control, as your thumb’s range of motion is smaller. The mistake is stabbing at it. Roll the pad of your thumb forward in a controlled press.
Easy to miss: On a twist-grottle, your hand position matters. If you’re death-gripping the bar with your thumb underneath, a sudden bump can cause your wrist to snap back, giving full throttle unexpectedly. Keep a relaxed grip with your thumb over the bar.
The first few starts are about finding the throttle’s “friction point”, the exact spot where the motor begins to hum. Once you know it, you can start smoothly every time.
What to Do When It Powers On But Won’t Move
The dashboard lights up, but pressing the throttle does nothing. This is the most common frustration. Before you assume it’s broken, run through this diagnostic tree. The answer is almost always here.
| Symptom | Likely Cause | Immediate Fix |
|---|---|---|
| No response to throttle, no error code. | Start condition not met. | Ensure you’ve kicked to 3 mph (5 km/h) for kick-start models, or performed the correct switch sequence (like brake lever) for zero-start models. |
| Error code on display (e.g., 02E). | System fault or low battery. | For Lime error code “02E”, charge fully. For other codes, consult the manual—riding is often disabled. |
| Single beep when throttling, no movement. | Kickstand down or brake lever engaged. | Ensure kickstand is fully up. Squeeze and release brake levers to ensure they aren’t stuck. |
| Motor engages then immediately cuts out. | Low battery or overload. | Charge the scooter. The Ather Rizta manual notes it may throttle down to a low-power mode when the battery is too low. |
| Everything works but scooter is sluggish. | Speed mode set to low (Eco). | Check your display for a mode icon (E, S, D) and use the mode switch to select a higher performance setting. |
If you’ve checked all of the above and the scooter still won’t go, the issue may be electrical. This is where knowing how to reset an electric scooter becomes valuable, a simple reset can clear a glitching controller. For persistent electrical faults, deeper electric scooter troubleshooting and repair may be needed, potentially involving the scooter wiring or a blown fuse.
Essential Post-Ride and Storage Rules
Starting your scooter next time depends on how you treat it today. Battery care is the long game.
Right after riding: Plug it in. Both the Razor XLR100 and Power Core E100 manuals state to always charge the battery immediately after riding. This keeps the battery chemistry healthy and prevents it from deep-discharging, which can permanently reduce its capacity.
For long-term storage (over a month): Here’s where manufacturer advice clashes. Razor’s manuals for the XLR100 and Power Core E100 Series say to fully charge battery before storing. However, general lithium-ion battery advice from sources like Dynamic Scooter is to store at 40-60% charge. This is a point of disagreement: Razor provides specific instructions for its products, while other sources recommend a different level for optimal long-term battery health.
Essential rule: Never store it in the cold. The Razor Power Core E100 manual warns that freezing will permanently damage the battery. The Ather Rizta adds another rule: if you don’t ride for around 25 days, you should charge for a few hours before heading out. And charge your scooter every 100 days, even in shutdown mode, to prevent permanent battery damage.
Think of the battery like a muscle. Regular, moderate use and proper charging your scooter keeps it strong. Letting it sit exhausted or frozen atrophy is it.
How to stand on an electric scooter for beginners
Your stance is your foundation for control. Start with the scooter powered off and practice standing on the deck before tackling the how to start an electric scooter question. Place one foot firmly forward, usually your dominant foot, and keep the other foot ready near the rear fender or kickplate. Your feet should be positioned roughly shoulder-width apart for stability, with your knees slightly bent. Keep your weight centered over the deck, not leaning too far forward or back. Grip the handlebars firmly but without locking your elbows. This balanced, athletic posture gives you the stability to handle the motor’s initial engagement and minor bumps without losing control.
Where to practice riding an electric scooter
Before hitting the streets, find a large, empty, and smooth paved area. A vacant parking lot, a quiet cul-de-sac, or an empty tennis court are ideal spots. The surface should be flat and free of gravel, potholes, or wet patches that could cause a slip. Ensure there is no vehicle traffic and minimal pedestrian activity to eliminate distractions and hazards. This gives you the space to practice starting, stopping, and turning without pressure. Remember, some scooters require you to kick to a minimum speed before the motor engages, so you need ample room to build that momentum safely.
Frequently Asked Questions
How do I start my electric scooter for the first time?
First, fully charge the battery (this can take up to 6 hours for a Lime Gen 2.5, or up to 12 hours for Razor models like the XLR100 or Power Core E100 Series). Perform the pre-ride safety check: tires, brakes, kickstand. Then, follow your model’s specific sequence: power on, meet the start condition (kick to 3 mph or press brake+start), then apply gentle throttle. Practice in a safe, open area.
Why won’t my electric scooter start?
The top three reasons are: a dead or very low battery (charge it fully), not meeting the kick-start requirement (you must push to ~3 mph), or a engaged safety lock like the kickstand or a stuck brake lever. Error codes on the display, like the Lime 02E, give you a direct clue.
What’s the difference between kick-start and zero-start?
Kick-start requires you to manually push the scooter to a set speed (usually 3 mph / 5 km/h) before the motor engages. It’s a safety feature common on many models. Zero-start allows the motor to engage from a complete standstill, often requiring a different button sequence (like pressing a brake lever first). Knowing which one your electric scooter has is critical.
My scooter turns on but doesn’t move when I throttle. What’s wrong?
You are likely on a kick-start model and haven’t reached the required speed. Give the scooter a solid push to get it rolling, then apply the throttle while it’s moving. If it’s a zero-start model, ensure you’ve completed any required safety steps, like disengaging the kickstand.
How long does it take to learn to start and ride an electric scooter?
The basic start sequence can be learned quickly in a controlled environment. Becoming proficient at smooth starts, stops, and turns takes practice over several days. The key is to start slow in a safe area, master the throttle control, and always wear a helmet.
Before You Go
Starting an electric scooter is a short checklist you internalize: battery, button, condition, throttle. Get those four in the right order for your specific model, and the scooter will work every time.
The one field test that settles most debates? If your scooter has a simple power switch and a twist grip, it’s a kick-start model. Assume nothing. That assumption, that all scooters start the same, is what leaves most new riders confused and pressing a dead throttle.
Your next step involves finding a flat, empty parking lot and practicing ten starts and stops in a row. Drill the sequence until you don’t think about the steps, you just feel the scooter roll and the motor hum to life. That muscle memory is what makes you ready to ride an electric scooter confidently, not just start one.