How to Bomb Hills on a Longboard: The Pro Rules
This post contains affiliate links. As an Amazon Associate, we earn from qualifying purchases.
To bomb a hill on a longboard, you need three things locked down: certified safety gear (helmet, slide gloves, pads), a pre-ride mechanical check of your board, and mastery of at least one speed-control method, footbraking for lower speeds and the Coleman slide for speeds approaching 50 mph. The discipline is about controlled risk, not uncontrolled speed.
The gap between a thrilling run and a hospital visit depends on the checklist you ran, or didn’t, before you dropped in. That pre-ride ritual is where the real sport begins, long before your wheels touch the pavement, and it’s the foundation for how to bomb hills on a longboard.
What follows is the system: the essential safety gear, the mechanical tweaks that stop speed wobbles before they start, and the progression from foot-dragging on a gentle slope to managing a 70 mph descent. This isn’t a list of tips; it’s the foundation for how to bomb hills on a longboard that you build every other trick on.
Key Takeaways
- Wear a certified helmet and slide gloves every single run; a half-shell protects your whole head circumference, but for speeds above 60 mph, a full-face helmet is the serious rider’s choice.
- Inspect your board before each ride: check bearing lubrication, test nut and bolt tightness, and adjust your bushings to your weight using the manufacturer’s chart, a loose bushing induces dangerous wobble at high speed.
- Master footbraking first; maxdubler.com states it slows you down just as quickly as sliding, and it is socially legible to drivers, making it a primary tool for managing speed and creating space on open roads.
- Learn the Coleman slide before tackling steeper hills; it’s the must-have shutdown slide for speeds approaching 50 mph and your emergency brake when footbraking isn’t enough.
- Always walk the hill first to scout for debris, plan your emergency exit, and never attempt a run that ends at a busy street or has unpredictable traffic.
The Gear That Isn’t Optional
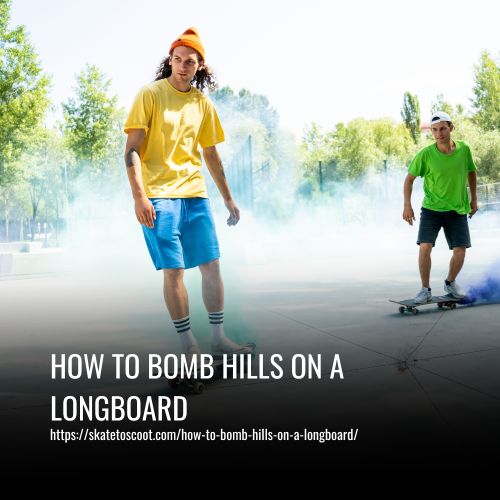
You can’t out-skill pavement. At the high speeds downhill longboarding can reach, a t-shirt and jeans are a cheese grater waiting to happen. Your gear is your first layer of control when learning how to bomb hills on a longboard.
Start with your head. Every source agrees a helmet is mandatory. Look for one with a certification tag inside. The type, however, is where experts diverge. Thelongboardstore.com calls a half-shell helmet “an optimal choice for downhill longboarding,” while tactics.com states that “downhill riders almost always wear full face helmets and full leather suits.”
Next, your hands. Slide gloves are a must. They let you put a hand down to balance during slides without shredding your palms. They’re not just for sliding; that hand-down position is a crucial third point of contact for stability. Knee pads and wrist guards are also strongly recommended, your instinct in a fall is to put your hands out, and broken wrists are a common hospital trip for skaters.
Before you start: A loose helmet strap won’t stay on in a crash. A glove with a worn-through puck offers zero protection. A pre-ride gear check is as vital as checking your board. If anything is compromised, don’t ride.
Your final piece of gear is your board itself. A cruising board won’t cut it. You need a setup tuned for stability.
| Component | Downhill Requirement | Why It Matters |
|---|---|---|
| Deck | Stiff, concave | Flex magnifies shocks and wobbles, which is potentially lethal at speed. Concave helps lock your feet in. |
| Trucks | Robust, properly adjusted | They are your steering center. Incorrect tightness prevents proper carving or induces speed wobbles. |
| Bushings | Matched to rider weight | The heavier the rider, the harder your bushings and durometer should be. Adjust using the recommended weight chart. |
| Wheels | Grippy, appropriate durometer | Softer wheels grip better for control; harder wheels slide more easily for speed checks. |
A board that feels “twitchy” on a small hill will be unmanageable on a big one. Your setup is a system, and every part talks to the others.
The Pre-Ride Safety & Setup Checklist
Your board isn’t a bicycle. You can’t just hop on and go. A single loose kingpin nut or a dry bearing can turn a controlled descent into a high-side crash in seconds. The ritual before the ride is what separates a prepared rider from a statistic.
First, the mechanical check. Pull from your truck bolts to your wheel nuts. All bearings should be properly lubed, nuts and bolts tested, and bushings inspected for proper tightness and balance. A dry bearing seizes up. A loose axle nut can eject a wheel. But the most critical, and most misunderstood, part is the bushing.
Bushings are the urethane donuts on your kingpin. They control how your truck leans and returns to center. Get this wrong, and you’re fighting your board the whole way down.
A loose bushing can get pretty gnarly at high speeds, and one that’s too tight will prevent you from proper carving or avoiding that parked car ahead.
The fix is in your skate tool. Crank the kingpin nut down until there’s no side-to-side play in the hanger, but no more. You should be able to lean the truck with firm pressure. If you’re heavy or riding very fast, you’ll need harder durometer bushings, the manufacturer’s weight chart is your guide, not a suggestion.
Second, scout the hill. Always walk the hill before attempting it. This is a tactical survey. Look for gravel patches, drainage grates, wet leaves, or pavement cracks. Judge the steepness and the run-out at the bottom. Most importantly, plan your emergency exit: where can you safely bail if you lose control? Don’t ever attempt hills that end at busy streets or are plagued by traffic.
If you’re with a group, this is where spotters come in. On open roads, using spotters is a great way to go fast relatively safely. A spotter stands at a blind corner, watches for cars, and signals to the rider. A clear corner is signaled by waving a whole arm in a circular motion. A car coming gets a hand held high, palm out. A red flag or arms in an ‘X’ overhead means stop immediately.
Speed Control: Carving, Footbraking, and Sliding
Speed is easy. Controlling it is the skill. You have three tools: carving, footbraking, and sliding. Each has its place, and the debate over which is primary is one of the few genuine disagreements in the community.
Carving is your first speed modulator. By making wide, linked turns across the road, you convert some of your downhill momentum into lateral movement. It scrubs off a little speed and keeps you in your lane. It’s not a stopping tool, but it’s essential for managing your line and setting up for everything else. If you can’t carve smoothly, you have no business on a steep hill.
Footbraking is your workhorse. It’s the most socially legible way to slow down, drivers understand a foot dragging on pavement. One detailed guide argues it’s supremely important: “footbraking will slow you down just as quickly as sliding.” It’s also versatile. Need to create space from a rider ahead? Footbrake. A car appears behind you? Footbrake to the right-hand side of the road as soon as possible and let them pass. It allows for fine, gradual speed adjustments in a straight line.
Where this goes sideways: Trying to learn footbraking when you’re already going too fast. You need to brake early and often to maintain a manageable pace. If you’re panicking, it’s too late to learn.
Sliding is your emergency brake and your tool for high-speed cornering. The most fundamental shutdown slide is the Coleman (or heelside pendulum slide). You squat low, put your gloved hand down behind you, and kick the board out sideways, using the wheels’ friction to kill speed. The Coleman slide is a must-have for speeds approaching 50 mph.
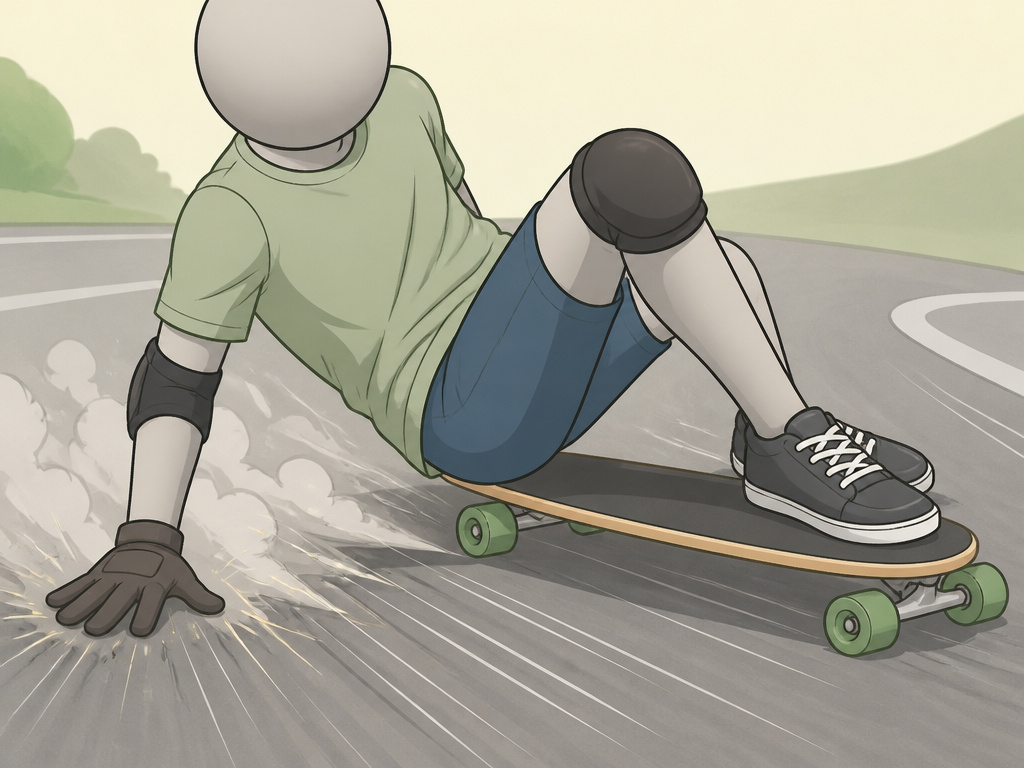
The source disagreement is instructive. Maxdubler.com states “footbraking will slow you down just as quickly as sliding,” while thelongboardstore.com presents the Coleman slide as a must-have for high speeds.
Body Position and Managing Speed Wobbles
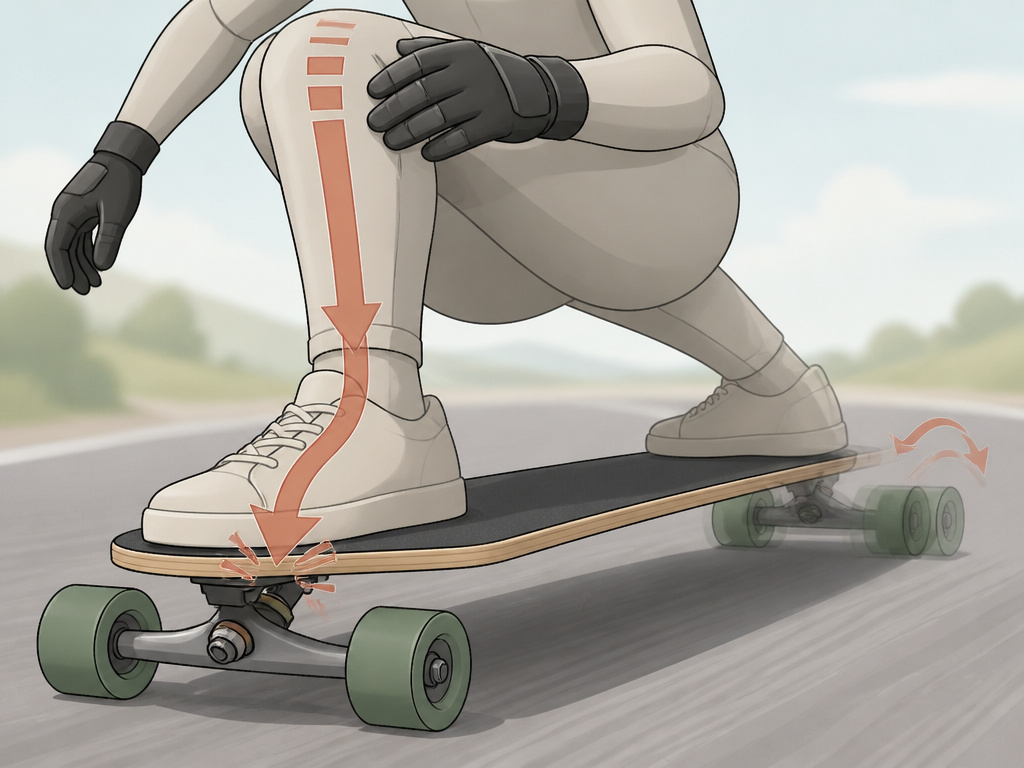
Your body is your board’s suspension and steering computer. Get your stance wrong, and the board will decide where you’re going. Get it right, and you become an extension of the pavement.
The classic downhill stance is the tuck. Crouch low, knees bent. Your front foot should be pointed nearly forward, your back foot perpendicular across the board. Your weight must be predominantly over your front truck. This is the single best defense against speed wobbles. Wobbles start in the rear truck when it oscillates side-to-side. By loading the front, you make the board track straight, with the rear truck following the front’s direction. It’s a physics fix.
If wobbles do start, don’t panic and stand up straight. That shifts your weight back, making them worse. Do the opposite: crouch lower, drive more weight onto your front foot, and focus on a point far down the road, not at your feet. Often, the wobble will dampen out. If it doesn’t, that’s what your speed-control techniques are for, initiate a gentle carve or prepare to footbrake to scrub speed.
A speed wobble isn’t a death sentence. It’s your board telling you your weight is in the wrong place, your trucks are too loose, or your bushings are too soft. Listen to it.
Beyond the tuck, you need to be loose. Tense muscles overcorrect every tiny bump. Your ankles and knees should act as shock absorbers. Practice on smaller hills just feeling how the board reacts to pavement seams and minor weight shifts. This “board feel” is what allows you to make the split-second adjustments downhill demands.
Progression Path: From Parking Lots to Steep Roads
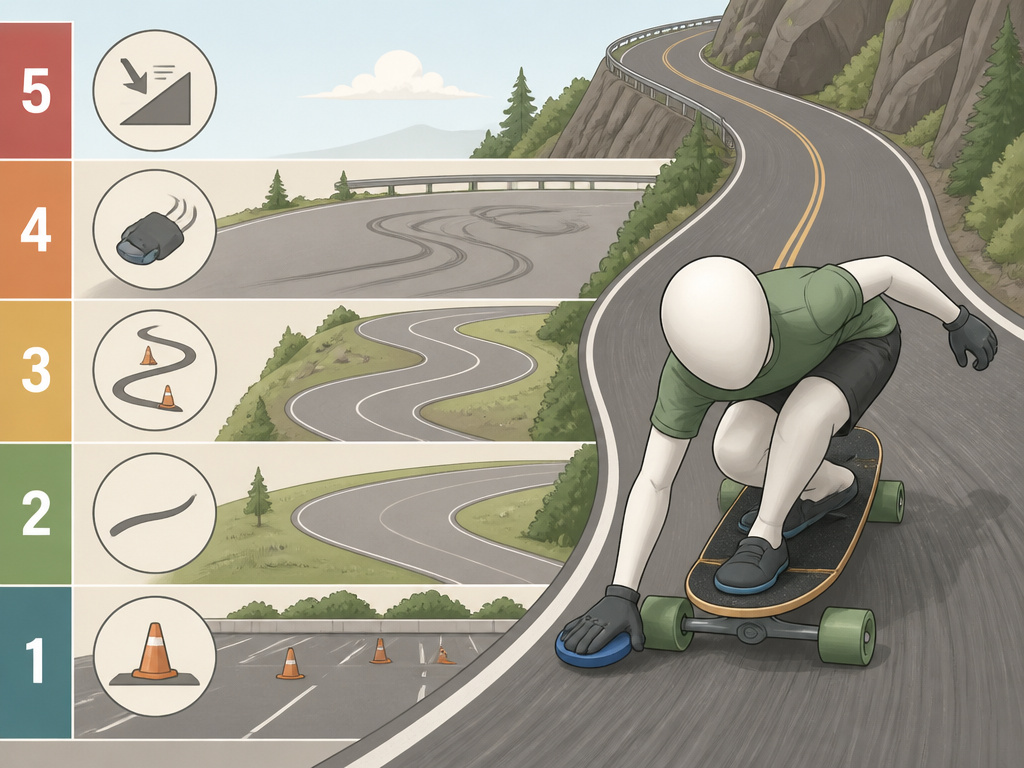
You don’t start by bombing the steepest hill in town. That’s a shortcut to the emergency room. There’s a ladder, and every rung is a skill you must own before moving up.
Rung 1: The Parking Lot. This is where you learn your board. Practice pushing, carving wide figure-eights, and coming to a stop by dragging your foot. Get comfortable riding switch (with your opposite foot forward). Do this until pushing and basic turning are unconscious.
Rung 2: The Gentle Slope. Find a mild, straight hill with a clear, long run-out at the bottom, a empty parking lot on a slight incline is perfect. Here, you practice maintaining a tuck and using footbraking to control your speed. The goal isn’t to go fast; it’s to learn how to keep a steady, manageable pace from top to bottom using only your foot.
Rung 3: Introducing Carves. On a slightly steeper but still straight hill, practice linking carves. Make big, smooth S-turns across the entire lane. This teaches you to control your line and scrub speed without braking. Once you can carve smoothly and predictably, you’re ready for the next step.
Rung 4: Learning the Coleman Slide. Find a wide, smooth, low-traffic hill. You need enough speed to break traction. Practice the squat, hand-down position first without sliding (hand-drag carving). Then, work on kicking the board out. Expect to fall. Wear all your gear. This single skill makes the next level possible.
Rung 5: The Real Hill. Now you find a road with a real grade and maybe a gentle corner. You walk it first. You session it with spotters if there are blind spots. You use your full toolkit: tuck for speed, carves to manage your line, footbrake to adjust, and have the Coleman in your back pocket as your “oh crap” button. You never go faster than you can safely stop.
The reddit communities are unanimous on this: ride with other riders. Find your local scene. Learning from someone who’s been through this progression is faster and infinitely safer than figuring it out alone. They can spot your mistakes, give you feedback, and show you hills appropriate for your level.
Group Riding and Spotter Protocols
Downhill is often a social sport. Riding with friends is more fun and can be safer, if you follow the rules of the pack. When it’s done wrong, it’s a fast-moving pile-up waiting to happen.
The core principle is simple: open road riding is not a race. If you’re the slowest rider, don’t kick in first. You don’t want the whole pack stacked up behind you. If you’re coming up behind someone, give a warning, a shout or a clap, so you don’t startle them.
The spotter system, detailed in one open-road guide, is a formalized version of “having a friend scout.” On a road with blind corners, a spotter stands where they can see oncoming traffic and be seen by skaters. Their signals are clear and critical:
- Clear corner: Wave a whole arm in a circular motion or use a green flag.
- Car coming: Hold one arm above your head, palm out, or wave a yellow flag.
- Stop immediately: Hold arms in an X over your head or wave a red flag.
If a car passes them regardless, they honk to warn the skaters ahead.
Common mistake: Treating a group ride like a competition. Passing someone only to immediately slow down forces them to adjust. If you make a pass, be ready to stay ahead. Otherwise, chill in the back and enjoy the view.
How to Fall (Because You Will)
You will fall. Accept it now. The goal isn’t to never fall; it’s to fall in a way that gets you back up. Learning to fall is more important than learning to stop when you’re starting out.
The worst thing you can do is stiffen up and try to catch yourself with outstretched arms. That’s how you break wrists and collar bones. Instead, if you feel yourself going down, try to turn it into a roll. Tuck your chin, curl your limbs in, and let your padded shoulders and back take the impact as you roll. Your slide gloves let you slide on your palms if you go down forward.
Practice this on grass. Seriously. Go to a park and practice tucking and rolling from a kneeling position, then from a squat. Make the motion muscle memory so when the pavement rushes up at 30 mph, your body defaults to the safe option.
After a fall, especially a hard one, don’t jump up immediately. Assess yourself. Can you move everything? Is anything bleeding or pointing the wrong way? In the event of a bad crash resulting in serious injury, the very first thing you should do is call 911 and tell them the truth about what happened. Your friend’s health is more important than the skate spot.
How to Warm Up Before Downhill Longboarding
You can’t just step on a board and hit a hill cold. Your body needs to be ready to react. Start by doing some hand drag carving on flat ground to get your muscles firing and your balance dialed in. This motion directly translates to the slides you’ll need for speed control. Focus on stretching, especially your hips and legs, to improve your squat position for stable sliding and bailing. A proper warm-up gets your blood flowing and your mind focused, turning your body from a passive passenger into an active part of the control system.
Frequently Asked Questions
What’s the most important piece of safety gear for downhill?
The helmet is essential. Every single source lists it first. Without a certified helmet protecting your head, nothing else matters. Slide gloves are a very close second, as they enable safe sliding and provide a critical point of contact.
Can I learn to bomb hills without learning to slide?
You can start, but you’ll hit a ceiling. Footbraking is effective, but for steeper hills and higher speeds (approaching 50 mph), a shutdown slide like the Coleman becomes essential for safety. Most guides advise learning a slide before tackling serious inclines.
How do I stop speed wobbles?
Prevention is key: a stiff deck, properly tightened trucks, and bushings matched to your weight. If wobbles start mid-run, stay calm, crouch lower, shift more weight onto your front foot, and look ahead, don’t stare at your board. Often, this will dampen the oscillation.
What should I look for when scouting a hill?
Walk it first. Look for surface hazards like gravel, cracks, or wet patches. Check the run-out at the bottom, is there a safe, clear area to slow down? Crucially, identify your emergency bail-out zone and never attempt a hill that ends at a busy street.
Is it safe to ride downhill with headphones?
No. One open-road guide explicitly warns against it: “Protect your eyes with sunglasses or a face shield and don’t ride with headphones.” Your hearing is critical for detecting cars, communicating with other riders, and hearing spotter warnings.
Before You Go
Bombing hills is about meticulous, almost obsessive preparation. The thrill comes from executing a plan under pressure, not from rolling the dice. Your gear checklist, your pre-ride inspection, your practiced shutdown slide, these are the things that let you tap into that raw speed with a margin of safety.
One rule to walk away with: never outrun your shutdown slide. If you find yourself on a hill going faster than you can reliably slide to a stop, you’ve made a mistake two corners back. The pavement is always there tomorrow. The goal is to be there with it.
So start in the parking lot. Wear the gear. Find the local crew. Trust the process, not just the trick. The hill will wait for you.
