How to Do a Manual on a Longboard: The 3-Step Lock-In
This post contains affiliate links. As an Amazon Associate, we earn from qualifying purchases.
A manual on a longboard is a three-step process: find your pivot point, shift your weight over the back truck, and use your front foot to modulate the board’s angle. The difference between a shaky two-second hold and a smooth roll is one step everyone skips, shifting your hips forward before your weight goes too far back.
That hip-shift is the recovery mechanic. Most guides talk about finding the balance point, which is correct, but they don’t mention what happens a quarter-second after you find it. On a longboard, the longer wheelbase gives you more time to feel the shift, but also a longer distance to fall if you don’t correct it. A key part of how to do a manual on a longboard is managing this timing.
What follows breaks down the manual into those three steps, plus the specific drills to build hold time, the longboard-specific pitfalls, and how to protect your deck from the inevitable damage while you learn how to do a manual on a longboard. By the end, you’ll have a progression plan that moves from stationary holds to rolling manuals you can actually use.
Key Takeaways
- Start your weight shift from your front foot’s ball, not your heel, this keeps your center of gravity low and controlled.
- A little forward speed (a brisk walking pace) is easier than practicing stationary; momentum provides gyroscopic stability.
- The manual is a front-foot trick; your back foot is mostly there to catch you if you over-rotate.
- Protect your deck with a tail plate (brands like Powell Peralta or SK8 Kings make them, or you can use alternatives like MAXPRO Deck Guards or a DIY version) before you start practicing; repairing razor tail is much harder than preventing it.
- If your board has a pronounced kick nose, nose manuals are often easier to learn first because the tail provides a natural stop.
The Longboard Manual: It’s Not a Skateboard Trick
The first thing to understand is that a longboard manual is a different beast from its skateboard cousin. A skateboard manual is about popping and locking into a quick, sharp balance. A longboard manual is about finding and riding a sweet spot. The longer wheelbase changes the entire physics of the trick. You have more board to control, which means more time to make micro-adjustments, but also a larger pendulum swinging underneath you if you get it wrong.
I’ve watched students try to force a skateboard-style manual on a longboard. They stomp on the tail, lean back hard, and the board either rockets out from under them or the nose slams down instantly. The problem isn’t their balance; it’s their approach. You don’t pop a longboard into a manual. You ease it in.
This is where your foundational balance skills come into play. If you’re still wobbly just pushing and cruising, go drill that first. A manual multiplies any instability you already have.
The 3-Step Manual Technique (and the One Step Everyone Skips)
We’ll break this down step by step. Forget “lean back.” That’s the vague instruction that leads to bruised heels.
Step 1: Find Your Pivot Point
Your pivot point is the rear truck’s axle. Your back foot should be on the tail, with the ball of your foot just behind the rear hardware. Your front foot goes in the middle of the board, flat and ready. Before you move any weight, bend your knees. A low stance is a stable stance.
Now, without lifting the nose, press down slightly with your back foot’s ball. Feel the front trucks loosen their grip on the ground? That’s the pivot starting. If nothing happens, your foot might be too far forward. Slide it back an inch.
Common mistake: Stomping on the tail with your heel. This lifts the nose too fast and too high, putting your weight directly over the rear wheels, the most unstable position. You’ll loop out backwards every time.
Step 2: Shift Weight Over the Rear Truck
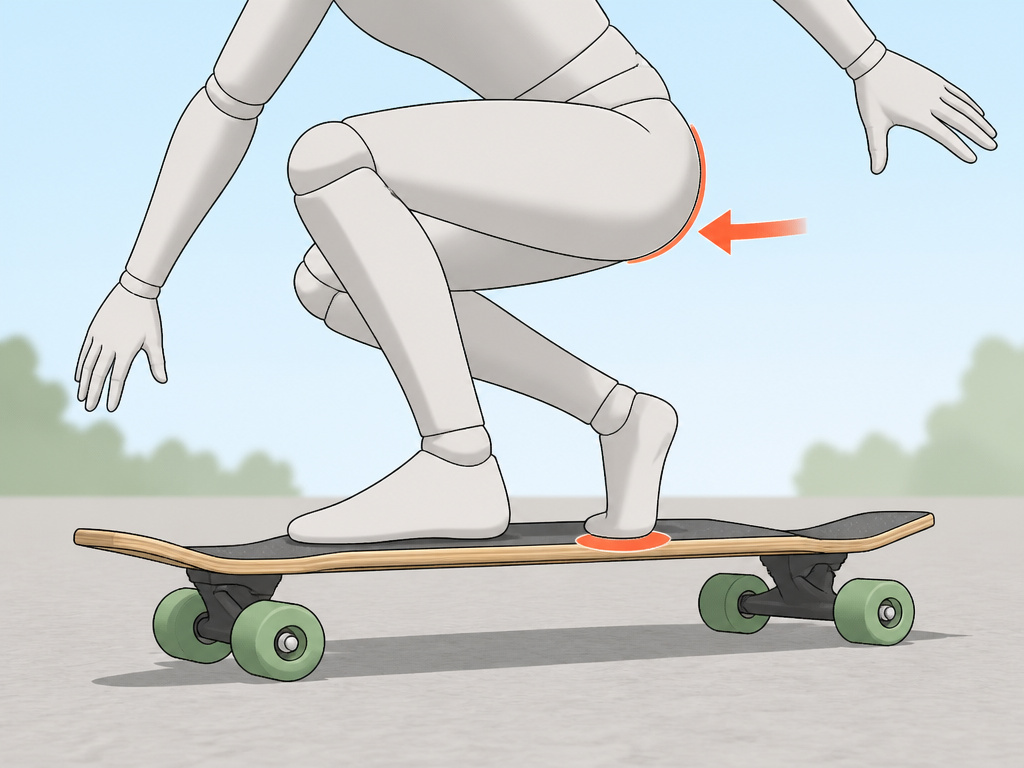
This is the critical shift. Don’t lean your upper body back. Instead, think about driving your hips backward while keeping your chest mostly over the board. The motion comes from your legs and core. As you shift, the nose will rise. Let it come up to a comfortable height, start with just an inch or two off the ground.
The goal is to feel the board balance on the rear wheels. You’ll feel a distinct “lock” when the weight is right. It’s a firm, balanced pressure on the ball of your back foot. If you feel yourself tipping backwards, you’ve gone too far.
Step 3: Modulate with Your Front Foot (The Skip)
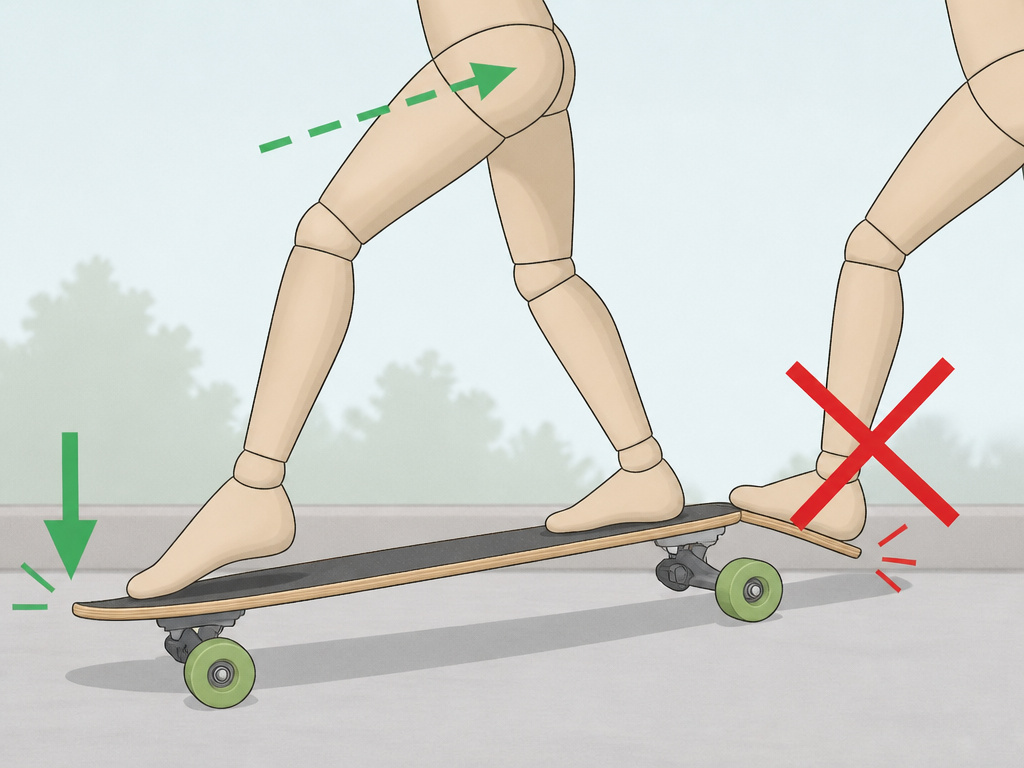
Here’s the step most tutorials omit. Once you’re balanced, you are not static. You are constantly correcting. Your front foot is your steering wheel and throttle. To lower the nose, press down gently with your front toes. To raise it, ease the pressure.
The real trick? Shift your hips forward the moment you feel the nose start to drop. Most people try to save a manual by pushing down harder with their back foot, which just makes the nose slam down faster. By moving your hips forward a fraction, you recenter your weight over the board and extend the hold. This is the “one-foot” feel Reddit users describe, your front foot does the fine-tuning, your back foot just provides the pivot.
| Step | Key Action | What Happens If You Skip It |
|---|---|---|
| 1. Pivot Point | Back foot’s ball behind rear truck | The board won’t pivot cleanly; you’ll rock back and forth without lifting the nose. |
| 2. Weight Shift | Hips back, chest forward | You’ll either not lift the nose or you’ll lean your upper body back and loop out instantly. |
| 3. Front-Foot Modulate | Use front toes to adjust angle; shift hips forward to recover | The manual lasts 1 second. The nose drops uncontrollably because you have no recovery mechanic. |
Nose Manuals: Often Easier on a Longboard
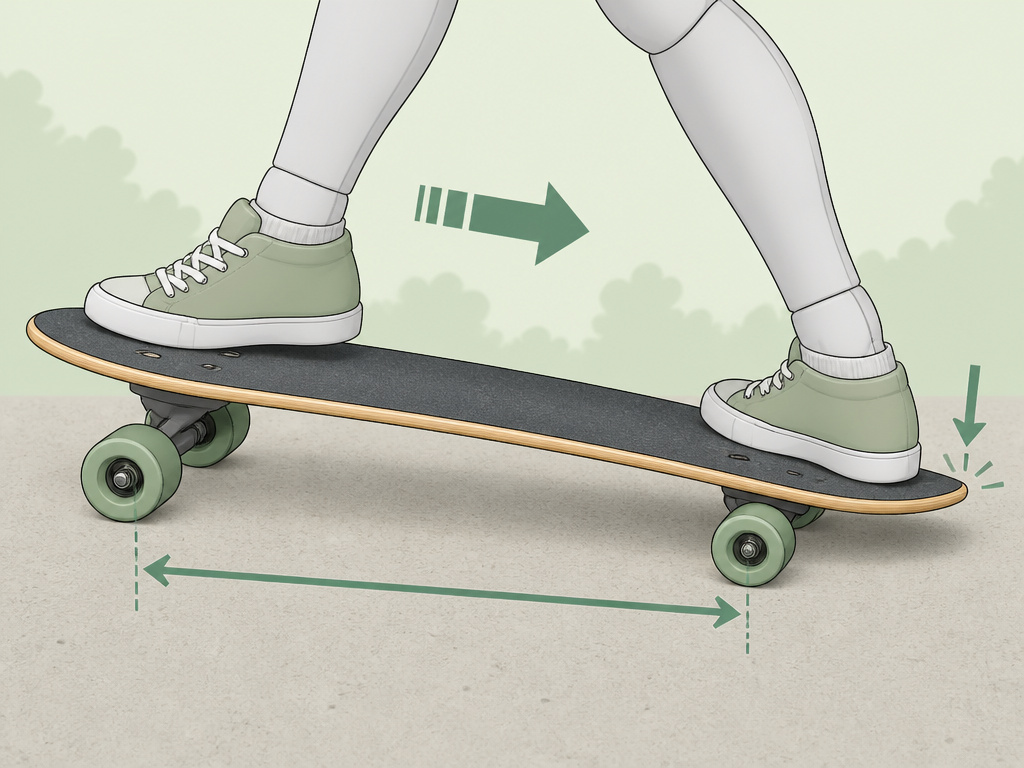
This sounds backwards, but for many longboarders, especially on boards with a kick tail, learning a nose manual first is simpler. Why? The tail acts as a physical stop. When you shift your weight too far forward, the tail touches down and saves you from a full forward fall. It’s a built-in training wheel.
The technique flips the script:
- Your front foot goes on the nose, ball of the foot near the front bolts.
- Your weight shifts forward over the front truck.
- Your back foot becomes the modulator, using gentle toe pressure to adjust.
Reddit riders note that adjusting your front foot angle so your toes face forward, “almost like stepping on a gas pedal,” gives you finer control. The principle is the same: find the balance point, then use your opposite foot to make tiny corrections. The longer wheelbase of a longboard makes this forward balance point less twitchy than on a short skateboard.
Drills to Build Your Manual Distance
Holding a manual for a city block doesn’t happen by accident. You build it with structured drills. Don’t just roll and hope; give each session a goal.
- Stationary Hold: On grass or carpet, find the balance point and hold it. Count seconds. Aim for progressively longer holds. This builds the muscle memory without the fear of rolling.
- The Cone Alley: Place two cones a short distance apart. Manual from one to the other. When you can do it consistently, move them farther apart. The concrete goal focuses your mind.
- Pump-Manual-Pump: Push to a slow speed, pop into a manual for two seconds, then put the nose down and push again. Link three of these in a row. This teaches you how to enter and exit the manual fluidly, which is how you’ll use it in real riding.
- Curb Transfer: Find a low, rounded curb. Approach slowly, pop into a manual just before the rear wheels hit the curb, ride the manual over the curb’s apex, and land. This advanced drill ties the manual to obstacle navigation, a key forum-requested topic.
The most important drill for learning how to do a manual on a longboard is the recovery drill. Deliberately take the nose too high, then practice the hip-shift forward to save it.
Protecting Your Deck from Razor Tail
You will scrape your tail. It’s part of learning. The question is whether you let it destroy your deck. Razor tail, where the tail wears down to a sharp, thin edge, weakens the deck’s structural integrity and makes popping any trick harder.
The solution is a tail plate, also called a skid plate. It’s a slab of hard plastic or rubber that screws onto the tail, taking the abrasion instead of your wood.
| Protection Method | Best For | Downside |
|---|---|---|
| Powell Peralta Tailbone | Dedicated practice, known brand quality | May require trimming with a Dremel if too large for your tail shape. |
| SK8 Kings Tail Plate | Custom shapes, variety of sizes | You must drill holes in your deck for installation. |
| MAXPRO Deck Guards | All-around edge and tail protection | Bulkier feel; can slightly change how the tail feels for foot placement. |
| DIY Cutting Board Plate | The budget option, highly customizable | Requires tools (jigsaw, drill) and time; finish may not be as clean. |
As one Reddit user put it, “Shredding your board is just a part of learning a new trick. The battle scars are a sign of love, labor, and commitment.” True, but a tail plate extends your board’s life by months. Slap one on before the wear gets past the top ply of wood.
If you’re already seeing damage, you can sand down the sharp edge to round it off. This shortens your tail slightly but restores a functional edge. It’s a stopgap; prevention is cheaper.
Troubleshooting: Why Your Manual Fails
Here are the common problems and how to fix them.
- The board shoots forward: You’re putting your weight too far back, behind the rear wheels. The board pivots around the wheels and launches. Fix: Keep your chest forward. Your shoulders should stay over or in front of the rear truck.
- The nose slams down immediately: You’re not committing your weight over the rear truck. You’re just lifting the nose with your foot, not shifting your mass. Fix: Practice the stationary hip-shift on grass. Feel the point where your body weight, not your foot strength, holds the board up.
- You wobble side-to-side: This is usually a stiff front leg or uneven foot pressure. Your front foot should be relaxed, knees bent. The wobble is the board seeking equilibrium under a rigid platform. Fix: Bend your knees more and let your ankles absorb the micro-adjustments.
- You can’t hold it for more than 2 seconds: You’re missing the modulation step. You’re finding the balance point and freezing. Fix: The recovery drill. Intentionally let the nose drop and practice the hip-shift save. This teaches the continuous correction a long manual requires.
Where this goes sideways: Practicing only on perfect, smooth concrete. When you finally try a manual on slightly rough pavement, the vibrations will wreck your balance. Mix in some practice on older asphalt or brick to build robust stability.
How to Use Manuals in Other Tricks
Once you can hold a steady manual, you can start incorporating it into other tricks and lines. The key is to think of the manual as a linking move, a way to add style and flow between obstacles or turns. For example, you can drop into a manual after a small hill or carve, using the momentum to carry you through the balance point. It’s easier to lock into a nose manual when you’re going at a moderate speed, which also applies to using manuals in combinations. Adjusting the angle of your front foot and bending your knees more gives you the control needed to transition out of the manual into another move, like a pivot or a simple step-off.
Frequently Asked Questions
How is a longboard manual different from a skateboard manual?
The main difference is the approach and control window. A skateboard manual is often popped into with a quick tail strike, relying on a short wheelbase for quick locks. A longboard manual is rolled into, using a smooth weight shift over a longer wheelbase, which allows for slower, more deliberate corrections. The longboard version is less about a sudden “click” and more about finding and riding a sweet spot.
Should I learn manuals on a moving or stationary longboard?
Start stationary on a soft surface (grass) to find the balance point without fear of falling. Once you can hold it for 10 seconds stationary, immediately switch to a slow rolling manual. A brisk walking pace is ideal; the forward momentum adds gyroscopic stability that actually makes balancing easier than when static.
What longboard is best for learning manuals?
Look for a medium-stiff deck (little to no flex) with a moderate wheelbase. A board that’s too flexy will bounce and destabilize you. A kick tail is helpful but not mandatory; it gives you a clearer pivot point and makes nose manuals a viable learning path. Avoid ultra-low drop-through boards for learning, as they can make finding the pivot point awkward.
How do I prevent my longboard from getting razor tail?
Install a tail plate before you start serious practice. Brands like Powell Peralta and SK8 Kings make reliable ones. If you’re against drilling into your deck, use a thick, clear grip tape patch on the tail or consider a sacrificial deck for learning. Once the wood is worn past the first ply, sanding it round is your only fix before replacement.
Can I use a manual to get over obstacles?
Yes. This is called a manual pad or “manny” over an obstacle. The technique involves approaching the obstacle (like a speed bump or curb) at a steady speed, popping into the manual just before the rear wheels hit it, holding the manual as the wheels roll over the apex, and then landing. It requires a very stable manual, so master the flat-ground hold first.
Before You Go
One threshold changes everything: if you can’t hold a manual for a solid period while rolling at a slow speed, you’re not ready for the next step. Don’t rush into linking manuals or trying them over obstacles. That 5-second mark is where the balance moves from conscious effort to something your muscles start to remember. Drill that first.
Your first step this week isn’t to manual farther. It’s to stand on your board, stationary, and find that hip-shift motion until you can lift and lower the nose ten times in a row without putting a foot down. That muscle memory is the foundation every other step builds on.
The most common concession? This all assumes a standard, symmetrical longboard. If you’re riding a pintail with no tail kick or a drop-through dancer board, the pivot point is less defined and the learning curve is steeper. In that case, focus even more on the precise foot placement over the rear truck, it’s your only reference point. The fundamentals still work, but they demand more precision.
