As an Amazon Associate we earn from qualifying purchases.
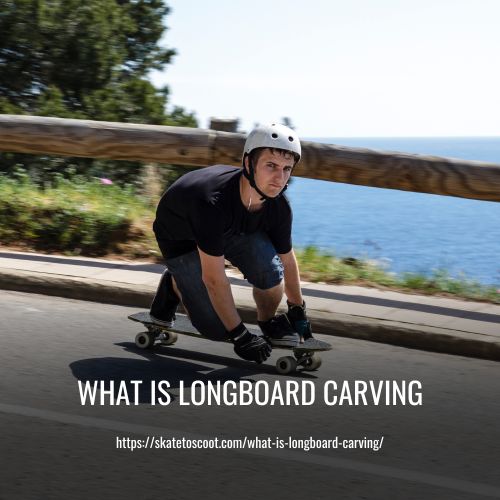
Longboard carving is a technique used in longboarding, a type of skateboarding where riders use longer boards for cruising and carving. Carving refers to the act of making flowing turns by shifting body weight and using the flex of the board to initiate and maintain turns.
To master longboard carving, it is important to have a proper stance, with feet positioned diagonally on the board and weight centered over the front foot. Balancing body weight, leaning into turns, and pivoting the hips will help initiate turns smoothly.
How To Do Basic Carving On A Longboard
Carving on a longboard is all about creating smooth, flowing turns on the pavement. To master this technique, follow these steps:
- Start with the right setup: Use a longboard designed for carving. Look for a board with a flexy feel and medium length. Choose larger, soft wheels to maintain grip and avoid wheel bite.
- Find your stance: Stand with your feet shoulder-width apart, with your dominant foot slightly further back. This is your regular stance if you use your left foot at the front.
- Body positioning and weight transfer: Bend your knees slightly and engage your core for stability. Begin by pushing with your toes to initiate a turn in the desired direction. Gradually transfer your weight to your heels, allowing the board to tilt and the wheels to turn.
- Use your upper body: As you shift your weight, twist your upper body slightly in the direction of your turn. This will enhance your balance and control.
- Practice with patience: Carving on a longboard requires consistent practice. Start with gentle turns and gradually increase speed and intensity as you gain confidence.
- Safety first: Always wear protective gear, including a helmet, knee pads, and elbow pads. Maintain control and keep the speed in check, especially when downhill skateboarding.
Remember, carving is a technical skill that improves with regular practice. With time and perseverance, you’ll develop the ability to effortlessly carve deep turns and enjoy a thrilling riding experience on your longboard.
Toe-Side And Heel-Side Carving Turns
When carving on a longboard, there are two types of turns you can make: toe-side turns and heel-side turns. The direction of your turn depends on your stance. If you are a regular rider with your left foot in front, pushing your toes into the rail will initiate a toe-side turn, turning your longboard to the right. On the other hand, leaning back on your heel will initiate a heel-side turn, turning your longboard to the left.
For goofy riders with their right foot forward, the directions of the turns are reversed. Pushing your toe onto the rail will initiate a toe-side turn, turning the longboard to the left. Turning your heel will initiate a heel-side turn, turning the longboard to the right.
Weight Transfer: Smooth Carving Motion
When carving on your longboard, achieving a smooth carving motion requires a proper weight transfer technique. Instead of just using your toes and heels, it is important to engage your entire body and create a wave-like movement from your head to your legs.
Many beginners make the mistake of only using their ankles and relying on pushing into the board with their toes and heels. On the other hand, experienced snowboarders may focus too much on their shoulders and forget about their feet, as they are used to riding with bindings.
To execute efficient and powerful turns on your longboard, you need to find balance and coordination between your head, shoulders, hips, and legs. This smooth transition between toe and heel positions will allow you to generate energy and maintain the flow of your carve.
How to simply Carving On A Longboard:
Carving on a longboard is relatively easy. All you need is the right balance and coordination to execute powerful and efficient turns. Here are some simple steps to help you get started:
Make Sure Your Longboard Is Set
When it comes to carving on a longboard or skateboard, it’s important to make sure your longboard is set up properly. This will ensure a smooth and enjoyable riding experience while also maximizing your carving abilities.
First and foremost, check that your longboard is in good working condition. Pay attention to the following:
- Make sure the wheels are secured properly and spin freely. Loose or wobbly wheels can affect your carving technique and stability.
- Check that the trucks are set to medium tightness. This will provide a good balance between grip and maneuverability.
- Inspect the deck for any cracks or damage. A cracked or broken deck can be dangerous and compromise your ability to carve effectively.
Using a longboard is ideal for carving due to the range of motion in the trucks and the grip of the larger wheels.
Learn The Difference Between Toeside & Heelside
Toeside and heelside are terms used in longboarding to describe the positioning of your feet on the board. It’s important for riders to understand the difference between the two to enhance their carving abilities and overall riding experience.
For regular riders, the toeside refers to the side where their toes will be located on the board, which is their right foot. Conversely, the heelside for regular riders is the left side, where their heels will be positioned. On the other hand, goofy riders have their toeside on the left and their heelside on the right.
Understanding the difference between toeside and heelside is crucial for proper body positioning and weight distribution while carving. When initiating a carve or turn, riders need to shift their weight and adjust their body movement accordingly. This helps them maintain balance and control over the board, especially during downhill skateboarding or when maintaining speed in check.
Take An Active Stance
When it comes to carving on your longboard, one of the key factors is to take an active stance. This means bending both of your knees while riding. By doing so, you are able to have a more flexible feel of the board and make necessary adjustments to your position and weight distribution when initiating a carve.
Taking an active stance is crucial because it allows you to have better control and balance while carving. If you fail to do so, carving may feel unnatural and become more challenging to learn. By bending your knees, you become more connected with your longboard and can effectively execute carving techniques.
Whether you are a regular rider or a goofy rider, taking an active stance is an essential skill for carving. It helps you maintain stability and maximize the benefits of body positioning and weight shifting.
Start With Turning
Before you can start carving on your longboard, it is important to first learn how to turn. Turning your longboard is as simple as leaning and shifting your weight in the direction you want to go. To begin, maintain an active stance with your knees bent and your body connected to the board.
Start by practicing turning to the left or right, focusing on one direction at a time. You may find that one direction feels easier than the other, which is common for beginners. Spend some time getting comfortable with turning in both directions before progressing to more advanced maneuvers.
Remember to keep your movements fluid and controlled as you turn. The harder you lean and shift your weight, the sharper the turn will be. This will allow you to gradually build up your carving abilities.
Once you feel confident with basic turning, you can begin incorporating carving techniques into your rides. Carving involves a combination of body positioning, weight shifting, and technique. It is an essential skill for riders of all styles, whether you prefer freestyle riding or downhill racing.
Start Carving!
Start carving on your longboard by practicing turning fluidly from left to right or right to left. Begin on a flat surface to get comfortable with the motion before progressing to more advanced maneuvers. Apply pressure to your toeside (leaning forward) for one turn and heelside (leaning back) for the next, or vice versa, depending on your preference.
It’s common to feel more at ease turning one way than the other, but in order to truly carve, it’s important to master both directions. Carving involves using your body weight and technique to make fluid turns. The more pressure and weight you put into your turns, the sharper your carving will be.
This skill is essential for all riding styles, whether you prefer freestyle or downhill racing. With consistent practice and patience, you’ll be able to carve smoothly and confidently on your longboard.
A Quick Recap
Carving is a fundamental skill in longboarding that allows riders to navigate turns and curves with fluidity and control. It takes time and practice to master, but it is an essential skill for any regular rider looking to enhance their riding experience. Carving involves using a combination of specific techniques and body positioning to shift the weight and control the longboard while riding. The rider’s left foot is typically used for foot braking, which helps maintain speed control during turns.
The key to effective carving lies in the rider’s ability to find a balance between their body weight and the board’s movements. This balance allows for smooth and precise turns, making carving an excellent choice for various riding styles, including freestyle riding and downhill skateboarding. To improve carving abilities, consistent practice is essential. Beginner riders can start by finding a large, open road or a smooth, flat surface to skate on. Gradually challenge oneself and push boundaries to improve.
It is important to note that carving can be different for each rider, depending on their personal style and preferences. Some riders prefer deep carves and aggressive turns, while others may opt for more fluid and mellow movements.
Advanced Carving Maneuvers and Tricks
Once you have mastered the basics of carving on a longboard, you can start exploring more advanced maneuvers and tricks to enhance your riding experience. Here are a few advanced carving techniques to consider:
- Cross-Step Carving: This involves shifting your feet and crossing them over the board while carving. Cross-step carving adds style and complexity to your turns, allowing for tighter and more dynamic arcs.
- Pumping: Pumping is a technique that utilizes your body’s motion to generate speed and maintain momentum without pushing. By using your legs and body weight, you can create a pumping motion that transfers energy from the board’s flex and generates forward propulsion.
- Nose and Tail Carves: Experiment with shifting your weight to the nose or tail of the board during a carve. This technique allows you to pivot the board around the front or back wheels, enabling sharper turns and creative lines.
- Carving Switch: Once you feel confident in your regular stance carving, challenge yourself to carve while riding the switch (opposite stance). Switch carving requires additional coordination and balance but can greatly enhance your overall longboarding skills.
Remember, advanced carving maneuvers and tricks require consistent practice, patience, and the use of appropriate safety gear. Embrace the freedom of carving through the streets or on your favorite downhill runs and enjoy the evolution of your longboarding experience.
Safety and Maintenance Tips for Longboard Carving
Safety should always be a top priority when engaging in longboard carving. It requires skill, control, and proper technique to ensure a thrilling yet safe experience. Here are some important safety and maintenance tips to keep in mind:
- Wear Proper Protective Gear: Investing in high-quality protective gear is essential for your safety. Always wear a certified skateboard or longboard helmet that fits properly and has a secure chin strap. Additionally, wear elbow pads, knee pads, wrist guards, and slide gloves to cushion potential falls and protect vulnerable areas.
- Maintain Your Longboard: Regularly check your longboard for any signs of wear and tear. Ensure that all the components, such as wheels, trucks, and bearings, are in good condition. Replace any worn-out parts promptly to avoid accidents due to malfunctioning equipment.
- Practice with Patience: Carving requires consistent practice to develop the necessary skills and techniques. Start by mastering basic carving techniques before progressing to more advanced moves. Be patient with yourself and gradually build your skills over time.
- Find the Right Riding Style: Experiment with different riding styles that suit your preferences and abilities. Whether you prefer deep carves, freestyle riding, or downhill racing, find the style that gives you the most enjoyment while maintaining control and safety.
- Ride Responsibly: Always exercise caution when carving and be aware of your surroundings. Observe traffic rules, yield to pedestrians, and avoid high-traffic areas. By being responsible and respectful, you can ensure a safe and enjoyable carving experience for yourself and those around you.
By following these safety and maintenance tips, you can enhance your longboard carving experience while prioritizing your safety. Remember to always wear proper protective gear, maintain your equipment, and ride responsibly. Happy carving!
FAQs
Longboard carving involves making smooth and controlled turns while riding, creating fluid movements resembling surfing or snowboarding on pavement. It’s a fundamental skill that involves leaning into turns to generate momentum and maintain speed.
To master carving, start by adjusting your stance for stability, bend your knees, and practice shifting your weight from heel to toe while leaning into turns. Engage your body, use your arms for balance, and gradually increase speed while maintaining control.
Longboards with a flexible deck, wider trucks, and softer wheels are ideal for carving. Look for a board that provides stability, maneuverability, and a comfortable flex that allows you to lean into turns smoothly.
Practice wide, sweeping turns to get comfortable with the motion. Experiment with your body positioning by shifting weight and leaning into turns gradually. Try figure-eight patterns or riding in S-shaped curves to refine your carving technique.
Carving involves making flowing, continuous turns while maintaining speed and control. It differs from sharper maneuvers like sliding or pumping, as those focus more on quick, abrupt movements or generating speed through specific techniques.
Foot placement plays a crucial role in carving. Position your front foot angled slightly forward toward the nose of the board while keeping the back foot near the tail for stability. Experiment with slight adjustments to find what feels most comfortable and responsive for your carving style.
Conclusion:
Longboard carving is not just a sport or a hobby, it’s a lifestyle. It’s a way to connect with nature, feel the wind in your hair, and experience the freedom of the open road. So grab your longboard, hit the pavement, and let the carving begin.
Whether you’re a beginner or a seasoned pro, the carving is a thrilling and exhilarating adventure that will keep you coming back for more. So get out there and carve your way to a life full of excitement and joy!
Amazon and the Amazon logo are trademarks of Amazon.com, Inc, or its affiliates.