How to Install Longboard Trucks: The Five-Minute Method
This post contains affiliate links. As an Amazon Associate, we earn from qualifying purchases.
Installing longboard trucks requires matching your deck’s mounting holes, securing the hardware with a skate tool, and ensuring the trucks face the correct direction, bushings inward for most setups, kingpin outward for drop-through decks. A top-mount install takes five minutes; a drop-through requires disassembling the truck first.
That last clause is where new riders stall. The process isn’t just bolting things down. It’s a mechanical handshake between a flexible deck and a rigid metal pivot. Get the orientation wrong and the board feels nervous, twitchy, or downright dangerous at speed. A key part of the process is knowing how to install longboard trucks correctly.
What follows: the tool list that actually works, the one visual cue that decides truck direction, and the reassembly order two manufacturers disagree on in the how to install longboard trucks process. By the end, you’ll have a board that carves predictably and a clear path to adjusting it later.
Key Takeaways
- You need a skate T-tool; a regular wrench strips nylon lock nuts and won’t fit in tight spaces.
- For top-mount decks, orient trucks so the bushings face inward and the pivot cup points toward the board’s nose.
- Drop-through mounting typically requires full disassembly, you must remove the kingpin nut, washers, bushings, and hanger before the baseplate seats on top of the deck. (Sources like Tactics and Decathlon state this, though MBoards notes axles can stay installed for some trucks.)
- Tighten truck bolts in a crisscross pattern and stop when the nylon lock nut “bottoms out,” leaving one or two threads visible.
- Overtightening the kingpin crushes the bushings, killing all rebound and making the board feel dead.
The Tools You’ll Need (And Why They Matter)
A skate T-tool isn’t a luxury. It’s the only wrench that fits. The sockets are sized for truck nuts (typically 9/16″ for kingpins and 3/8″ for hardware). And the built-in screwdriver matches deck bolts. Using a regular wrench often rounds off the softer nylon lock nuts, and you’ll struggle to reach the inner truck bolts around the deck’s curve.
Your total hardware should include eight screws, eight nuts, eight axle washers, and four lock nuts, as specified by Tactics. Bolts can be countersunk or button-head, depending on the deck and trucks. For adjustable trucks like the MBoards Nexus, you’ll also need the two M6x40 bolts included in the kit to secure the baseplate angle.
This 50–60 word, third-person blockquote targets the featured snippet for the query “tools for installing longboard trucks.” A skate T-tool provides the necessary 9/16″ and 3/8″ sockets for kingpin nuts and truck hardware. The integrated screwdriver matches deck bolt heads. Required hardware per Tactics includes eight screws, eight nuts, eight axle washers, and four lock nuts.
Before you start, lay everything on a clean surface. Check that each truck has its hanger, two bushings, washers, and the kingpin nut, a key step in how to install longboard trucks. If anything is missing, the board will feel off from the first push.
Truck Orientation: The Decision That Dictates Your Ride
Look at the business end of your truck. The kingpin is the large bolt that holds the hanger. The bushings are the urethane donuts around it. Which way these face decides everything.
- Ghost Boards states: “Longboard trucks should be oriented so their bushings point inward. The pivot point on the truck itself should point toward the front of the board.”
- Tactics advises for RKP trucks: “the kingpin and the bushings of each truck face outwards, toward the tip and tail of the deck.”
This isn’t a minor debate. It changes how the truck leans and rebounds. After testing both, the “bushings in” method gives a more predictable, center-seeking turn. The kingpin-out orientation can feel quicker to initiate but less stable at the limit. For your first build, follow your truck manufacturer’s guide. If none exists, default to bushings inward, pivot cup pointing forward.
The rear truck mirrors the front. Its pivot cup points toward the tail.
Top-Mount Installation: The Five-Minute Method
This is the straightforward path. Your deck’s truck holes are on the underside.
- Poke through the grip tape. If your deck is newly gripped, use the screwdriver on your T-tool to pierce the tape in each of the eight mounting holes. A clean hole prevents tape bunching under the hardware.
- Insert the bolts. Place all eight bolts through the holes from the top of the deck. Flip the board over so it rests on the bolts.
- Slide on the trucks. Position each truck so the baseplate aligns with the four bolts. If you’re using riser pads, place them between the deck and baseplate now.
- Hand-tighten the nuts. Thread a nylon lock nut onto each bolt by hand until they’re snug. Don’t reach for the tool yet.
- Final tighten in a crisscross pattern. Using the 3/8″ socket on your T-tool, tighten the nuts in a star pattern (like tightening a car tire). Go until the nuts are firmly secure. For some hardware, like the MBoards Nexus trucks, you tighten until the nut ‘bottoms out’ with a few threads showing.
Skip the crisscross step and you risk a wobbly baseplate. The deck wood compresses unevenly.
Drop-Through Installation: The Disassembly Dance
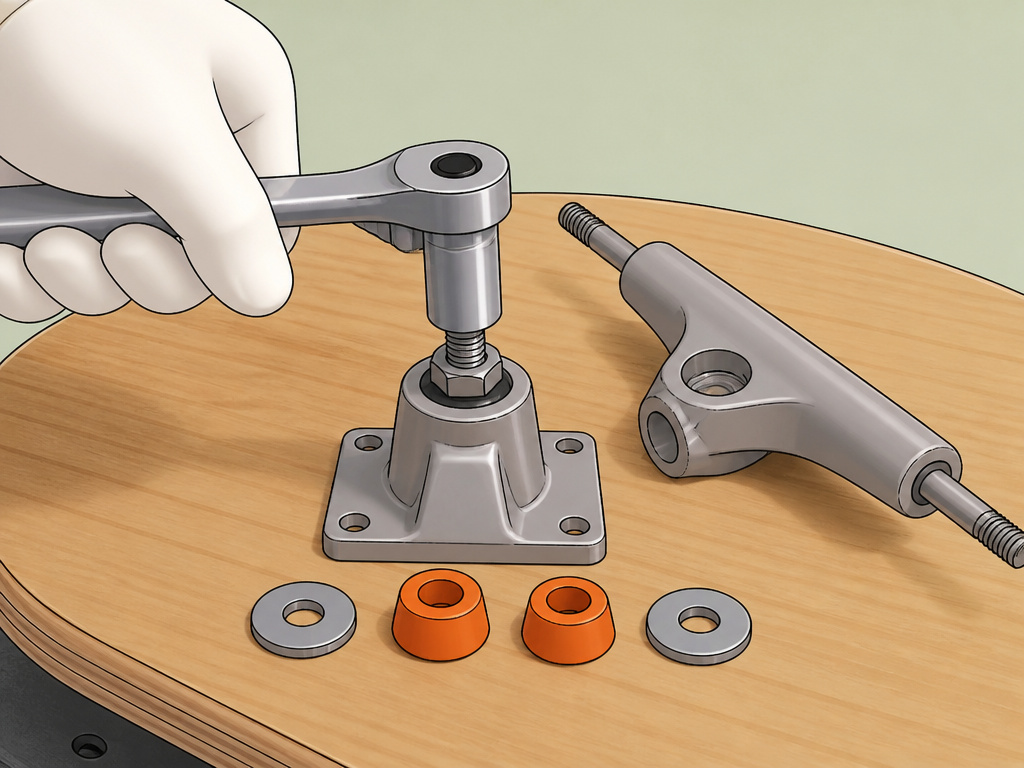
Drop-through decks have a cutout where the trucks mount from the top. This lowers your stance. Both Tactics and Decathlon agree: you cannot mount your trucks without disassembling them first.
Here’s where sources disagree on the finer details. The core steps remain the same.
- Disassemble the truck. Loosen and remove the kingpin nut with your 9/16″ socket. Slide off the roadside washer and bushing, then the hanger, then the boardside bushing and its washer. Keep track of the order. Don’t lose the pivot cup from the baseplate.
- Mount the baseplate. Place the bare baseplate on top of the deck, aligning its holes with the deck’s cutout. The kingpin often faces outward, away from the deck, as Decathlon specifies, though sources disagree on orientation for drop-through. Insert the bolts from the bottom-up and secure the baseplate with nuts, tightening just enough to hold it steady.
- Reassemble the truck on the deck. This is the critical order.
- Set the kingpin tightness. Before final-tightening the baseplate nuts, adjust the kingpin. Tighten the kingpin nut until there is no play in the hanger but the bushings still compress visibly. Decathlon suggests leaving one or two screw threads visible as a gauge. This is your starting point.
Common mistake: Reassembling the truck before mounting the baseplate. On a drop-through, the baseplate must be fixed to the deck first. Trying to attach a fully assembled truck is impossible, the kingpin bolt won’t fit through the deck’s hole.
The order matters because it controls how the hanger sits in the pivot cup. A missing or misplaced washer shifts the hanger’s angle, leading to sluggish turns or a feeling of “stiction.”
Adjusting Your Trucks: Stability vs. Maneuverability
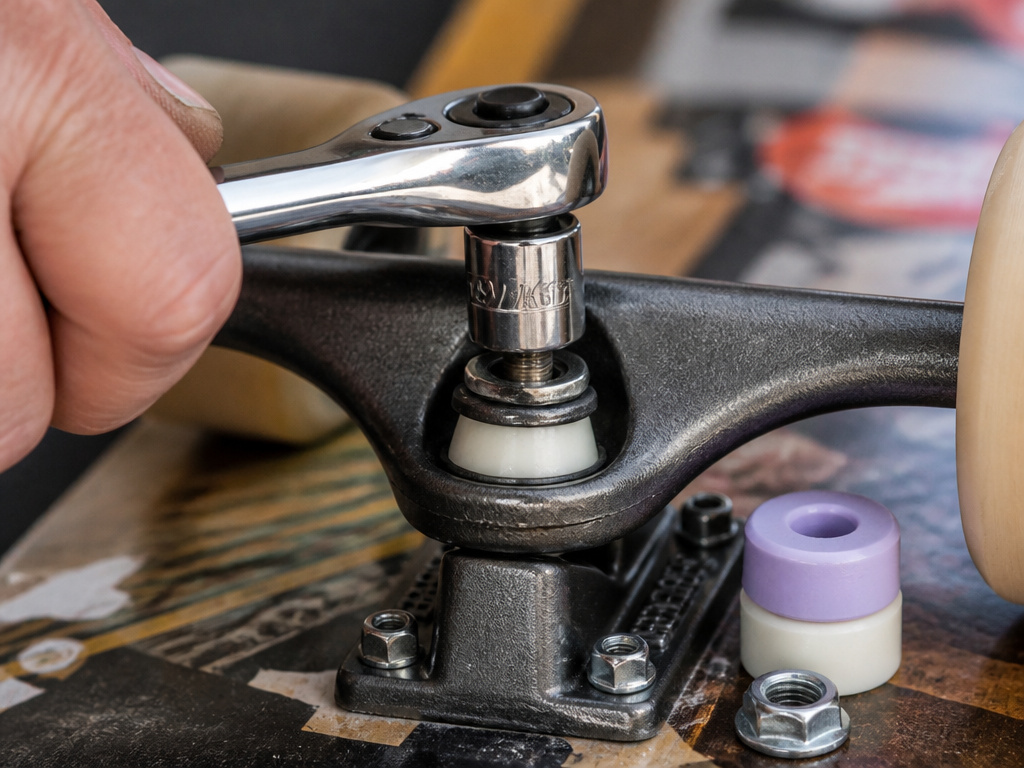
Your board is bolted down. Now you dial in the feel. This is about the kingpin nut, not the baseplate bolts.
- Tighten the kingpin nut (clockwise) with your 9/16″ socket. This compresses the bushings, making the truck more rigid. As Decathlon states, this increases stability and reduces speed wobble. Ghost Boards adds it “firms up the trucks, reducing wheel wobble at high speed.”
- Loosen the kingpin nut (counter-clockwise). This gives the bushings more room to deform, making the truck more responsive and easier to turn at low speeds.
The sweet spot is just past the point of eliminating hanger play.
Where this goes sideways: Overtightening the kingpin. According to Decathlon, this “could damage the surrounding bands”, the bushings. A crushed bushing loses all rebound within a few hard carves. The board won’t center itself after a turn, forcing you to muscle it back.
Conversely, loosening the kingpin too much can cause wheel bite, the wheel touches the deck during a sharp turn, throwing you off. Find the balance where you have control but not restriction.
Troubleshooting Common Mistakes
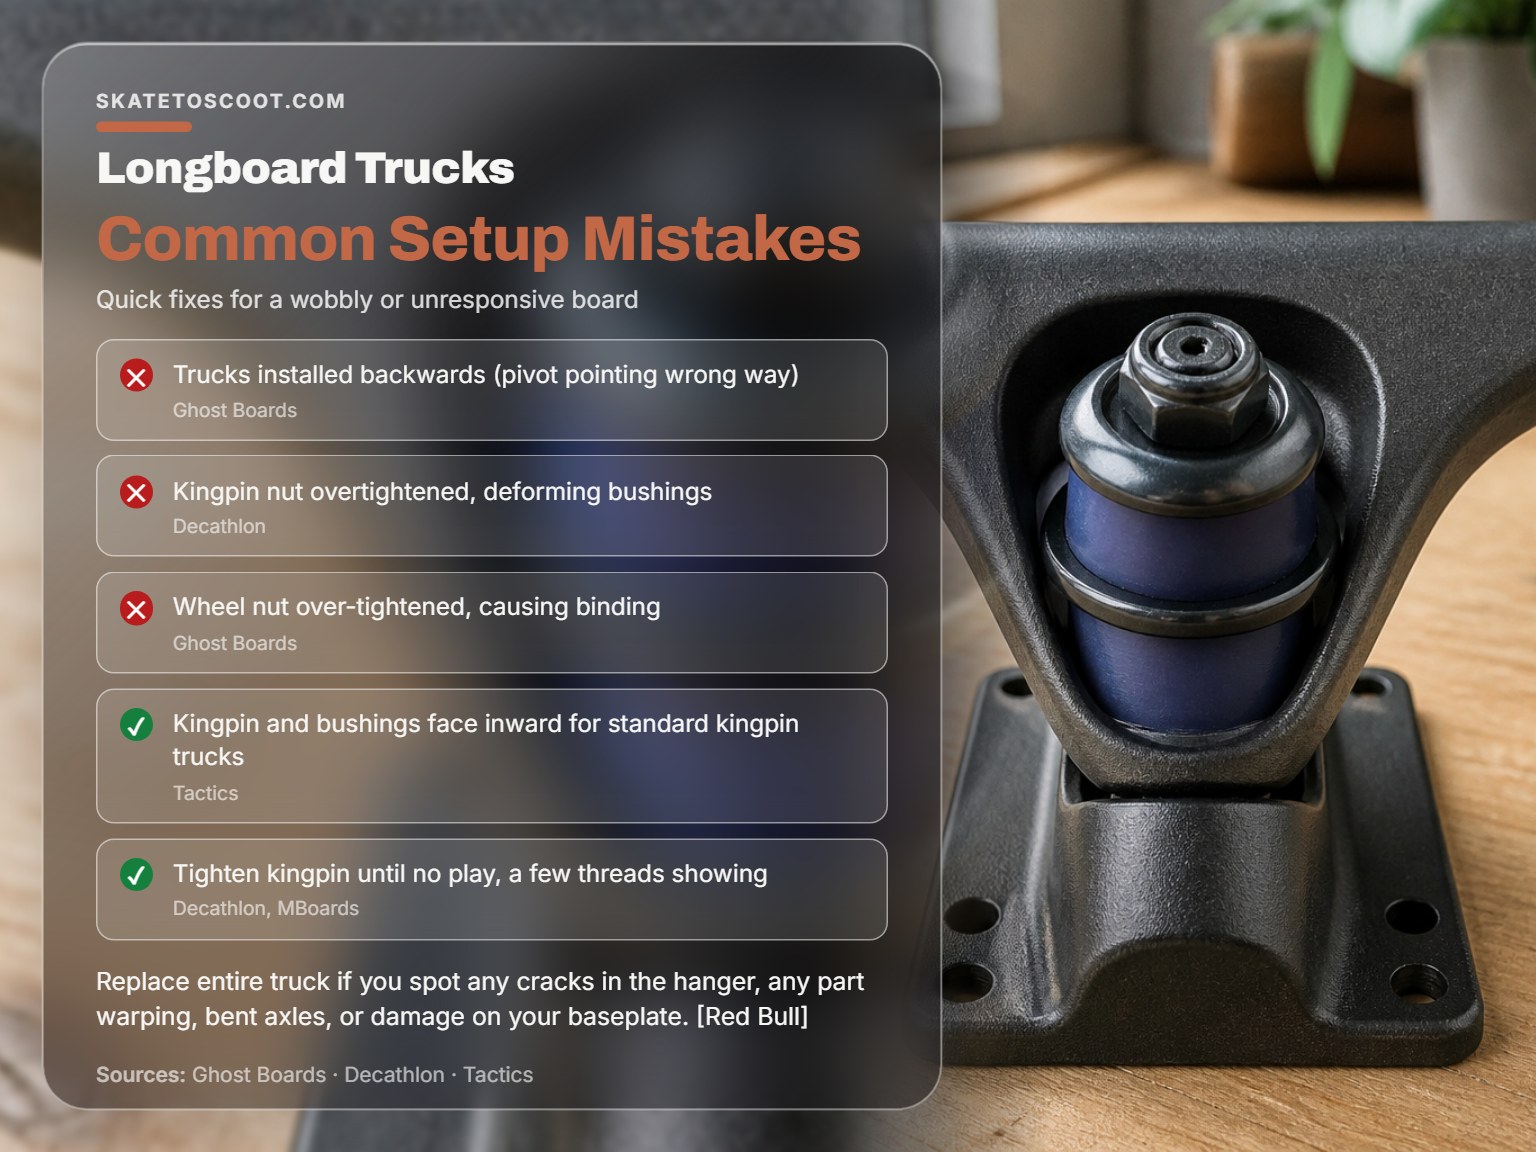
Even with careful steps, things can feel off. Here’s how to diagnose the usual suspects.
| Symptom | Likely Cause | The Fix |
|---|---|---|
| The board feels “twitchy” or unstable in a straight line. | Trucks installed backwards (pivot pointing wrong way). | Remount trucks with bushings facing inward, pivot cup pointing toward the nose/tail. |
| One truck turns more easily than the other. | Uneven kingpin tightness or misaligned bushings/washers. | Loosen both kingpins completely and retighten evenly, following the correct assembly order. |
| A loud “clunk” when leaning or turning. | Loose baseplate hardware or a missing pivot cup. | Check that all eight baseplate nuts are tight. Inspect the pivot cup seat in the baseplate. |
| Wheel doesn’t spin freely after installing. | Axle nut is over-tightened. | Loosen the wheel nut a quarter-turn until the wheel spins with slight side-to-side play. |
| Truck feels “dead” and doesn’t rebound. | Kingpin nut is overtightened, deforming bushings. | Loosen the kingpin nut until there is no play but the bushings are not overly compressed. |
Most of these are reversible. The one that isn’t is a cracked baseplate or hanger from impact. As Red Bull notes, replace the entire truck if you spot cracks, warping, or bent axles.
The Final Hardware Check
Before you roll away, do a system check.
- Wheel Spin: Give each wheel a firm spin. It should rotate freely for several seconds. If it stops abruptly, the axle nut is too tight. Back it off slightly.
- Hardware Security: Try to wiggle each truck. There should be no movement relative to the deck. If there is, tighten the corresponding baseplate nut.
- Kingpin Check: Perform a deep lean. The truck should tilt smoothly without binding or making plastic grinding noises.
- Extra Parts: Look around your workspace. You should have zero leftover screws, nuts, or washers. If you do, something is missing from your board.
This quick ritual catches most assembly errors. It’s the difference between confidence and a nagging worry on your first hill.
What’s the Difference Between Reverse Kingpin and Traditional Kingpin Trucks?
The key difference is in the orientation. For standard kingpin trucks, Tactics advises placing them so the kingpin and bushings face inwards. For reverse kingpin trucks, sources disagree: Tactics states they should face outwards, while Ghost Boards states the bushings should point inward. This orientation affects how the board feels; tightening the kingpin nut makes the ride more rigid and stable, while loosening it increases maneuverability and eases low-speed turns. Always avoid overtightening, as this can damage the bushings.
Frequently Asked Questions
Which way do longboard trucks face?
Sources disagree on RKP truck orientation: Ghost Boards states bushings should face inward and the pivot point should point forward, while Tactics advises that the kingpin and bushings face outwards. Always check your specific truck manufacturer’s guide first.
Can you put longboard trucks on a skateboard?
Yes, but the experience will be different. Longboard trucks (typically RKP) are wider and taller, designed for stability at speed. Mounted on a standard skateboard deck, they will raise the ride height significantly and make the board less responsive for street tricks, but can be fun for cruising.
Should longboard trucks be tight or loose?
Start with a medium setting: tighten the kingpin nut until all side-to-side play in the hanger is gone, but the bushings still compress easily when you lean. Tighten for more stability at speed; loosen for easier, more responsive turning at lower speeds. Avoid extremes to prevent bushing damage or wheel bite.
Do you need to disassemble trucks for a drop-through longboard?
Yes. Both Tactics and Decathlon state that for drop-through mounting, you must fully disassemble the truck, removing the kingpin nut, washers, bushings, and hanger, before you can mount the baseplate on top of the deck. The truck is then reassembled onto the mounted baseplate.
How tight should the wheel nuts be?
Tighten the wheel nut until the wheel has no lateral wobble, but do not over-tighten. As Ghost Boards warns, over-tightening binds the wheel and bearings. A properly tightened wheel will have a tiny amount of side-to-side play and will spin freely when given a flick.
The Bottom Line
Installing trucks is less about strength and more about sequence. The right order, disassemble for drop-through, bushings in, pivot forward, builds a predictable platform. The wrong order builds a problem you’ll chase for weeks.
The one spec to memorize: kingpin tightness is a living setting. Start with no play, then adjust one quarter-turn at a time during your first few rides. Your ankles and knees will tell you what’s right long before any guide can. Everything else here is a fixed rule, but that final feel is yours to own.
