How to Measure Longboard Wheels: Step-by-Step
This post contains affiliate links. As an Amazon Associate, we earn from qualifying purchases.
To measure longboard wheels, you need their diameter in millimeters, width, and durometer (hardness). Use a ruler or digital caliper across the wheel’s face for diameter, measure the side for width, and find the durometer number stamped on the side. Most wheels fall between 65–75mm in diameter and 78a–80a in hardness.
That diameter number is the single most important spec on your setup. Get it wrong, and you’re either crawling over cracks or grinding your deck to a stop on every turn. The width and hardness decide everything else, grip, slide, speed, and how long the wheel lasts before it cones out. Understanding how to measure longboard wheels is therefore essential.
What follows is a field guide, not a textbook. You’ll get the step-by-step on pulling measurements with a ruler, a caliper, or just your eyes if the stamp is still there, which is the core of how to measure longboard wheels. Then we’ll break down what those numbers actually mean for pushing, sliding, and not eating pavement. By the end, you’ll be able to read any wheel like a spec sheet and know exactly what it’ll do under your feet.
Key Takeaways
- Measure wheel diameter across the face, not the side, using a ruler or caliper for accuracy within 1-2mm.
- Check for wheelbite clearance before buying new wheels; ensure you have sufficient deck gap for your chosen wheel diameter.
- Softer wheels (78a–80a) grip better on rough ground but wear faster; harder wheels (83a+) slide easier and last longer.
- Rotate your wheels every 2–3 weeks of regular riding to prevent uneven wear and coning.
- A wheel’s urethane formula matters as much as its durometer rating for slide feel and durability.
The Tools You Actually Need (And One You Don’t)
You can measure a wheel with a $5 ruler from a hardware store, which is the most accessible tool for how to measure longboard wheels. A digital caliper is more precise, but for choosing wheels or checking wear, a ruler’s 1-2mm margin is fine. What you don’t need is a fancy durometer tester, the hardness number is almost always stamped on the wheel’s side.
A clean, flat surface helps. So does good light, especially if you’re hunting for faded size stamps. If the wheel is still on your board, you’ll need a skate tool or a wrench to loosen the axle nut. That’s it.
Before you start: If you’re removing wheels, support the truck hangar with your hand while loosening the axle nut. Letting the truck dangle strains the axle and can strip the threads over time. A loose wheel is easier to measure, but you can get diameter with it mounted if you’re careful.
I keep a 6-inch metal ruler in my gear bag. The caliper lives on my workbench for when I’m comparing new sets or documenting wear. For a quick check at the park, the ruler wins every time.
How to Measure Wheel Diameter with a Ruler
This is the number that decides speed and clearance. The wrong diameter leads to wheelbite, where the wheel grabs the deck mid-turn and throws you.
First, find the wheel’s rolling surface, the smooth, flat band that touches the ground. Don’t measure the total width including the lips; you want the distance straight across the center of this riding surface. If the wheel is off the board, place it flat on a table. Line up your ruler’s zero mark with one edge of the riding surface. Stretch it straight across to the opposite edge.
Read the millimeter marking. Most longboard wheels sit between 65mm and 75mm, with 70mm being the most common size according to retailer Tactics. If you’re between marks, round to the nearest millimeter. A 69.5mm wheel is effectively a 70mm wheel.
If the wheel is mounted, the process is similar but trickier. Hold the ruler perpendicular to the axle, not angled. Press the ruler’s end against the bottom of the wheel’s riding surface. Have a friend read the mark at the top, or take a photo and zoom in. The error here is usually plus or minus 2mm, which is enough to matter for tight clearances.
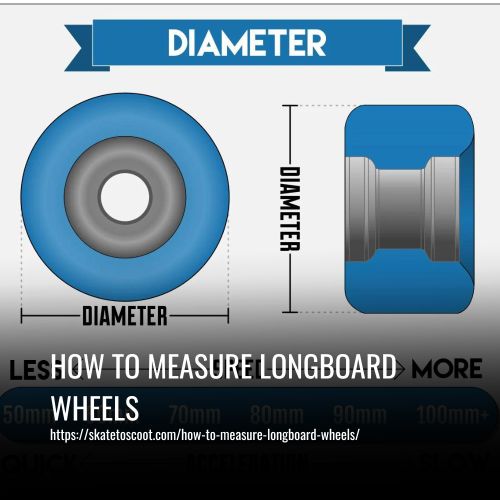
A wheel’s diameter is the straight-line distance across its face, through the center. This measurement, in millimeters, dictates top speed and acceleration more than any other single factor.
The part nobody mentions: Wheels wear down. A new 70mm wheel can lose 8–10mm of diameter before it’s shot, per LongboardsUSA. That wear happens unevenly if you don’t rotate them, so one wheel might be 68mm while its mate is still 70mm. That mismatch makes your board pull slightly to one side, a dead giveaway you’ve skipped rotation for too long.
The Caliper Method: When 1mm Matters
For comparing new wheels or documenting wear over time, a digital caliper is the tool. It reads out in millimeters and often in fractions of an inch, with a precision of 0.1mm. You’re not just measuring for replacement; you’re gathering data.
Open the caliper jaws wider than the wheel. Place the wheel between them, ensuring the jaws contact the riding surface squarely. Gently close the jaws until they just grip the wheel, don’t compress the urethane. The digital readout is your diameter. Write it down on a piece of tape stuck to the wheel if you’re tracking multiple sets.
This method is perfect for verifying manufacturer claims. For example, Orangatang lists its Caguama wheel at 85mm diameter. My caliper showed 84.9mm on a new set, close enough. That kind of check matters when you’re riding at the limit of your deck’s wheelbite clearance and every millimeter counts.
| Measurement Goal | Tool | Expected Accuracy | Best For |
|---|---|---|---|
| General diameter check | Ruler | ± 2mm | Quick park-side checks, basic compatibility |
| Precise diameter/wear tracking | Digital Caliper | ± 0.5mm | Comparing new sets, documenting wear over months |
| Width & contact patch | Ruler or Caliper | ± 1mm | Understanding grip vs. Slide potential |
| Finding stamped specs | Eyes & good light | Exact | Reading durometer and original size |
The table shows why you might reach for one tool over another. If you’re just seeing if a 75mm wheel will fit your deck, the ruler is fine. If you’re logging wear to see how fast your sliding technique eats urethane, the caliper is worth the $25.
Reading the Stamp: When the Wheel Talks Back
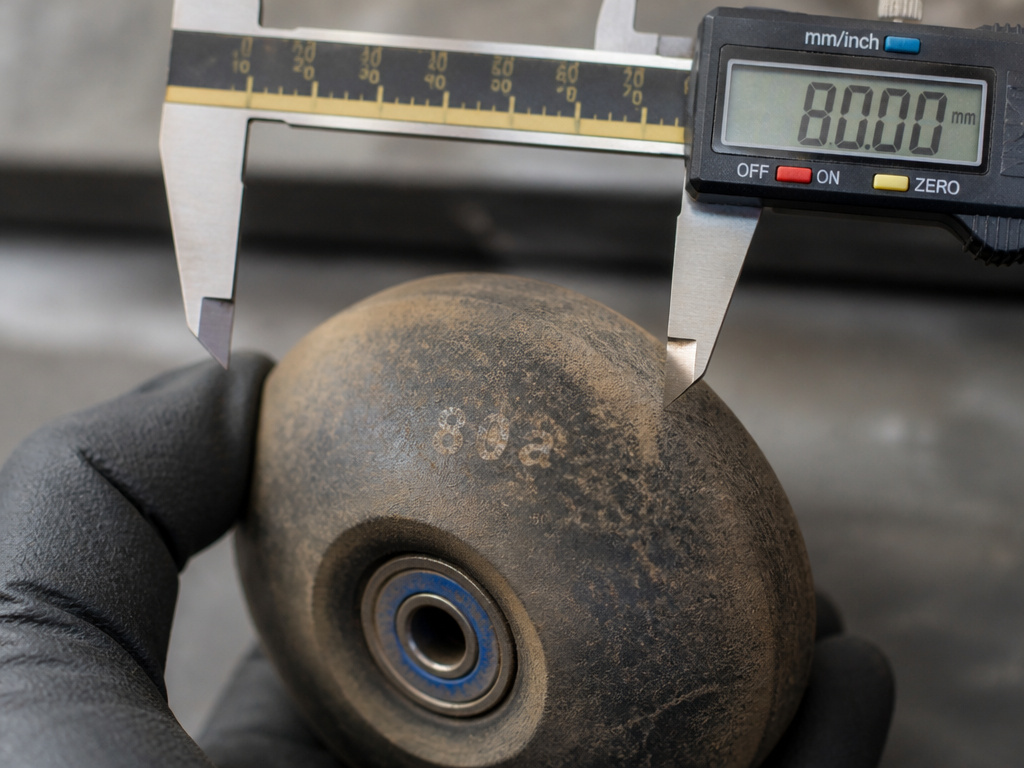
Most quality wheels have their size and durometer molded into the sidewall or the inner lip. It’ll say something like “70mm 80a” or “83a STIM.” This is the manufacturer’s spec, and it’s your primary source before you ever pick up a ruler.
The stamp can fade, especially on wheels that see a lot of grinds or slides. If you can’t read it, the physical measurement is your backup. Sometimes the stamp is just wrong, a production hiccup. I’ve seen a batch marked “78a” that felt and slid like an 83a. When in doubt, trust your caliper and your hands.
Durometer stamps use the Shore A scale. Sources cite different typical ranges; LongboardsUSA states 75a to 90a, while BASF notes the scale goes from 78A to 101A. Comfortable cruising wheels usually land between 78a and 80a, a range the BASF material science guide confirms. Harder wheels, like an 86a, slide easier but transmit every pebble to your feet.
Measuring Wheel Width and Contact Patch
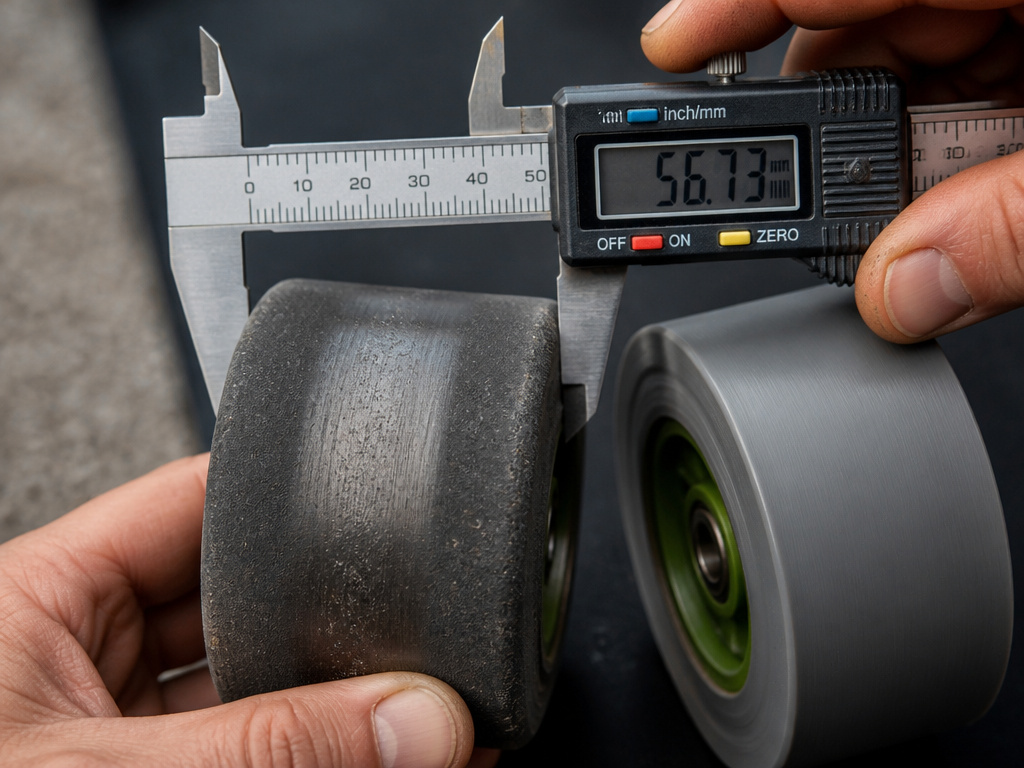
Diameter gets the headlines, but width decides how the wheel feels in a turn. There are two width numbers: the wheel’s total width and the contact patch.
Total width is easy. Hold your ruler against the side of the wheel and measure from the outer lip to the inner lip. BASF notes widths can run from 25 to above 55 millimeters. This total width affects stability, broader wheels feel steadier, especially on rough asphalt.
The contact patch is the part of the wheel that actually touches the ground during normal riding. It’s almost always narrower than the total width because of the wheel’s rounded lips. To measure it, you need to see the wear pattern. On a used wheel, measure the polished band in the center of the riding surface. Measure the width of that band with your caliper.
A wide contact patch grips more. A narrow one slides more easily. This is why freeride wheels often have a defined, rounded lip, it reduces the contact patch for predictable slides. As the BASF guide puts it, “narrower wheels are preferred for sliding.”
Common mistake: Assuming total width equals grip. A wide wheel with heavily rounded lips can have a surprisingly small contact patch, making it slide-happy. Always check the lip shape.
What Your Measurements Mean for Your Ride
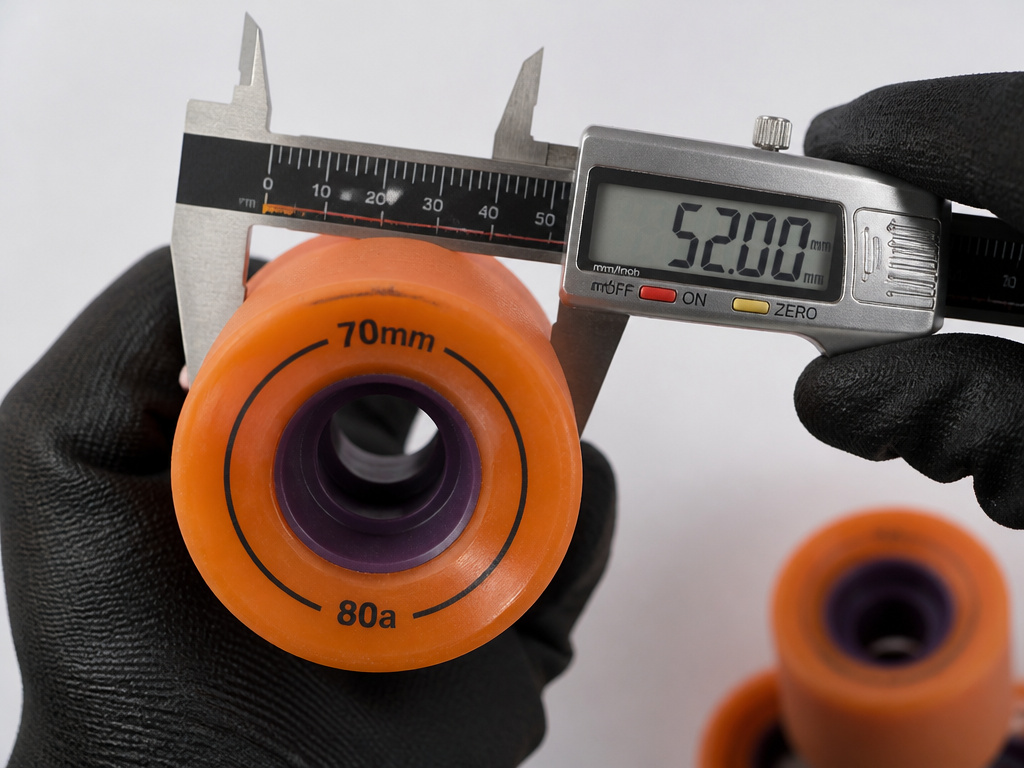
You have your numbers: for example, 70mm diameter, 52mm total width, and an 80a durometer stamp. Now what?
That 70mm diameter is your speed and clearance key. Per the BASF guide, larger wheels enable higher final speeds and more stable running. Your 70mm wheel is the all-rounder, big enough to roll over sidewalk cracks comfortably, small enough to keep your board low and avoid wheelbite on most standard decks. Orangatang’s buyer guide says wheels over 85mm usually need riser pads.
The 52mm width suggests a wheel designed for a mix of grip and slide. If the lips are rounded, it’s likely a freeride wheel. If they’re square, it’s built for grip and carving. The 80a durometer is the sweet spot for many riders. Tactics calls 78a and 80a the most popular durometers for nearly all longboarding. They offer a blend of grip, roll speed, and a predictable break into a slide.
But durometer isn’t everything. As Tactics notes, “a wheel’s urethane formula dictates just as much about the way the wheel performs.” Two 80a wheels from different brands can slide and wear completely differently. The number is a starting point, not the final answer.
Wheelbite: The Measurement That Isn’t on the Wheel
This is the critical step most measuring guides skip. Wheelbite happens when a turn compresses your trucks, bringing the deck down onto the top of the wheel. The board stops dead, and you don’t.
Your wheel’s diameter is only half of the wheelbite equation. The other half is your deck’s clearance. You need to know the gap between the top of your mounted wheel and the bottom of your deck. Here’s how to measure it.
First, put your weight on the board. Better yet, have a friend stand on it while you’re in a deep turn. Look at the space between the wheel and deck. You want sufficient clearance between the wheel and deck in your hardest turn to prevent wheelbite. If it’s less, you risk bite.
If you’re planning new, larger wheels, do the math. A 70mm wheel needs more clearance than a 65mm wheel. If you are swapping to a larger wheel, calculate the change in diameter to ensure you maintain sufficient deck clearance. If your gap is only 8mm with the 65s, the 70s will bite. The BASF guide states it plainly: “the size of the wheels must match the height of the board to prevent the dreaded wheelbite.”
Where this goes sideways: Buying wheels based solely on diameter without checking your deck’s clearance. The resulting wheelbite isn’t a maybe; it’s a guarantee on your first hard carve, and it pitches you over the front every time.
When clearance is tight, riser pads are your friend. Riser pads can be added to increase deck clearance and prevent wheelbite. Angled risers can also change your truck geometry for more turn without adding height. It’s a fix, but it’s better than a crash.
When to Measure and When to Replace
You don’t need to measure your wheels every session. But you should check them when something feels off, a new vibration, a pull to one side, or slides that feel inconsistent.
Rotate your wheels every 2–3 weeks with regular riding. This promotes even wear. When you rotate, do a quick visual check. Look for flat spots, chunks missing from the lips (called “chunking”), or a pronounced taper where one side of the riding surface is more worn than the other (called “coning”).
Coning is common on sideset wheels, where the core is aligned with the inner lip. Tactics warns that this design causes the inner lip to wear faster, leading to severe coning. When you see it, it’s a sign to rotate more frequently or adjust your sliding technique.
For a wheel that started at 70mm, that means retiring it around 60–62mm. Performance drops before that, the wheel gets slower, acceleration feels sluggish, and it vibrates on smooth pavement. According to LongboardsUSA, most quality wheels will last 3–6 months of regular riding before performance noticeably declines.
My own rule is simpler: when slides feel gritty and unpredictable, or the wheel looks visibly smaller next to a new one, it’s time. The cost of a new set is less than the cost of a fall from a wheel that suddenly grabs.
Core types (centerset, offset, sideset)
A wheel’s core position changes how it slides. A sideset core is aligned with the inner lip. This makes slides easy to initiate, but they become harder to control. Sideset wheels also have the least amount of grip and can wear unevenly, leading to severe coning where the inner lip wears much faster. For more predictable slide control, look for wheels with the core placed more centrally, like an offset or centerset configuration. These offer a more balanced contact patch, which provides more grip and more stable wear over time.
Frequently Asked Questions
How do I tell what size my wheels are if there’s no stamp?
Use the ruler or caliper method described above to measure the diameter across the face of the wheel. For durometer (hardness), you can’t measure that without a tool, but you can make an educated guess based on performance. If the wheel grips well on rough pavement and feels cushy, it’s likely in the 78a-80a range. If it slides easily and feels hard, it’s probably 83a or higher.
What’s the difference between wheel width and contact patch?
Total width is the measurement from the outer lip to the inner lip of the wheel. The contact patch is the narrower band of the wheel that actually touches the ground during normal, straight-line riding. The contact patch is always smaller than the total width because of the wheel’s rounded lips. It’s the contact patch width that most directly affects grip.
Can I measure my wheels without taking them off the board?
Yes, you can measure diameter with the wheels mounted, though it’s less accurate. Hold a ruler perpendicular to the axle against the bottom of the wheel’s riding surface and read the measurement at the top. For width, you’ll need to remove the wheel to get a clean measurement from side to side.
How often should I rotate my longboard wheels?
Aim to rotate your wheels every 2–3 weeks of regular riding. This means moving the front wheels to the back and swapping them left-to-right. This promotes even wear and prevents coning, where one side of the wheel wears down faster than the other.
Is a 70mm wheel a good all-around size?
Yes. At 70mm in diameter, a wheel offers a great balance of speed, acceleration, and compatibility with most decks without excessive riser pads. It’s the most common longboard wheel size for a reason, it works for cruising, commuting, and light freeriding.
The Bottom Line
Measuring your wheels isn’t about being a gear nerd. It’s about knowing what’s under your feet. A 2mm difference in diameter can be the gap between clearing a crack and pitching over it. A misread durometer can turn a predictable slide into an unexpected grip.
Start with the stamp, verify with a ruler, and use a caliper when precision counts. Remember that width and contact patch are different numbers, and always, always check for wheelbite clearance before you commit to a bigger wheel. Your wheels are your connection to the ground. Know them as well as you know your own balance.
If you’re swapping sizes, keep your old set for a month. Ride the new ones, then go back. Your feet will tell you more than any caliper ever could. Then go practice.
