As an Amazon Associate we earn from qualifying purchases.
Are you tired of pushing yourself around on a regular longboard? Do you want to add some speed and excitement to your rides? Then it’s time to consider making your own electric longboard! Electric longboards are gaining popularity among thrill-seekers and commuters alike, offering an exhilarating and convenient way to get around town. With a few simple steps, you can transform your ordinary longboard into an electrifying ride that will turn heads and make your daily commute a breeze.
The best part about making your own electric longboard is that it allows you to customize every aspect of your ride. From the motor power to the battery life, you have complete control over how fast and far your longboard can go. Plus, with advancements in technology, making an electric longboard has become more accessible than ever before. So, whether you’re a seasoned DIY enthusiast or a beginner looking for a fun project, this article will guide you through the process of making your own electric longboard step by step.
In this article, we will cover everything you need to know to make your own electric longboard. From choosing the right components and tools to assembling and fine-tuning your ride, I will provide you with detailed instructions and tips to ensure a successful and safe project. So, grab your longboard, and let’s get started on this electrifying journey!
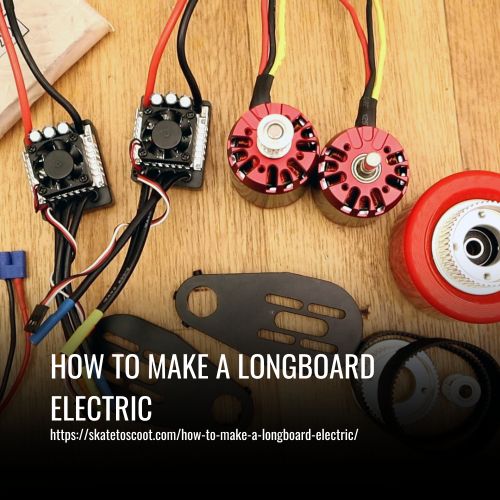
Supplies to Make a Longboard Electric:
Here are all the supplies you will need to built the Electric Skateboard
Parts & Components:
- Longboard, Skateboard
- Brush Less DC Motor
- Sensored BLDC Motor (This one is better than Mine)
- SensorLess BLDC Motor (Cheaper)
- ESC(Speed Controller)
- Sensorless ESC
- Sensored ESC (VESC)
- Drive Train
- Pulley Belt Version
- Chain Sprocket Version
- Motor Mount kit
- Batteries
- 18650 cells
- Lipo Cells
- Battery case
Tools and Supplies:
- Soldering Iron
- Solder wire
- Tool Box
- Metal Files
- Drill
- Drill Bits
- Plyers
How to Make a Longboard Electric: A Step-by-Step Guide
Longboarding is a thrilling and eco-friendly way to commute or have fun. By converting your traditional longboard into an electric one, you can experience added speed and convenience. In this step-by-step guide, we will explore how to make your longboard electric. From choosing the right motor and battery pack to assembling and fine-tuning the components, we will cover all the necessary steps to bring your longboard to life. So, let’s get started and turn your ordinary longboard into an electrifying ride!
1. Selecting the Right Skateboard or Longboard
When it comes to making a longboard electric, selecting the right skateboard or longboard is crucial. While there are various options available, choosing a longboard is often the best choice for this project. Longboards are usually wider and longer, providing ample space to add electronics later on.
Additionally, longboards have soft wheels, making them more reliable and easier to ride. They also have a more balanced structure, which is ideal for beginners. Whether you’re a beginner or an experienced rider, opting for a longboard will provide you with a suitable foundation for creating an electric skateboard.
It’s important to consider your personal preferences and riding style when selecting a skateboard or longboard. While a longboard is recommended, you can choose a different type that suits your needs. Remember to ensure it offers enough space to accommodate the electrical components you’ll be adding. With the right skateboard or longboard as your starting point, you’ll be well on your way to creating your own electric longboard.
2. Selecting Motors & ESC
When it comes to selecting motors and ESCs (Electronic Speed Controllers) for your electric longboard, there are a few key factors to consider.
First, you’ll want to choose a brushless DC motor (BLDC) as they are more efficient and provide smoother acceleration compared to brushed motors. Look for a motor with a kv rating between 170 to 300 and a power rating between 1500 to 3000 Watts. The kv rating determines the torque of the board, with lower kv ratings providing higher torque.
Next, you’ll need to choose an ESC, which acts as the “brain” of your electric longboard. The ESC is responsible for controlling the speed of the motor based on the input from your remote control. It also connects to the batteries and the motor. It’s important not to cheap out on the ESC as cheaper options can be unreliable and even pose a fire hazard. Look for an ESC that is rated for a voltage and current that matches your setup, ensuring that it can handle the power requirements of your motor.
Additionally, you may consider using a VESC (Vedder’s Electronic Speed Controller) for more advanced functionality and customization options.
3. Building the Battery Pack
Building the battery pack for your electric longboard is a crucial step in the DIY process. Your battery determines how far you can go and how long your rides will last. When choosing a battery, it’s important to ensure compatibility with your motor.
One option is to build your own battery pack using 18650 Li-ion cells. For example, a 6S 3P setup means you would have six Li-ion cells connected in series and three in parallel. This results in a battery voltage of 25.2 Volts (6 x 4.2). The capacity of the battery, measured in mAh, determines the amount of energy it can store. For instance, a 7,800 mAh battery can deliver a specific amount of watt-hours.
Alternatively, you can also opt for a pre-built Li-Po 6S battery pack if you’re not comfortable building one yourself. However, it’s important to note that Li-Po cells can be dangerous if mishandled.
4. Pulley and Motor Mount
When making a longboard electric, one crucial aspect to consider is the pulley and motor mount setup. Firstly, the pulley and belt need to fit together smoothly, creating what is known as the drive train. The gear reduction ratio, which is the ratio between the wheel pulley and motor pulley, plays a significant role. It is recommended to aim for a gear reduction ratio of around 2.5, but it can range from 1.5 to 3 depending on your preferences.
Generally, a lower reduction ratio is better for speed, but it might sacrifice some low-end torque. For higher speeds, a wheel pulley with a 3:1 gear ratio is commonly used. This ratio ensures sufficient speed while maintaining a good balance between speed and torque.
The motor mount is another essential component to consider. While there are pre-made motor mounts available, designing and creating your own can offer more durability and customization options. Software like Autodesk Fusion 360 is useful for designing the motor mount, and materials like aluminum 6061-T6 are commonly used due to their strength and ease of workability.
To manufacture the motor mount, one option is to take the design to a nearby CNC workshop. CNC (Computer Numerical Control) machining is a subtractive manufacturing process where computer-controlled tools remove layers of material to create the desired part. This allows for precise and customized motor mount production.
5. The Built Process of Drive Train
The building process of the drive train for an electric longboard involves several key steps. Firstly, start by removing the rear right wheel of the longboard to create space for the motor mount and motor.
Next, take a metal file and smooth out any slight curves on the truck of the skateboard to ensure that the motor mount fits perfectly. This step is important for a secure and stable attachment.
Once the motor mount is securely in place, install the motor using machine screws. Make sure to tighten the screws properly to ensure a secure connection.
After the motor is installed, it’s time to add a pulley to the wheel. Place the larger pulley at the center of the wheel and mark the holes where you will need to drill.
Using a drill, create the necessary holes and then attach the pulley to the wheel using machine screws. It’s important to use thread lock or self-locking nuts to prevent the pulley from coming loose during use.
Next, attach the smaller pulley onto the motor shaft and align it properly with the wheel. This will form the drive train for the electric longboard.
Ensure that the belt is properly tensioned and aligned with both the motor pulley and the wheel pulley. This is crucial for the smooth transfer of rotational energy from the motor to the wheel.
6. Electronics and 3D Printing
To complete the process of making an electric longboard, the next step is to add the electronics and consider 3D printing options.
First, we need to attach the Electronic Speed Controller (ESC) to the motor. Connect the three wires of the ESC to the corresponding wires of the motor. Then, connect the battery pack to the ESC. Finally, connect the ESC to the radio receiver.
For the radio controller, you have the choice to build one using Arduino and an nRF24L01 module or purchase one. If you decide to build your own, you will need Arduino Nano (x2), nRF24L01 module (x2), Joystick Module (x1), 500mAh 1S Li-Po Battery (x1), TP4056 Module (x1), a switch, and a boost module. A 3D-printed case is recommended for the components.
Connect the transmitter and receiver as shown in the provided circuit diagram and upload the code to both Arduino boards. Connect the 5V, GND, and Digital Pin 5 of the receiver Arduino to the 5V, GND, and Signal PIN of the ESC, respectively.
After attaching the receiver, test if the motor is spinning in the right direction. If not, simply swap any two wires connecting the motor and the ESC.
Lastly, assemble all the electronics and batteries into a case. A 3D-printed case is ideal, but you can also use plastic boxes and securely mount them underneath the longboard.
With the electronics and 3D printing considerations taken care of, your electric longboard is ready for a thrilling ride on the streets!
7. You Did It!
Congratulations, you did it! You have successfully built your own electric longboard. Now it’s time to hit the streets and enjoy the ride. Don’t forget to share your pictures with me on my social media channels.
Here are some quick specs about your electric longboard:
Weight: The electric longboard weighs approximately 7.2 kilograms, making it easy to carry and maneuver.
Clearance: It has a clearance of 7.5 centimeters, which provides enough space to ride smoothly over bumps and uneven surfaces.
Top Speed: Your electric longboard can reach a top speed of 40 kilometers per hour. It is possible to achieve a speed of 48 kilometers per hour, but this can make the ride highly unstable.
Cruising Speed: The ideal cruising speed for your electric longboard is around 25 kilometers per hour. This speed allows for a comfortable and enjoyable ride.
Range: With the current battery setup of 6S 3P Li-ion (25.2V 7800mAh), your electric longboard has a range of approximately 18 kilometers. This gives you plenty of distance to explore and have fun.
Now that your electric longboard is complete, it’s time to get out there and experience the thrill of riding with the power of electricity. Enjoy the freedom, speed, and excitement that your creation brings. Safe travels and have a great time!
FAQs
Building your own electric longboard can save you money compared to the cost of a pre-built skateboard. It also allows you to customize your board with components that match your preferences and riding style.
Absolutely! There are numerous online resources, tutorials, and forums that can guide you through the process. Many DIY electric skateboard kits also come with detailed instructions to make it easier for beginners.
The cost of building an electric longboard varies depending on the components you choose. Generally, it is more affordable than buying a pre-built electric skateboard. By sourcing parts yourself and opting for budget-friendly options, you can further reduce costs.
You will need a longboard deck, skateboard trucks, motor mounts, wheel pulleys, a battery pack, a motor, and a drive pulley. Other components include a battery charger, wires, connectors, and tools.
For beginners, understanding the electrical and mechanical aspects of building an electric longboard can be challenging. Additionally, integrating the components onto the longboard deck and ensuring proper alignment can require some trial and error.
Conclusion:
Turning your regular longboard into an electric one is not only a fun DIY project, but it also opens up a whole new world of possibilities. From cruising effortlessly through the city streets to tackling steep hills with ease, an electric longboard will take your riding experience to the next level.
So go ahead, grab your tools, unleash your creativity, and get ready to ride the electric wave!
Amazon and the Amazon logo are trademarks of Amazon.com, Inc, or its affiliates.